Many of the apps and services that you use on your iPhone 13 will require a subscription that you pay for monthly or yearly.
Due to the prevalence of this type of payment system, it’s pretty easy to forget information about your active subscriptions.
Fortunately, you can find this information on your device with just a few steps so that you can cancel any existing subscriptions that you don’t want anymore.
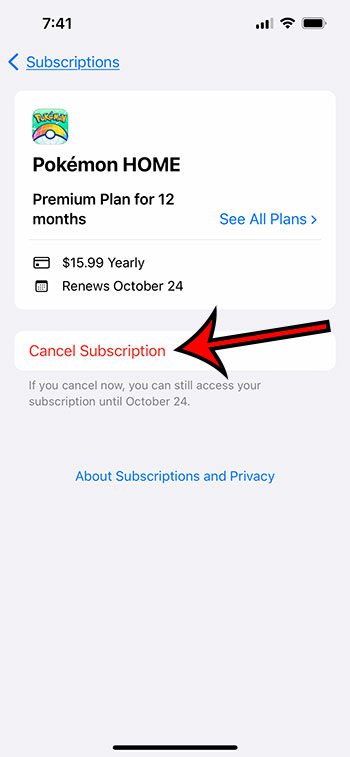
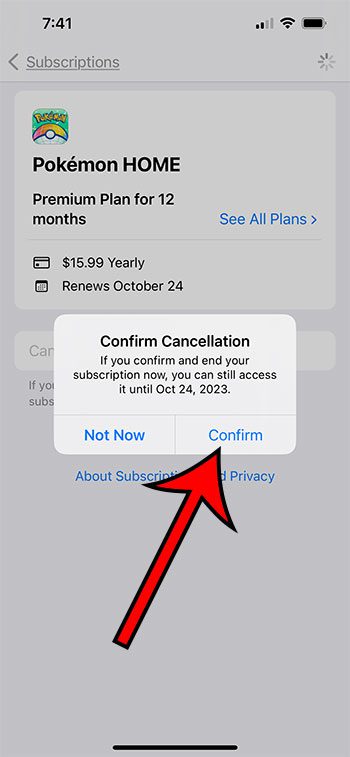
You can delete subscriptions on your iPhone by going to Settings, selecting your Apple ID card, choosing Subscriptions, then tapping on the one to delete. You can then touch the Cancel Subscription button, then tap Confirm.
You can also check out this how to delete subscriptions on iPhone video on YouTube.
How to Cancel an iPhone Subscription
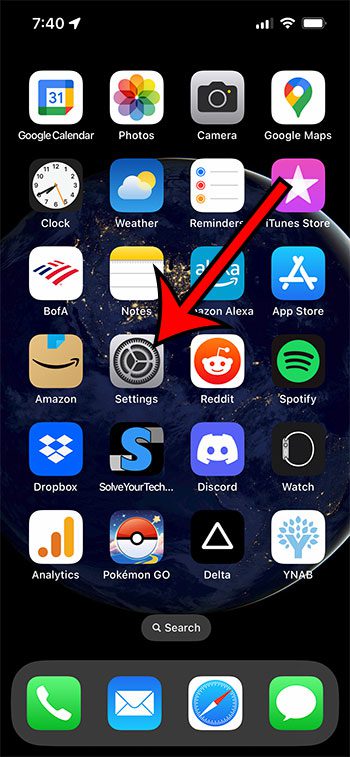
- Tap Settings.
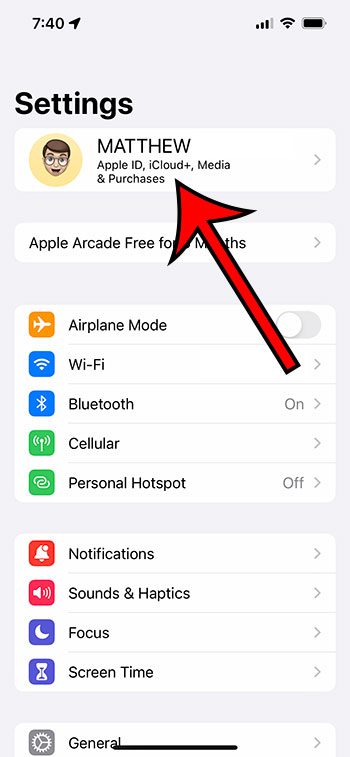
- Select your name.
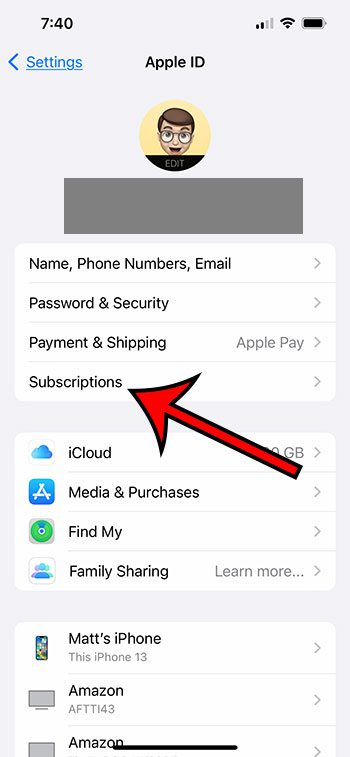
- Touch Subscriptions.
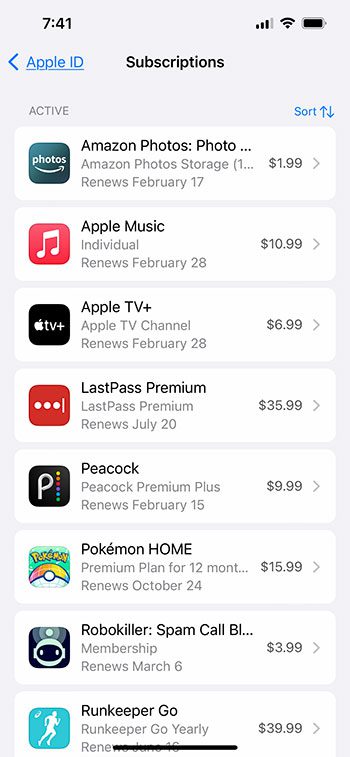
- Choose the subscription.
- Tap Cancel Subscription.
- Select Confirm.
Our guide continues below with additional information on how to delete subscriptions on iPhone 13, including pictures of these steps.
If you are listening to music or watching movies on your iPhone, then you might be doing so via a subscription.
Along with these options, you might also have subscriptions for fitness apps, games, or even cloud storage services.
Since there are so many potential reasons you might be paying for a subscription on your iPhone, it can be difficult to manage everything.
Luckily there is a menu in the Settings app where you can find a lot of your currently active and inactive subscriptions.
If you find something there that you don’t want or need anymore, then you can follow the steps below to cancel that subscription directly from your iPhone.
Related: You can read more about how to screen record on an iPhone if you want to create a video of something that you see on your phone.
How to View and Cancel Your Subscriptions in iOS
The steps in this article were performed on an iPhone 13 in the iOS 16 operating system.
Step 1: Open the Settings app on your iPhone.
Step 2: Select your name at the top of the menu.
Step 3: Choose the Subscriptions option in the top section.
Step 4: Select the iPhone subscription that you want to cancel.
Step 5: Touch the Cancel Subscription button.
Step 6: Tap the Confirm button to verify that you want to cancel this subscription at the end of the current term.
Now that you know how to delete subscriptions on iPhone 13, you can check this location periodically to make sure that you haven’t forgotten about any subscriptions, or that you don’t have any that you are paying for and not using.
More Information About Canceling or Delete iPhone 13 Subscriptions
You will notice that there is an “expired” or “inactive” section in the list of subscriptions on your device.
These are the subscriptions that you had previously had but which are no longer active.
Unfortunately, you can’t manually delete these subscriptions from this menu, and you will need to wait for a year before they are removed.
Another way that you can view your iPhone subscriptions is to open the App Store, then tap your profile icon at the top-right of the screen.
You can then select the Subscriptions option, where you will be able to view the information that you saw in the section above.
Additionally, you could open the iTunes application on your Windows laptop or desktop computer.
Click Account, then View My Account, then View Account. You can then scroll down to the Settings section of the menu, where you can click the Manage button to the right of Subscriptions.
Here you will be able to view a similar menu to the one discussed previously.
Note that canceling most subscriptions on your iPhone won’t result in a refund. The subscription will simply expire once the current subscription period is finished.
Video About How to Delete Subscription on iPhone

Matthew Burleigh has been writing tech tutorials since 2008. His writing has appeared on dozens of different websites and been read over 50 million times.
After receiving his Bachelor’s and Master’s degrees in Computer Science he spent several years working in IT management for small businesses. However, he now works full time writing content online and creating websites.
His main writing topics include iPhones, Microsoft Office, Google Apps, Android, and Photoshop, but he has also written about many other tech topics as well.
