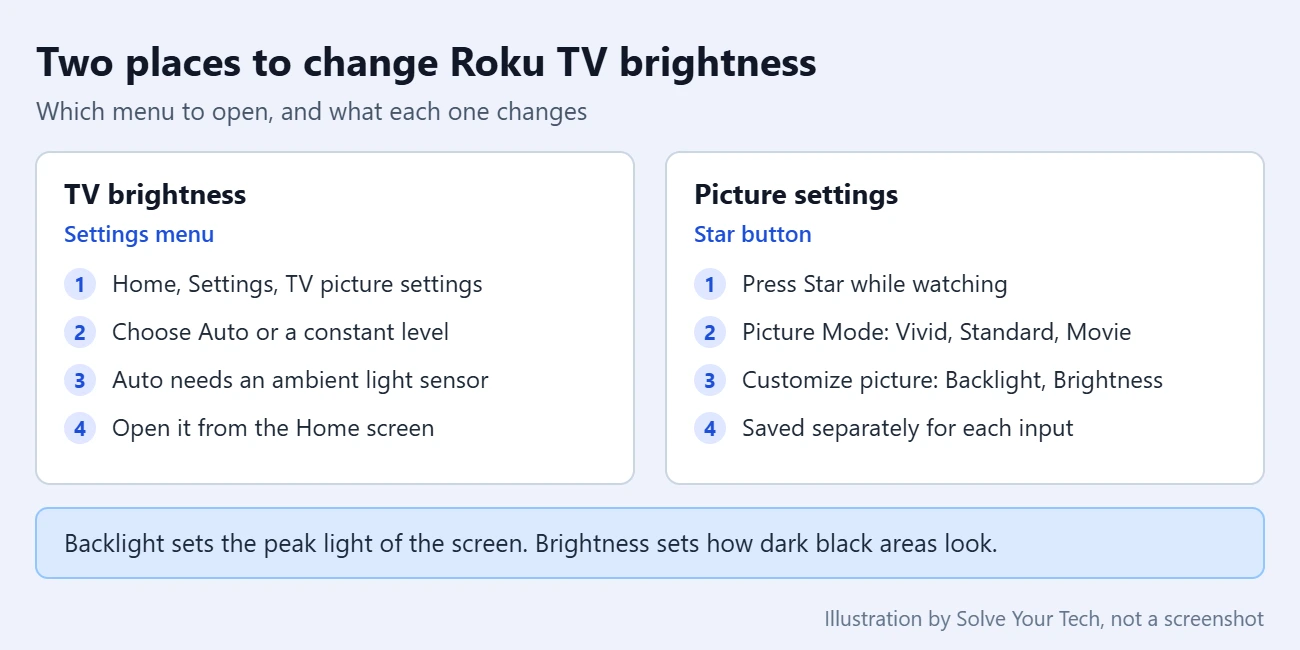
To change the brightness on a Roku TV, press Home on the remote, go to Settings > TV picture settings > TV brightness, choose a brightness level, and press OK. For a quick change while you are watching something, press the Star (*) button, select Picture Settings, and change the Picture Mode.
Those are two different controls, and they do different jobs. This guide covers both, explains the extra sliders that hide inside the picture menu, and lists what to check when the screen is still too dim or too bright afterward. The steps and labels come from Roku’s current support articles, which were last updated between June and September 2026.
This Applies to Roku TVs
These steps apply to a Roku TV, which is a television with the Roku software built in. TCL, Hisense, onn. and Roku’s own Select, Plus and Pro Series sets are common examples.
- What you need: the Roku TV remote, or a phone with the Roku remote app connected to the TV.
- Roku players and sticks are different. Roku’s brightness instructions are written for Roku TV systems. If you have a Roku streaming player or Streaming Stick plugged into another brand of TV, the picture is controlled by that TV, so look for the brightness setting in the TV’s own menu instead. To change the resolution the player sends to the TV, change the display type on the Roku.
- Picture settings are saved per input. Roku says the TV stores picture mode settings separately for each video input. Changing the picture while you watch a streaming app does not change it for the cable box on HDMI 1.
Method 1: Change TV Brightness in Settings
This is the shortest route when the whole screen is too bright or too dim. It starts from the Home screen, so you don’t need to be playing anything.
- Press Home on your Roku TV remote. The Home screen opens with a menu down the left side.
- Scroll to Settings and select it.
- Select TV picture settings.
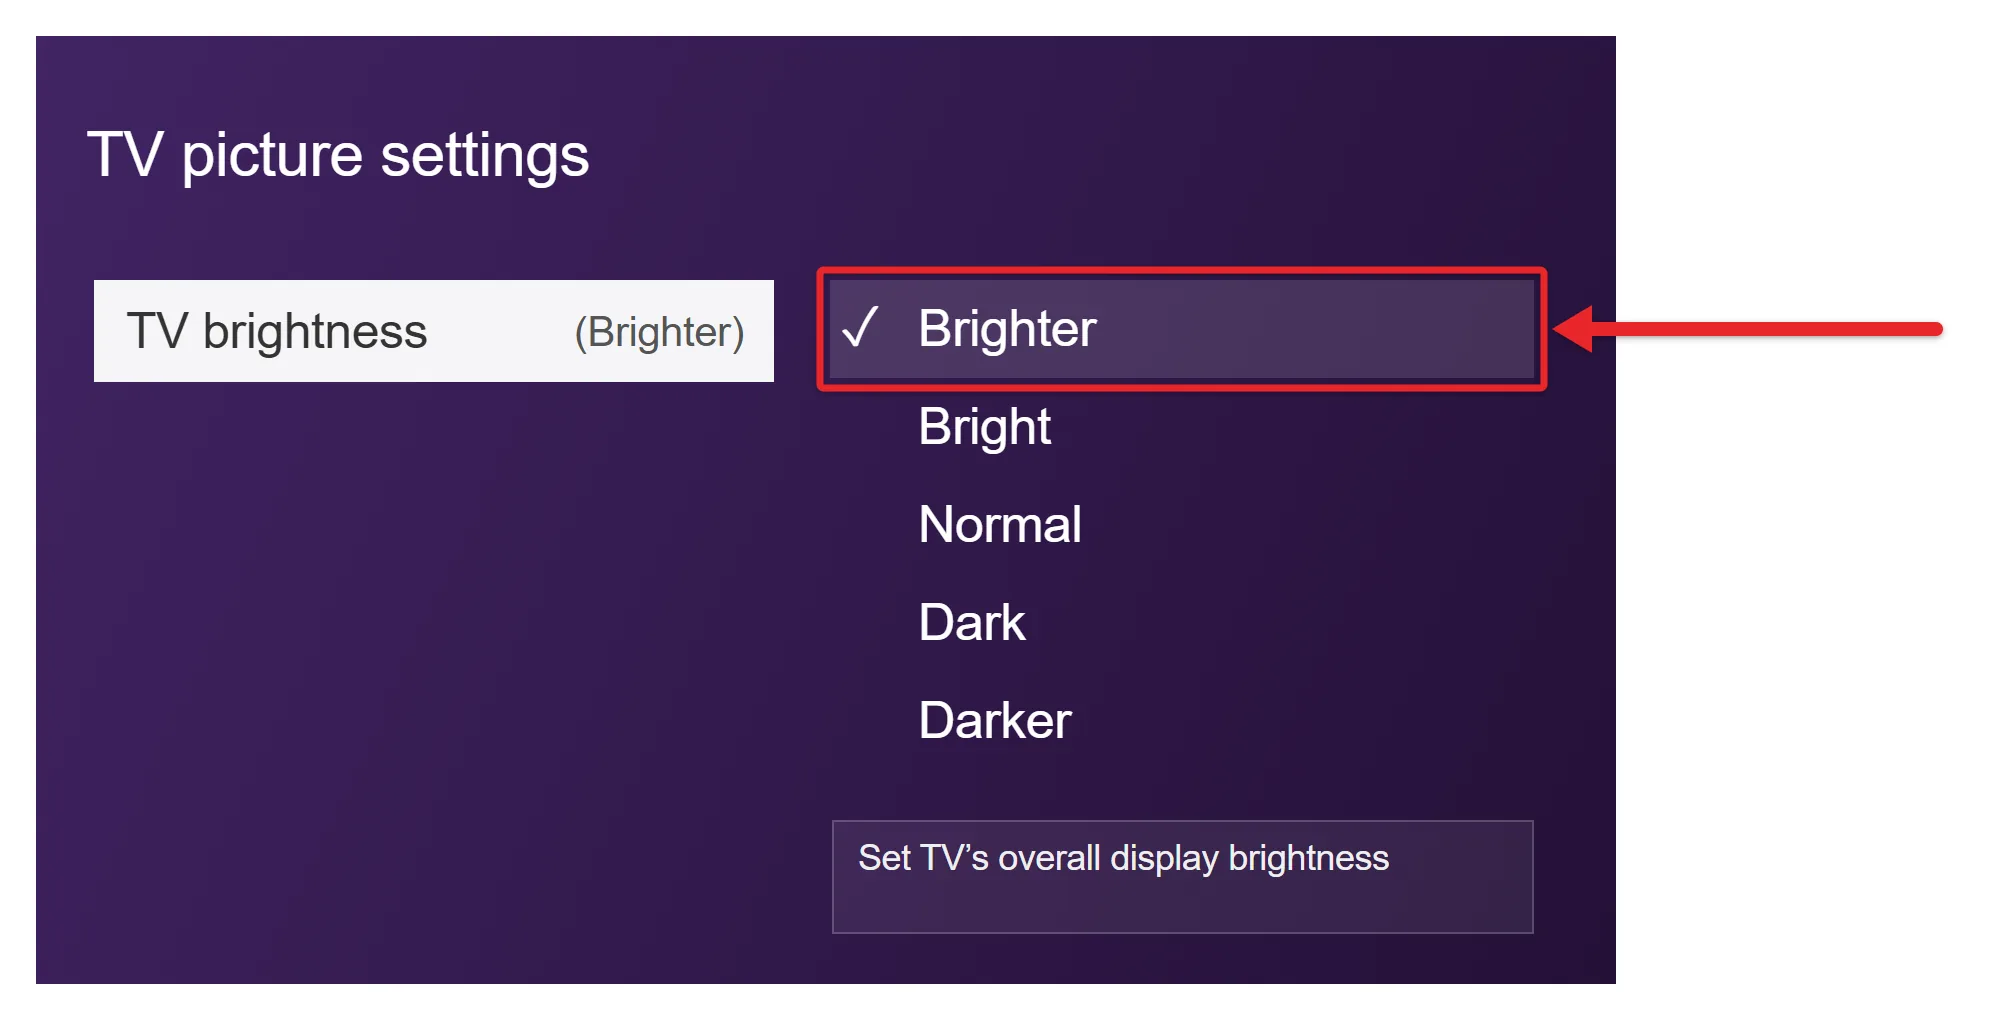
- Select TV brightness. A short list of brightness levels opens.
- Highlight the level you want. Pick a brighter level for a sunny room or a darker level for watching at night. If your TV lists Auto, that option lets the TV set the brightness for you.
- Press OK on the remote to apply your choice.
What the Auto Option Does
Some Roku TVs have an ambient light sensor, a small sensor that measures how much light is in the room. With TV brightness set to Auto, the TV raises the picture brightness when the room is bright and lowers it when the room is dark. The goal is a consistent picture whether you watch in sunlight or at night.
If you do not see Auto in the list, your TV does not have an ambient light sensor, and you can only choose a constant level. Roku covers this in How to adjust ambient light sensing on your Roku TV system.
Method 2: Change the Picture Mode With the Star Button
A picture mode is a preset that changes several picture settings at once, including how bright the image looks. It is the fastest fix while a show is already playing, and it is the right place to look if the TV has seemed dim since the day you set it up.
- Start streaming a movie or show, or switch to the Live TV, HDMI or AV input you want to adjust. The change applies only to the input you are on.
- Press Star (*) on the Roku remote. The TV settings menu opens over the picture.
- Select Picture Settings.
- Select Picture Mode.
- Press the left and right buttons on the remote to move through the modes. The picture behind the menu changes as you go, so you can compare them.
- Stop on the mode you like and close the menu.
Which Picture Mode Is Brightest?
All Roku TV models have these picture modes:
| Picture mode | What Roku says it is for | Effect on brightness |
|---|---|---|
| Vivid | Intense, brilliant picture for rooms with a lot of light | The brightest-looking standard mode |
| Standard | Everyday viewing in moderate to bright rooms | A good middle setting |
| Sports | Sports, where camera panning and action shots are common | Tuned for motion rather than light level |
| Movie | Darker rooms, to show the movie as the director intended | Easier on the eyes at night |
| Low Power | Saving energy; the default out-of-box setting | Can look dim |
| Roku Smart Picture | Automatically picks the best mode for what you are watching (recommended by Roku) | Varies with the content |
If your TV has looked dull from the start, check for Low Power first. It is the factory default, and switching to Standard or Vivid gives a brighter picture. If the screen is too harsh in a dark room, try Movie. TVs that support THX Certified Game Mode also have a Gaming picture mode.
The full list is in Roku’s article How to improve image quality using picture modes on your Roku TV system.
Method 3: Adjust Backlight and Brightness
When no preset is quite right, you can fine-tune the picture mode you are using. This is where the slider actually named Brightness lives, and it does not do what most people expect.
- Start playing something, or switch to the input you want to adjust.
- Press Star (*) and select Picture Settings.
- Select Customize picture. On some software versions the label reads Customize Picture Mode.
- Highlight Backlight and press left or right to lower or raise it.
- Adjust Brightness or Contrast only if the picture still looks wrong.
The three settings that affect light level work this way:
- Backlight: adjusts the peak backlight level of the TV screen. This is the setting that makes the whole picture lighter or darker, so change it first.
- Brightness: adjusts how dark the black sections appear. Raising it too far turns blacks gray and makes the picture look washed out.
- Contrast: adjusts the intensity of the white parts of the image.
The settings available in this menu depend on your TV model, so you may not see all three. The same menu also has Apply settings to all inputs, which copies your adjustments to every input so you do not have to repeat them for each HDMI port.
On a 4K Roku TV, Expert Settings appears in this menu too. It holds advanced controls such as gamma and color temperature that are meant for AV enthusiasts and professional calibrators. You do not need it to change brightness.
Brightness Options for HDR Content
HDR stands for High Dynamic Range, a video format with a wider range of light and dark than regular video. If your Roku TV can display HDR, the standard picture modes are only available for SD, HD and non-HDR 4K content. When the TV detects an HDR10 or Dolby Vision movie or show, the picture mode list changes to these three choices:
- Dark: balanced picture settings closest to a cinema experience.
- Normal: brighter picture settings that slightly boost colors.
- Bright: vivid picture settings for much brighter colors.
So if one HDR movie looks too dim, open the Star menu while it is playing and switch from Dark to Normal or Bright. When the HDR content ends, the TV switches back to the picture mode you had selected before.
Change Brightness Without the Remote
If the remote is lost or not working, the free Roku remote app for iPhone and Android can stand in for it. You need to install the app, sign in to it, and connect it to your Roku TV, and the phone and TV must be on the same wireless network.
- Open the Roku remote app and select Remote.
- Use the on-screen directional pad and Home button to follow Method 1, or tap Options to open the options menu and follow Method 2. Options is the app’s version of the Star button.
The app cannot find a TV that is not connected to the internet, so this will not work on a TV that was just reset. See Roku’s guide to using the Roku remote app without a remote, or the steps for using an iPhone as a Roku remote.
How to Confirm the Change or Undo It
The picture updates while the menu is open, so you can see the result right away. To double-check a change made in Method 1, go back to Settings > TV picture settings > TV brightness and confirm that your level is the one selected. To undo it, pick the previous level and press OK.
To undo a picture mode change, open the Star menu on the same input and choose the earlier mode. To throw away slider changes and return a picture mode to its defaults:
- Start playing a movie or show.
- Press Star (*) and select Picture settings.
- Select Customize picture.
- Select Reset Settings for the picture mode you currently have selected.
- Select Reset to erase all changes made to that picture mode.
Roku’s article How to use Expert Picture Settings to adjust your Roku TV system describes the reset. It only affects the picture mode you are in, on the input you are on.
When the Picture Is Dim or Brightness Changes
The Picture Is Still Too Dim
- Check the picture mode. A TV left in Low Power looks dim even at a high TV brightness level. Switch to Standard or Vivid.
- Check each input. Because settings are stored per input, a cable box or game console can still be on a darker mode after you fixed the streaming apps. Switch to that input and repeat Method 2, or use Apply settings to all inputs.
- Check for HDR. HDR titles use their own Dark, Normal and Bright modes, so change the mode while that title is playing.
- Raise Backlight, not Brightness. The Brightness slider changes black level, so pushing it up makes the picture look gray rather than brighter.
- Roku OLED TVs: these are set to Low Power on every input by default to protect the panel, and this is intentional. For a brighter image, press Star or go to Settings > TV picture settings and choose Roku Smart Picture Max.
The Brightness Keeps Changing on Its Own
Two features can change the light level without you touching the remote. The first is the ambient light sensor: if TV brightness is set to Auto, the TV brightens and dims as the room lighting changes. Choose a constant level in Method 1 to stop that.
The second is local dimming, which Roku also calls local contrast. On TVs that have it, the backlight is split into zones that dim separately, so dark scenes get darker while bright areas stay bright. To adjust it, press Star during playback, select Advanced picture settings, and set Local dimming to Off, Low, Medium or High. Not every model has this option. Roku’s own Plus and Pro Series TVs support it, and a TV without the option in that menu does not have the feature. Details are in Roku’s local dimming article.
If the picture changes completely after the TV sits idle, the screensaver has started; you can pick a calmer one and set a clock as the screensaver on a Roku.
A Setting Is Missing or Named Differently
- No Auto under TV brightness: the TV has no ambient light sensor.
- No Backlight or Brightness slider: availability depends on the TV model.
- No Expert Settings: Roku offers it on 4K Roku TVs, and the TV must be running Roku OS 12.5 or higher to show it in the TV’s own menu.
- Standard picture modes are gone: the TV has detected HDR content and is showing the HDR modes instead.
Pressing Star Does Not Show Picture Settings
The picture options appear when the Star button is pressed while video is playing or while a TV input is on screen. On the Home screen, Star opens options for the highlighted tile instead. Start a show or switch to an input first, then press Star again. If you gave your inputs custom names, you will find them under those names; here is how to rename an input on a Roku TV.
Nothing Helps
Restarting the TV is a harmless next step. Here’s how to restart a Roku from the Settings menu. A factory reset under Settings > System > Advanced system settings > Factory reset returns all picture and audio settings to their defaults, according to Roku. Be careful with it: a factory reset also erases the rest of your setup, so you would have to set up the TV again from the beginning. Read how to factory reset a Roku before you try it, and use the per-mode reset above first.
Start with TV brightness in Settings, then fix any input that still looks off with the Star button and Picture Mode. Roku’s page on common questions about Roku OLED TVs has more on why those models look dim by default.
More Roku TV guides:
- How to turn off the Roku screensaver
- How to turn on closed captions on a Roku
- How to change the theme on a Roku
- How to turn off the voice on Roku
Roku TV Brightness Questions
How do I make my Roku TV brighter?
Press Home, go to Settings > TV picture settings > TV brightness, and choose a brighter level. If the picture still looks dim, press Star while watching, select Picture Settings, and change Picture Mode from Low Power to Standard or Vivid.
How do I turn the brightness down on a Roku TV at night?
Choose a darker level under Settings > TV picture settings > TV brightness, or press Star while watching and switch Picture Mode to Movie, which is designed for darker rooms. If your TV offers Auto under TV brightness, it can dim the picture for you when the room is dark.
Why is my Roku TV so dark?
The most common documented cause is the Low Power picture mode, which is the default setting on a new Roku TV and is tuned to save energy. Other causes are a dark TV brightness level, the Auto brightness option reacting to a dark room, and HDR content playing in the Dark picture mode.
What is the difference between Backlight and Brightness on a Roku TV?
Backlight adjusts the peak light level of the screen, so it makes the entire picture lighter or darker. Brightness adjusts how dark the black parts of the picture appear. To change how bright the TV looks overall, use Backlight or the TV brightness setting and leave Brightness near its default.
Will changing the brightness affect my other Roku settings?
No. TV brightness and picture modes only change how the image looks. They do not touch your apps, account, sound or network settings.

Matthew Burleigh is the founder, head writer, and editor of Solve Your Tech, which he launched in 2012. He has written technology tutorials since 2008 and worked in IT since 2003, including small-business support, IT management, and consulting. He holds Bachelor’s and Master’s degrees in Computer Science from Arizona State University.
Matthew writes practical guides for Windows, iPhone and iPad, Microsoft Office, Outlook, Google apps, and Android. Solve Your Tech’s guides are checked step by step against the device or app maker’s own documentation and tested on his own devices whenever he has the hardware or software, with clear steps, sources, and update dates.
Read more about Matthew and how Solve Your Tech writes and updates its guides, or report a correction.