You want PowerPoint to read your slide text out loud, either to check your wording or so your audience can listen instead of read. On Windows, add the Speak command to the Quick Access Toolbar, select text, and click Speak. Speak only plays the text on your computer; it doesn’t save audio in the file. To put a voice into the presentation itself, record narration or insert an audio file from the Insert tab.
Which Kind of Text-to-Speech Do You Need?
Text-to-speech (TTS) means the computer turns written text into spoken words. In PowerPoint, people use the phrase for two different jobs, and they are handled by different features:
| Goal | Feature to use | Is audio saved in the file? | Platform |
|---|---|---|---|
| Hear slide text read to you while you edit or proofread | Speak (Quick Access Toolbar) | No | PowerPoint for Windows |
| Listen to slide text in a reading window with play controls | Immersive Reader (View tab) | No | PowerPoint where your version shows it |
| Have a voice play on a slide during the show | Insert > Audio > Record Audio, or Audio on My PC | Yes | Windows (Mac supports inserting audio too) |
| Narrate the whole deck, with timings, or make a video | Record (slide show recording) | Yes | Windows and Mac |
| Have everything on screen read, including menus | Narrator, the Windows screen reader | No | Windows |
One thing to clear up before you start: there is no Text-to-Speech item on PowerPoint’s Insert > Audio menu. Microsoft’s documentation for that menu lists Audio on My PC and Record Audio. If you saw instructions to pick a voice from a Text-to-Speech window there, they don’t match how PowerPoint works.
Add Speak to the Quick Access Toolbar (Windows)
Speak is built into PowerPoint for Microsoft 365, PowerPoint 2024 and PowerPoint 2021 on Windows, but it isn’t on the ribbon by default. You add it once and it stays on the toolbar.
- Open PowerPoint.
- Next to the Quick Access Toolbar, select the Customize Quick Access Toolbar arrow.
- Select More Commands.
- In the Choose commands from list, select All Commands.
- Scroll down to Speak, select it, and then select Add.
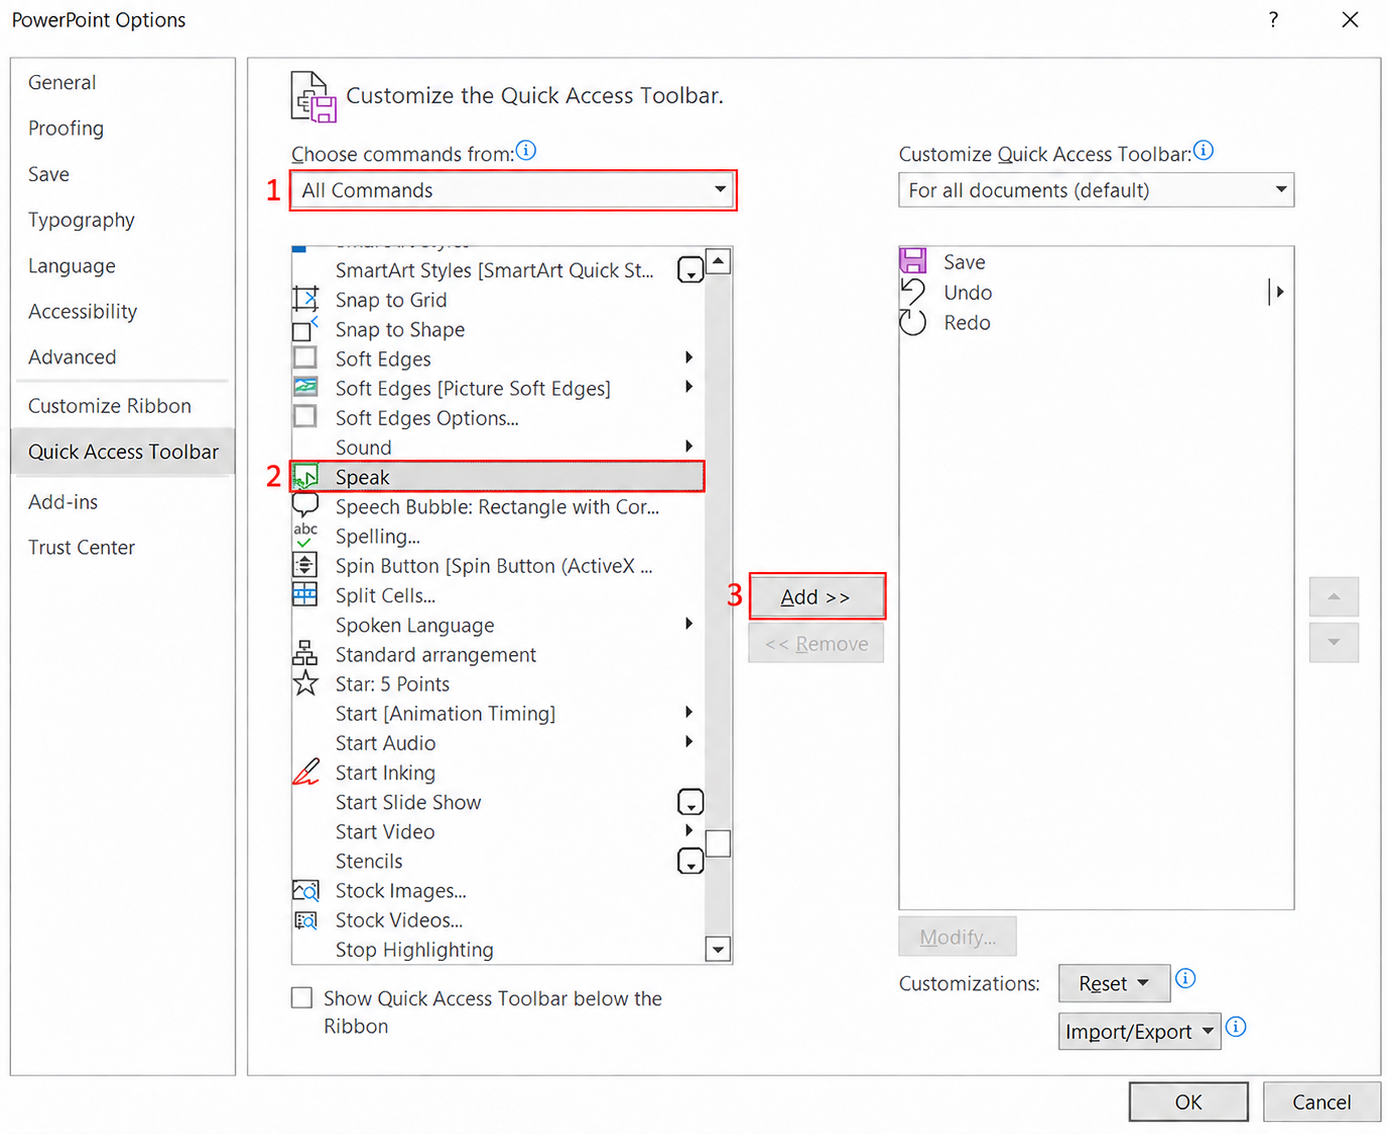
- Select OK. A Speak icon appears on the Quick Access Toolbar.
If you can’t see a Quick Access Toolbar at all, it may be hidden in your version. Look for an option to show it by right-clicking the ribbon. The steps above come from Microsoft’s page on using the Speak text-to-speech feature, which also applies to Word, Outlook and OneNote.
Read Slide Text Aloud With Speak
- Click inside a text box, title or the speaker notes pane.
- Select the words you want to hear. Speak reads only the selected text, so to hear a whole box, click in it and press Ctrl+A to select everything inside it.
- Select the Speak icon on the Quick Access Toolbar. PowerPoint reads the selection through your speakers or headphones.
- To stop early, try selecting the Speak icon again.
Speak uses the text-to-speech engine installed on your computer, and it reads in the language of your version of Office. With the English version, the English engine is installed automatically. Other languages need Microsoft’s multilingual TTS setup.
Where Speak is most useful:
- Proofreading. Hearing a sentence catches missing words and awkward phrasing your eyes skip.
- Rehearsing speaker notes. Select your notes and listen to judge how long a slide will take to deliver.
- Reading support. For people who find long text tiring, listening to a slide is easier than reading it.
Example: Marcus is preparing a ten-slide training deck. He selects the notes for each slide and clicks Speak to check that each one sounds natural and runs about a minute. Two sentences that looked fine on screen sound clumsy out loud, so he rewrites them before recording his narration.
Word has a fuller listening tool called Read Aloud, with play controls and voice options. If you need to listen to long scripts, you can draft them in Word and use Word’s Read Aloud feature, then paste the final text into your notes.
Change the Voice and Reading Speed
Speak has no voice or speed controls inside PowerPoint. Because it uses the text-to-speech engine in Windows, any changes happen at the system level. In Windows 11, look in Settings for the speech or voice options (often under Time & language or Accessibility), where you can usually pick a voice and adjust its speed. Microsoft doesn’t document this link between Windows speech settings and the Speak command on its Speak page, so if a change doesn’t take effect, restart PowerPoint and try again.
Listen With Immersive Reader
Immersive Reader is a second way to hear slide text. It opens the text in a separate reading window with a Play button, and it can also change how the text looks. Like Speak, it doesn’t add any audio to the file.
- Select the text, the text boxes or the slides you want to hear.
- On the View tab, select Immersive Reader. You can also right-click the selection and choose Open in Immersive Reader.
- Select Play to have the text read aloud.
- Use the options in the upper-right corner to change text size and spacing, split words into syllables, or translate the text.
Microsoft describes these options on its page about using Immersive Reader in PowerPoint. If you don’t see Immersive Reader on the View tab, your version may not include it; use Speak instead.
Put a Voice Into the Presentation: Record Audio on a Slide
If you want sound that plays during the slide show, it has to be saved in the file as audio. The quickest way for one slide is Record Audio. You need a working microphone.
- Select the slide.
- Go to Insert > Audio > Record Audio.
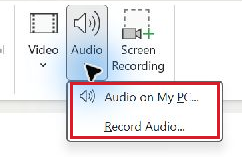
- Type a name for the recording, such as Slide 3 intro.
- Select Record and start speaking. Reading your speaker notes aloud is the easiest way to keep it tight.
- Select Stop when you finish, then Play to review it.
- Select OK. An audio icon appears on the slide; drag it where you want it.
Then set how it plays. Select the audio icon and open the Playback tab:
- Start: In Click Sequence plays it on your next click, Automatically plays it when the slide appears, and When Clicked On plays it only when someone clicks the icon.
- Hide During Show: hides the icon in the slide show. Use it only with Automatically, or nobody can click it.
- Play in Background: keeps the audio playing across slides, better suited to music than narration.
Microsoft’s page on adding or deleting audio in PowerPoint covers these options. For more on delivering a recorded voice track, see how to do a voiceover on PowerPoint.
Record Narration Across the Whole Slide Show
For a self-running presentation or a video, recording the show is better than adding audio slide by slide, because PowerPoint saves your narration and the timing of each slide together. Microsoft documents this for PowerPoint for Microsoft 365, 2024, 2021, 2019 and 2016. Recent Microsoft 365 versions use a newer recording screen; older versions use the classic one.
Newer Recording Experience
- Open the presentation and select Record near the top of the window, or open the Record tab and choose to start recording.
- Check that the correct microphone is selected in the recording window. If the slides have speaker notes, they appear at the top of the screen as a teleprompter.
- Select Start recording, wait for the countdown, and speak while you advance the slides.
- Use Pause if you need a break and Stop when you’re done. Play lets you review.
- Close the recording window. Slides with narration show an audio icon.
Classic Recording Experience
- If you don’t see a Recording tab, go to File > Options > Customize Ribbon and check Recording in the list of main tabs.
- On the Recording tab, choose to record from the beginning or from the current slide.
- Select the red record button (or press R), narrate, and advance the slides.
- Select Stop (or press S) when you finish.
Two details that trip people up. First, PowerPoint doesn’t record narration during slide transitions, so let a transition finish before you start talking. Second, if a slide needs redoing, use Clear to remove the recording on the current slide or on all slides, then record that part again. Microsoft explains both experiences on its page about recording a slide show with narration and slide timings.
When the narration is done, you can share it as a video using the export option in the recording window; the full process is in how to make a PowerPoint into a video. If you only need slides to advance on their own without narration, setting the time between slides is enough.
Insert a Narration File You Already Have
Some people create a computer voice outside PowerPoint, for example with a text-to-speech app or service, and save it as an audio file. Others record on a phone. Either way, you add the file like this:
- Select the slide.
- Go to Insert > Audio > Audio on My PC.
- Find the file and select Insert.
- Set the Playback options described above.
Use a format PowerPoint supports. On Windows, Microsoft recommends .m4a files (AAC audio) and also supports .aac, .mp3 and .wav. Older formats such as .wma and .aiff have limited support in recent versions, and MIDI files are no longer supported. Check Microsoft’s list of audio and video formats supported in PowerPoint if a file won’t insert. If you use an outside voice service, check its terms for whether you may use the audio in your presentation.
Mac, Web and Other Options
- PowerPoint for Mac: Microsoft says Speak is a Windows feature. On a Mac, macOS can read selected text: choose Apple menu > System Settings > Accessibility > Read & Speak (the name may differ on older macOS versions), turn on Speak selection, then select text and press Option-Esc. You can still record narration and insert audio files in PowerPoint for Mac.
- PowerPoint for the web: Microsoft doesn’t document Speak for the web version; if your PowerPoint shows View > Immersive Reader, use that to hear slide text.
- Narrator: the screen reader built into Windows reads everything on screen, including menus and slide content. It is meant for people who rely on a screen reader rather than for quick proofreading.
- Dictate goes the other way: Home > Dictate turns your speech into text on a slide. It’s useful for drafting, but it doesn’t read anything back.
When It Doesn’t Work
- Speak isn’t in the All Commands list: make sure you’re in PowerPoint for Windows, not the web or Mac version, and that the Choose commands from list is set to All Commands, not Popular Commands.
- Speak does nothing: select some text first. Speak reads only the selected text.
- No sound: check the volume and the output device in Windows, and try headphones. If no app plays sound, the problem is the audio device; installing an audio driver in Windows 11 may help.
- Record Audio or Record shows no input: plug in or choose a microphone, and check that Windows allows apps to use it in the microphone privacy settings.
- Narration is cut off at the start of slides: wait for the transition to finish before speaking.
- An audio file won’t insert or play: convert it to .m4a or .mp3 and insert it again.
Questions about text-to-speech in PowerPoint
Can Speak Read My Slides Automatically During a Presentation?
No. Speak reads text you select while editing. For audio during the show, record narration or insert an audio file.
Will Speak Read Text Inside Shapes and Tables?
It reads text you can select. Click into the shape or table cell and select the words. Text inside pictures can’t be selected, so Speak can’t read it.
Does Recorded Narration Make the File Much Larger?
Yes, audio is stored in the presentation, so each minute of narration adds to the file size. Keep recordings short and remove takes you don’t use.
Can I Use Text-to-Speech in Another Language?
Speak reads in the language of your Office version by default. For other languages, Microsoft points to its multilingual TTS instructions, linked from the Speak support page.
Add the Speak button now so it’s ready the next time you proofread, and record narration once your wording sounds right.

Matthew Burleigh is the founder, head writer, and editor of Solve Your Tech, which he launched in 2012. He has written technology tutorials since 2008 and worked in IT since 2003, including small-business support, IT management, and consulting. He holds Bachelor’s and Master’s degrees in Computer Science from Arizona State University.
Matthew writes practical guides for Windows, iPhone and iPad, Microsoft Office, Outlook, Google apps, and Android. Solve Your Tech’s guides are checked step by step against the device or app maker’s own documentation and tested on his own devices whenever he has the hardware or software, with clear steps, sources, and update dates.
Read more about Matthew and how Solve Your Tech writes and updates its guides, or report a correction.