Much like documents that you create in Microsoft Word, there is spacing between your words and lines.
The amount of space here can affect not only the amount of data you show on a slide but the ease with which your audience can read it.
Fortunately, you can follow our instructions below on how to change line spacing in Powerpoint if you find that there is too much or too little space between the lines on your slides.
How to Adjust Microsoft Powerpoint Line Spacing
- Open your presentation.
- Select the Outline tab.
- Press Ctrl + A to select everything.
- Choose the Home tab.
- Click Line Spacing, then the desired amount of spacing.
Our guide continues below with additional information on how to change line spacing in Powerpoint, including pictures of these steps.
Microsoft Powerpoint presentations consist of a series of individual slides that each convey a certain point about your presentation.
You can customize the appearance of your entire presentation using a number of different tools, including the options found on the Design tab.
However, most of these changes are cosmetic, and will affect elements like your font, background image and slide object structure.
If you are looking for a way to change all of the content of your slide, such as if you want to change the line spacing for every Powerpoint slide simultaneously, then you may have found that the solution to this problem is not immediately obvious.
Fortunately, it is possible to universally apply a line spacing change to every slide of your Powerpoint presentation, it just needs to be done in a manner that is a little different than you might be familiar with.
Are you having trouble working with lists in Google Slides? Check out our tutorial on how to add bullet points in Google Slides.
How to Change Line Spacing on Every Powerpoint Slide (Guide with Pictures)
The slide layout and order of a Powerpoint presentation are displayed in a column at the left side of the Powerpoint window.
However, this display is only one of the tabs that you can select from that column. Clicking the Outline tab at the top of the column will also display all of your presentation slides, but will do it with a focus on the content of the slides.
By leveraging the function of this tab, you can select all of the content on all of your slides and make changes to all of the content at the same time. This includes the ability to adjust the line spacing of every slide.
These steps will show you how to change line spacing in Powerpoint for your current presentation.
Step 1: Begin the process by launching Powerpoint, then open the presentation for which you want to change the line spacing.
Open your Powerpoint slideshow.
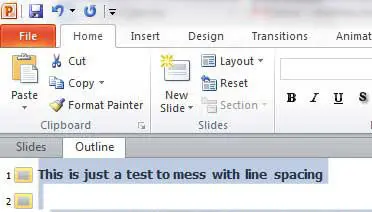
Step 2: Click the Outline tab at the top of the column at the left side of the window.

Choose the Outline tab.
Step 3: Press Ctrl + A on your keyboard to select all of the text.

Use the Ctrl + A keyboard shortcut to select everything.
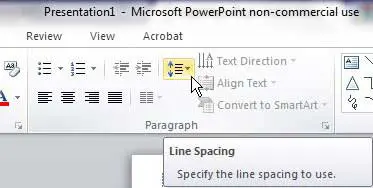
Step 4: Click the Home tab at the top of the window, then click the Line Spacing button in the Paragraph section of the ribbon at the top of the window.

Choose the Home tab and click the Line Spacing button.
Step 5: Click the amount of spacing that you want to apply to your slides.
Choose the desired amount of line spacing.
Step 6: Click the Slides tab at the top of the column at the left side of the window to see your slides with their adjusted line spacing.
Check out your slides with the new line spacing.
Now that you know how to change line spacing in Powerpoint, you can use this method to enact other universal changes to your text, such as if you wanted to change the font, font color, or size.
Frequently Asked Questions About the Powerpoint Line Spacing Setting
How do you adjust leading in Powerpoint?
Leading is the technical name for line spacing, so when you choose the amount of space between two lines from the Line Spacing dropdown list, you are adjusting the leading for that selection.
Note that this allows you to use single spacing, double spacing, or triple spacing, as well as some other options.
You can even click the Line Spacing Options button at the bottom of that list and adjust settings that can affect the amount of space between separate paragraphs in a text box.
Where can I find the line spacing options for my Powerpoint presentation?
Microsoft Powerpoint has a special menu where you can make changes to the exact line spacing for a selection in your presentation.
You need to select the Home tab at the top of the window, then click the small Paragraph dialog box launcher at the bottom-right corner of the Paragraph group on the ribbon.
This is going to open a new window where you can make changes to settings like:
– Alignment
– Text direction
– Indentation
– Line Spacing
This line spacing section lets you adjust the line spacing option for a selection in a slide, and you can choose from a number of different options.
You can also adjust the spacing before and after an entire paragraph, which can be useful when you need more space between two paragraphs.
What is the first line indent marker in Powerpoint?
When the ruler is visible in PowerPoint (you can toggle it on or off by checking the box next to Ruler on the View tab) and you click inside a text box, you can see some controls on the ruler.
If you move the top one that looks like a downward-facing arrow you can adjust the indent for the first line in a paragraph.
Can I use this method if I want to change the font size for my entire presentation?
Yes, utilizing the Outline tab or Outline view option is helpful when you need to make changes to more than just a single text box.
You simply need to switch to that view mode, then select all of the content in the presentation. You are then able to go somewhere like the Font group on the Home tab and make changes to the font style, size, color, or any of several other options found on that menu.
I don’t see the Outline tab in my version of Powerpoint. Can I still do this?
Yes, this is still possible, but you will need to switch to the Outline view in a different way in newer versions of Powerpoint like the one for Office 365.
If you select the View tab at the top of the window you can click the Outline View button in the Presentation Views section of the ribbon.
You are then able to select all the text on all of your slides and apply various formatting changes to the selected text.

Matthew Burleigh has been writing tech tutorials since 2008. His writing has appeared on dozens of different websites and been read over 50 million times.
After receiving his Bachelor’s and Master’s degrees in Computer Science he spent several years working in IT management for small businesses. However, he now works full time writing content online and creating websites.
His main writing topics include iPhones, Microsoft Office, Google Apps, Android, and Photoshop, but he has also written about many other tech topics as well.