To drag slides from one PowerPoint presentation to another, open both files, place the windows side by side, select the slide thumbnails in the first deck, and drag them into the thumbnail pane of the second. The slides arrive as copies, so the first deck normally keeps its originals.
You built a few slides in one deck and now need them in another presentation without rebuilding them from scratch. This covers PowerPoint for Microsoft 365 on Windows and Mac, plus the web.
Which Method to Pick
All three routes put a copy of the slide in the destination deck. The difference is how you choose the slides and where you set the formatting.
- Drag between windows works best when both decks are already open and you can see exactly where each slide should land.
- Copy and paste works when the windows are hard to arrange (one small laptop screen, for example) and it is the route that also works in PowerPoint for the web.
- Reuse Slides lets you browse a saved file and insert slides without opening it in its own window, including every slide at once. It is limited to desktop PowerPoint and local files, as explained further down.
A quick example: Odessa has a 12-slide sales deck called Q3-Review.pptx and wants slides 4 through 6 (the regional charts) in a new board presentation. Dragging is the fastest choice if she can fit both windows on screen. If she is on a laptop with one cramped display, copy and paste gets the same result.
Drag Slides Between Two Open Windows
Dragging only works when you can see both presentations at the same time. If one window covers the other, there is nowhere to drop the slides, which is the most common reason this method seems not to work.
- Open the presentation that has the slides (the source) and the one that should receive them (the destination).
- Put the two windows side by side. On Windows, the View tab usually has an Arrange All button in the Window group that tiles the open presentations. If you do not see it, use Windows Snap: press the Windows logo key + Left arrow in one window and the Windows logo key + Right arrow in the other, as Microsoft describes on its Snap your windows page. On a Mac, drag each window to one half of the screen.
- In both windows, make sure the slide thumbnails are showing. View > Normal shows the thumbnail pane on the left, and View > Slide Sorter shows every slide as a grid, which is easier when you are copying many slides.
- In the source window, select the slides. Click one slide to select it, click the first slide and Shift+click the last to select a range, or hold Ctrl and click to pick slides that are not next to each other. Mac users typically hold Command instead of Ctrl.
- Press and hold on any selected thumbnail, drag it across to the destination window’s thumbnail pane or Slide Sorter grid, and watch for the insertion line between two slides.
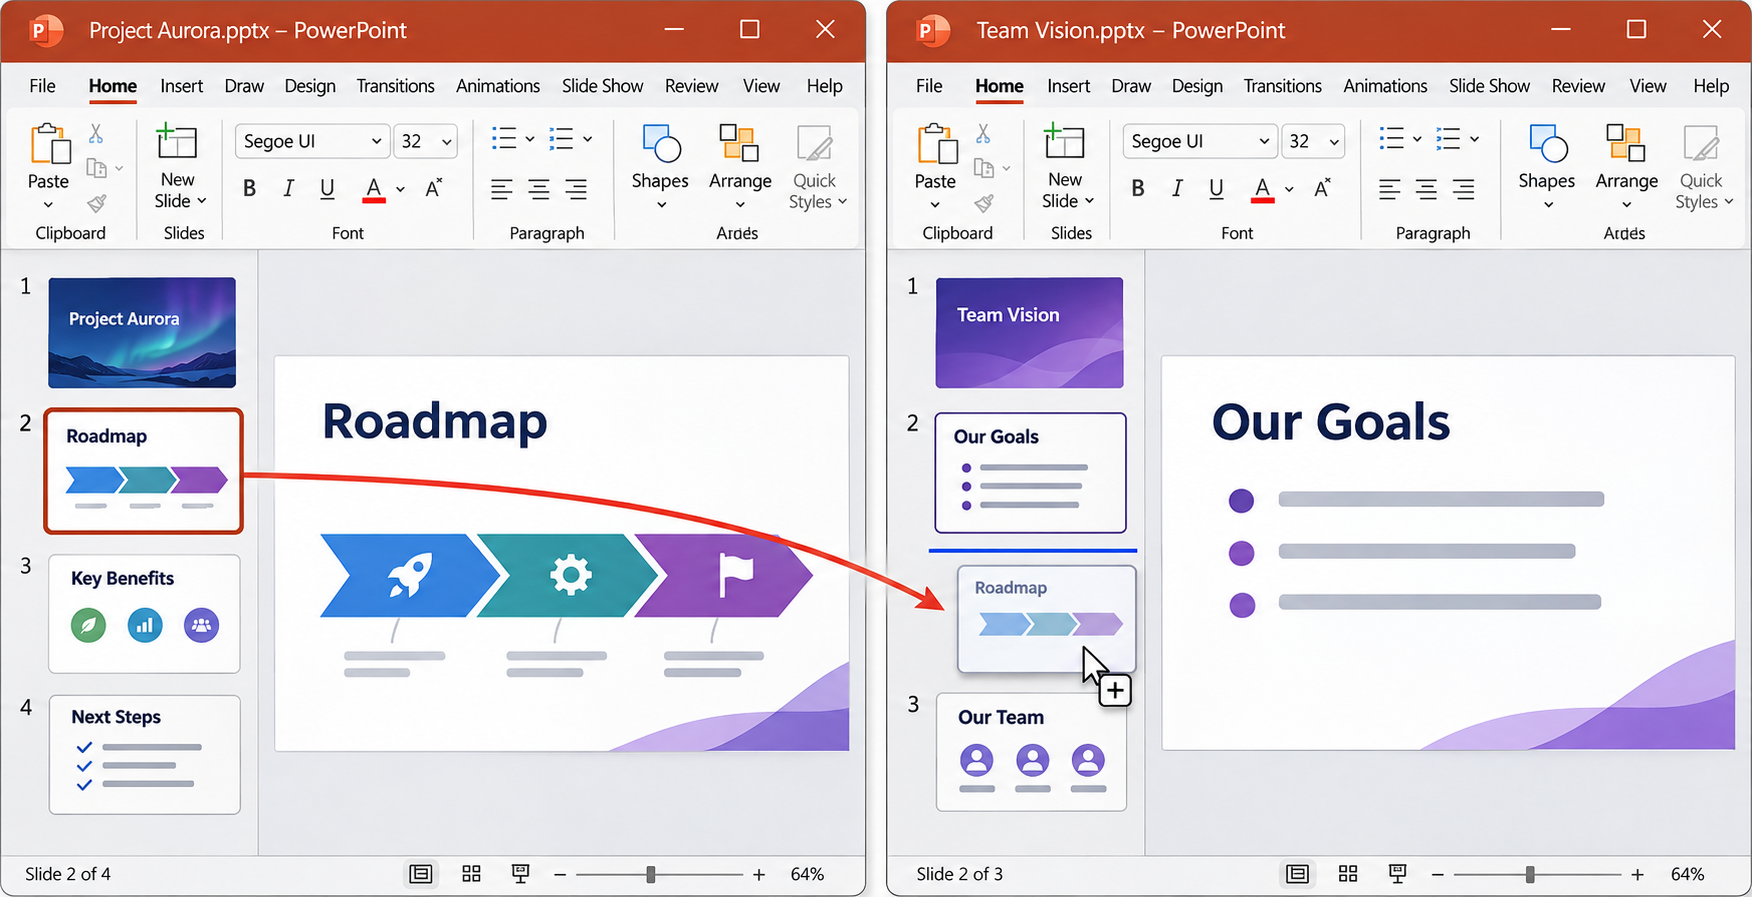
- Release the mouse button. The copies appear at the insertion point.
- If a small Paste Options button appears next to the new slides, select it to choose how they should be formatted (see the formatting section below).
Expect a copy, not a move. In current desktop versions the source presentation normally keeps its slides, so check it before you delete anything. If you really wanted to move them, delete the originals from the source deck after you check the copies, then save both files. The copies are independent, so later edits in one deck do not change the other.
Copy and Paste Slides Instead
Copy and paste gives you the same copies without needing both windows visible at once. Microsoft documents this route on its copy and paste your slides support page, which covers Windows, macOS and the web.
- In the source deck, go to View > Normal so the thumbnails show.
- Select the slides with a click, Shift+click or Ctrl+click, as described above.
- Right-click a selected thumbnail and choose Copy (or press Ctrl+C).
- Switch to the destination deck and right-click the thumbnail that the new slides should follow.
- Under Paste Options, pick Use Destination Theme or Keep Source Formatting. You can also press Ctrl+V, which uses the destination theme, then change your mind with the Paste Options button that appears near the pasted slide.
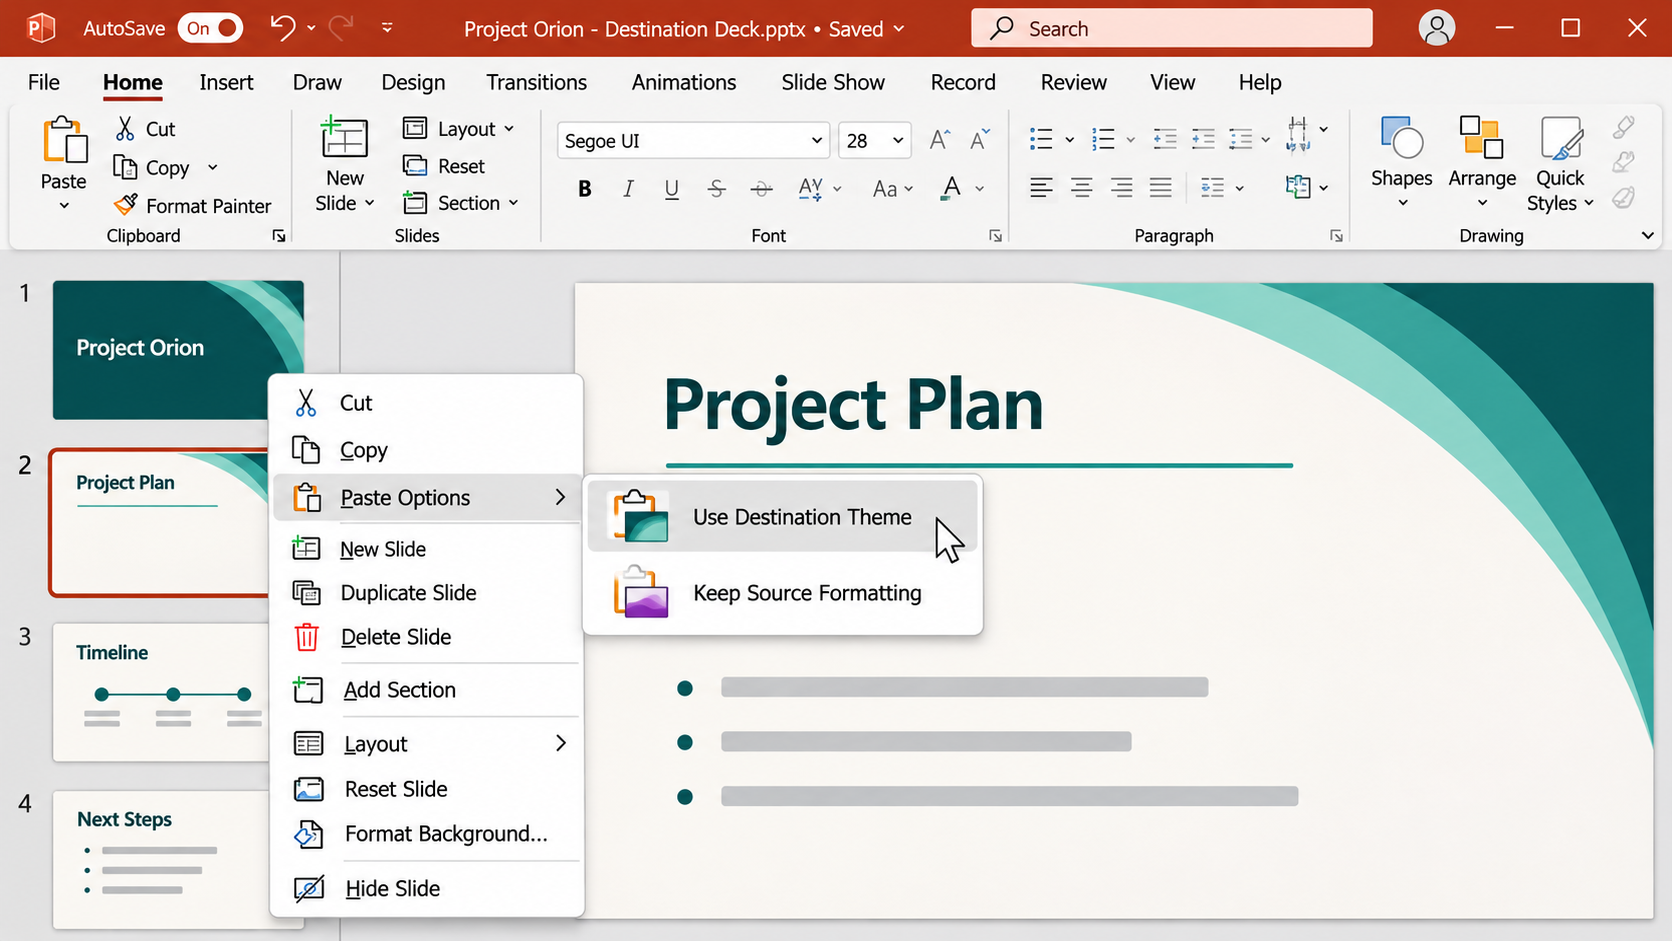
The Home tab has the same choices under the small arrow below the Paste button. Depending on your version, you may also see a Picture option, which pastes the slide as a flat image you cannot edit, so skip it unless that is what you want.
In PowerPoint for the web, open both presentations in separate browser tabs, copy the thumbnails in one tab, and paste them into the other. Copy and paste is the route Microsoft documents for the web, so use it there rather than dragging between tabs.
Keep the Original Look or Match the New Deck
The usual surprise is that pasted slides suddenly have different fonts, colors or backgrounds. That happens because, by default, PowerPoint applies the destination presentation’s theme and slide master to the incoming slides. The text and images come across, but they are redressed to match the new deck.
- Use Destination Theme is the right choice when the slides should blend into the new deck, such as a company template.
- Keep Source Formatting keeps the original design. To do this, PowerPoint usually brings the source slide master along, so the destination file can gain extra layouts.
A few other things change hands, or fail to, when slides travel:
- Slide size. Slides usually take the destination deck’s size, so a 4:3 slide pasted into a 16:9 deck can look stretched or have shifted objects. Check charts and pictures first.
- Fonts. If the source used a font the other computer lacks, PowerPoint substitutes one. Embedding fonts before you share the file avoids this; the same idea is covered in embedding fonts in an Office file.
- Extra layouts. Keeping source formatting adds the source master. Open View > Slide Master afterward and delete layouts nobody uses to keep the file tidy and smaller.
Use Reuse Slides From a Saved File
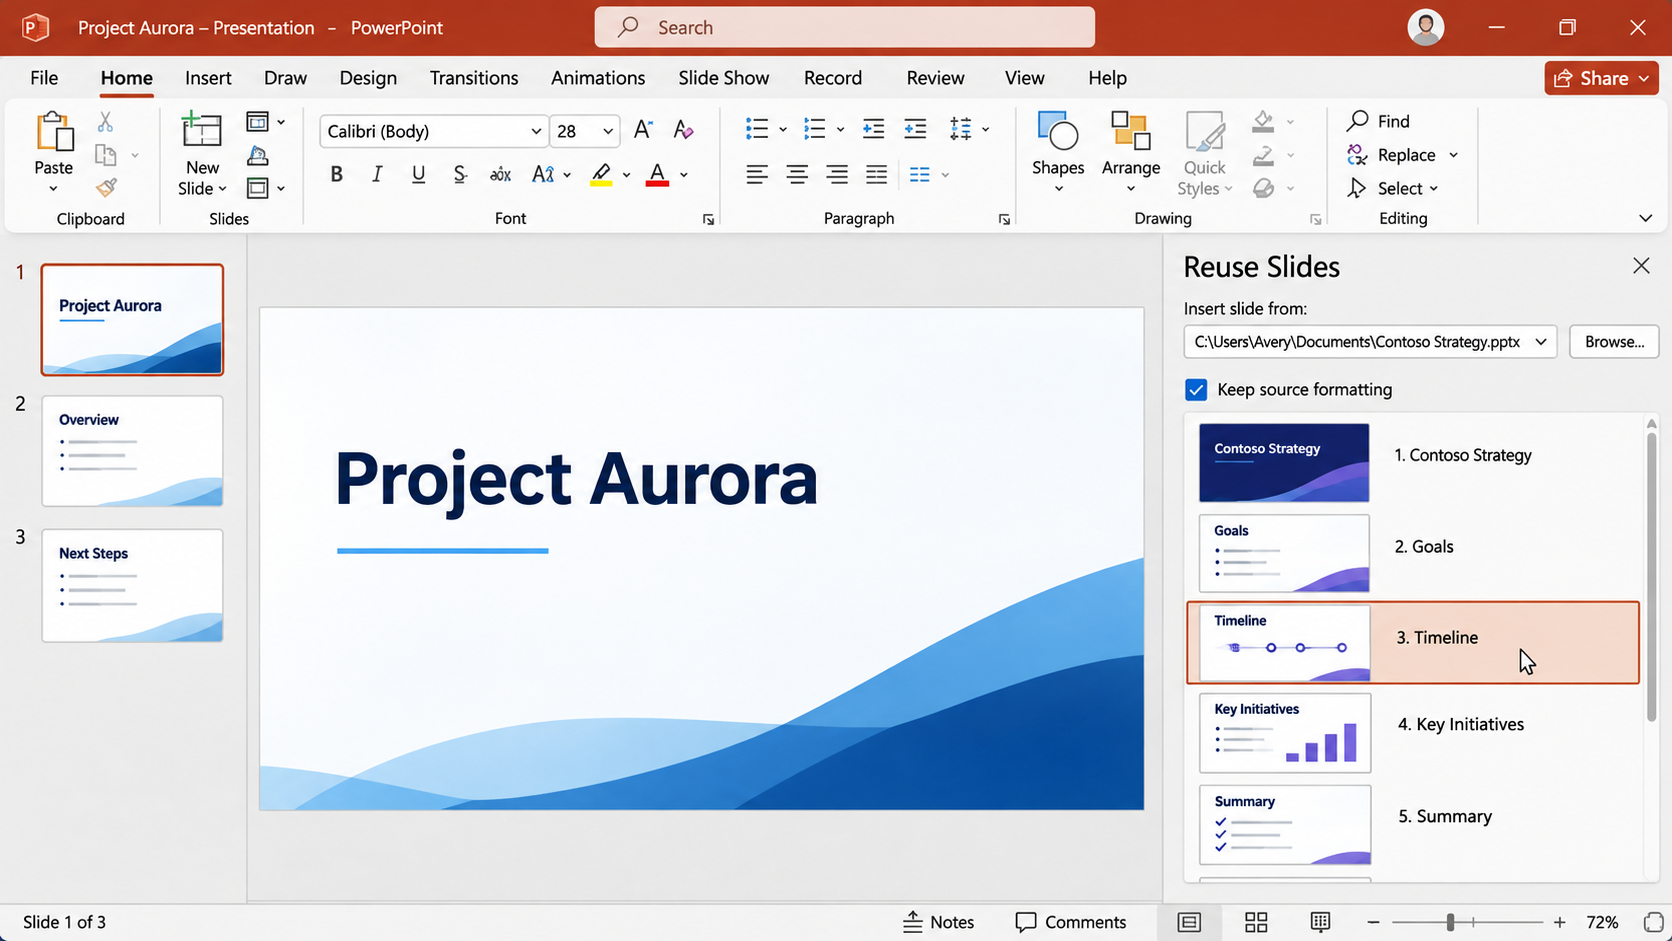
Reuse Slides opens a side pane that previews another presentation so you can insert slides without opening that file in its own window. Microsoft’s Reuse (import) slides from another presentation page documents it for Windows and Mac only, and only for local files: the page states that reusing slides from cloud files is deprecated. In practice, browse to a copy of the source file saved on your computer. There are no steps for PowerPoint for the web on that page.
- Open the destination presentation and click the thumbnail that the new slides should follow.
- On the Home tab, in the Slides group, select the arrow next to New Slide, then select Reuse Slides.
- In the Reuse Slides pane, select Open a PowerPoint File.
- In the Browse dialog box, pick the source presentation from a folder on your computer and select Open.
- To keep the original design, check Keep source formatting at the bottom of the pane before you insert anything. Without it, the inserted slides take the styling of the slide they are inserted after.
- Click a slide in the pane to insert it, or right-click any slide and choose Insert All Slides to bring the whole presentation in.
If you do not see Reuse Slides under New Slide, or your source file only lives in the cloud, download a copy to your computer first or use drag and drop or copy and paste, which do the same job.
Check the Slides After They Land
A copied slide carries its text, pictures and, usually, its animations, transitions and speaker notes. Spend a minute in Slide Show view before you present:
- Play each new slide and confirm animations run in the right order, especially ones with triggers.
- Click any links. Links that pointed to other slides in the source deck may now point somewhere else or nowhere.
- Play audio and video to make sure the media came along rather than a broken placeholder.
- Hide any extras you want to keep but not show; hiding a slide in PowerPoint leaves it in the file but skips it during the show.
If something went wrong, press Ctrl+Z (Command+Z on a Mac) right away to undo the paste or drop, then try again with the other paste option.
More Questions About Moving Slides
Does dragging remove the slide from the first presentation?
Normally not. Dragging between two presentation windows inserts a copy, so the slide stays in the source deck. Delete it there yourself, after checking the copy, if you want a true move. Dragging inside a single presentation is different: that rearranges the slides in the same file.
Can I reuse slides straight from OneDrive?
Not with Reuse Slides. Microsoft’s page says the feature works only with local files and that reusing from cloud files is deprecated. Open the OneDrive file in PowerPoint and drag or copy the slides, or save a local copy and browse to it from the Reuse Slides pane.
Can I copy slides between two different PowerPoint versions?
Yes, as long as both files open in the copy of PowerPoint you are using. Features the receiving version does not support may look different, so check those slides closely after pasting.
How do I share the combined deck with people who do not have PowerPoint?
Save or export it as a PDF. The steps for turning a PowerPoint into a PDF keep the layout fixed, though animations and video will not play in the PDF.
Once the slides are in place, save the destination deck under a new name if you might need the earlier version, then run through the whole show once from the first slide.

Matthew Burleigh is the founder, head writer, and editor of Solve Your Tech, which he launched in 2012. He has written technology tutorials since 2008 and worked in IT since 2003, including small-business support, IT management, and consulting. He holds Bachelor’s and Master’s degrees in Computer Science from Arizona State University.
Matthew writes practical guides for Windows, iPhone and iPad, Microsoft Office, Outlook, Google apps, and Android. Solve Your Tech’s guides are checked step by step against the device or app maker’s own documentation and tested on his own devices whenever he has the hardware or software, with clear steps, sources, and update dates.
Read more about Matthew and how Solve Your Tech writes and updates its guides, or report a correction.