To print on both sides automatically with an HP LaserJet P2055d or P2055dn, open the print settings for the printer, go to the Finishing tab, and check Print on both sides. If that option is missing or the printer asks you to flip the pages, open Printer properties in Windows, select the Device Settings tab, and set Duplex Unit (for 2-Sided Printing) to Installed.
These steps cover Windows 11 and Windows 10 with HP’s driver for the P2055 series, plus the Mac print window. The base P2055 has no duplexer, so it can only print two-sided manually. That method is covered below too.
Which P2055 Models Have Automatic Duplexing?
HP’s datasheet for the LaserJet P2050 series lists automatic two-sided printing as standard on the P2055d and P2055dn. The plain P2055 supports manual two-sided printing only, through the driver. HP’s own rule of thumb is that a d in the model name means a built-in duplexer.
| Model | Two-sided printing |
|---|---|
| P2055 | Manual only (you reload the pages) |
| P2055d | Automatic |
| P2055dn | Automatic, plus a network port |
Not sure which one you have? The model name is printed on the front of the printer.
Before You Start: Set the Paper-Width Lever
The duplexer has a blue paper-width lever at the back of the printer. Set it before you print two-sided:
- Lift the duplex jam-release door on the back of the printer.
- Push the blue lever in for Letter or Legal paper, or pull it out for A4.
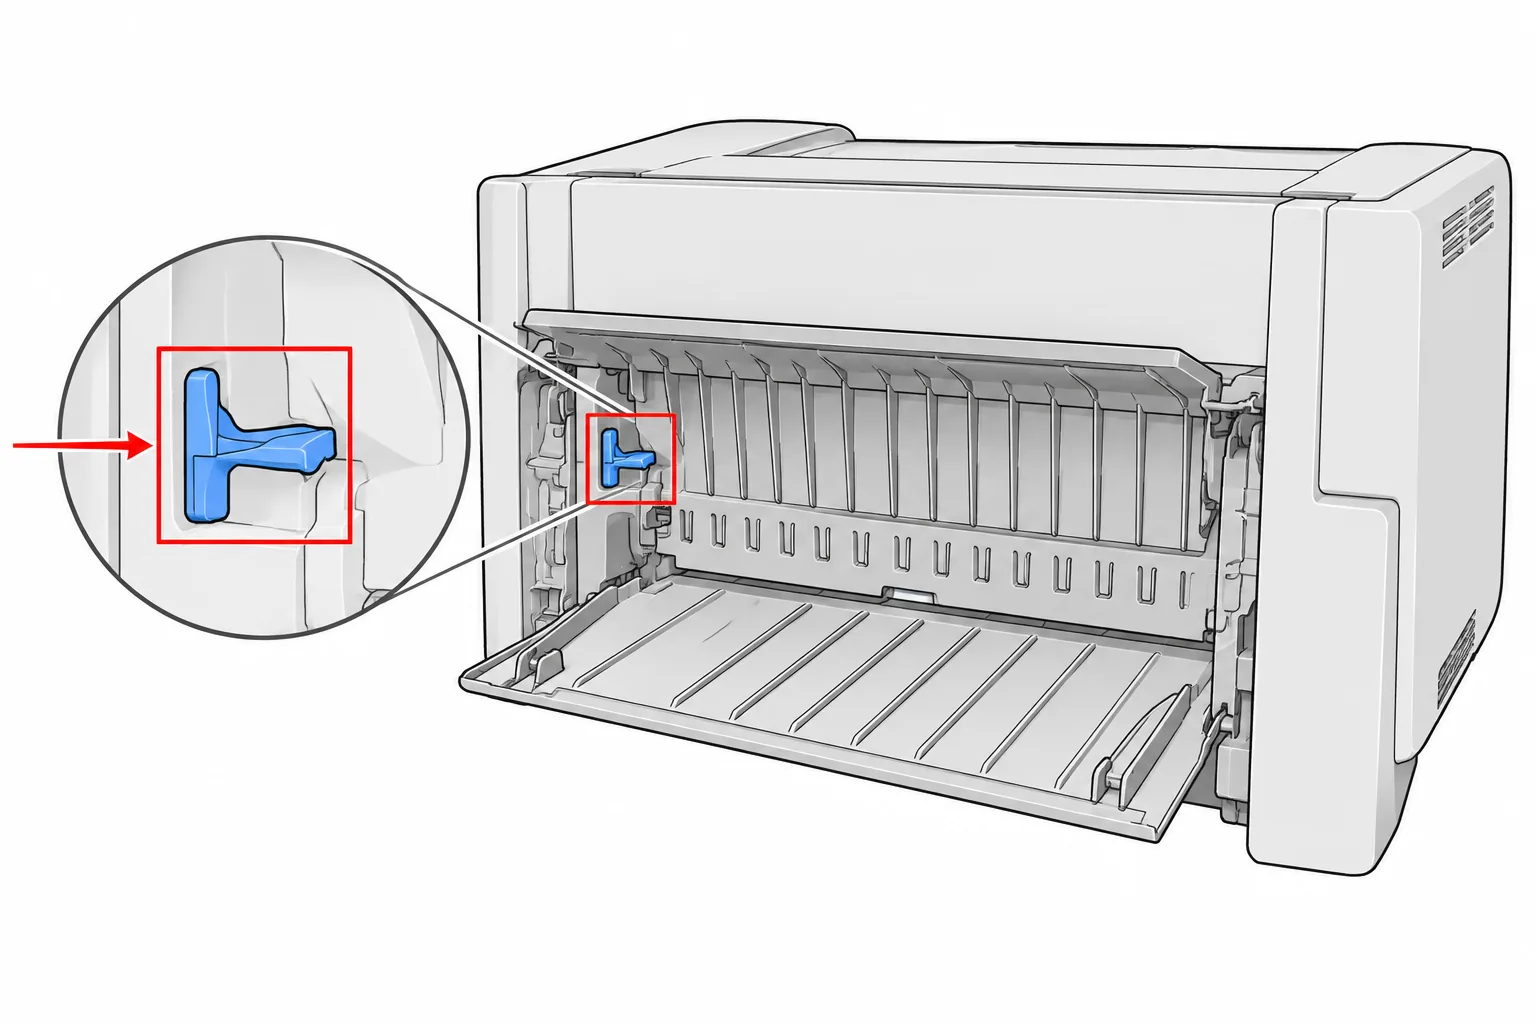
- Close the door and load enough paper in the tray for the whole job.
If the lever doesn’t match your paper, two-sided jobs can jam. Plain paper works best. Don’t run envelopes, labels or transparencies through the duplexer.
Step 1: Tell Windows the Duplex Unit Is Installed
Windows doesn’t always detect the duplexer, especially after a driver reinstall or a move to a new PC. When that happens, the driver offers only manual two-sided printing.
- Open Settings and go to Bluetooth & devices > Printers & scanners. In Control Panel, the same list is under Devices and Printers.
- Select your HP LaserJet P2055, then select Printer properties. In Control Panel, right-click the printer and choose Printer properties.
- Click the Device Settings tab.
- Under Installable Options, set Duplex Unit (for 2-Sided Printing) to Installed.
- Click Apply, then OK.
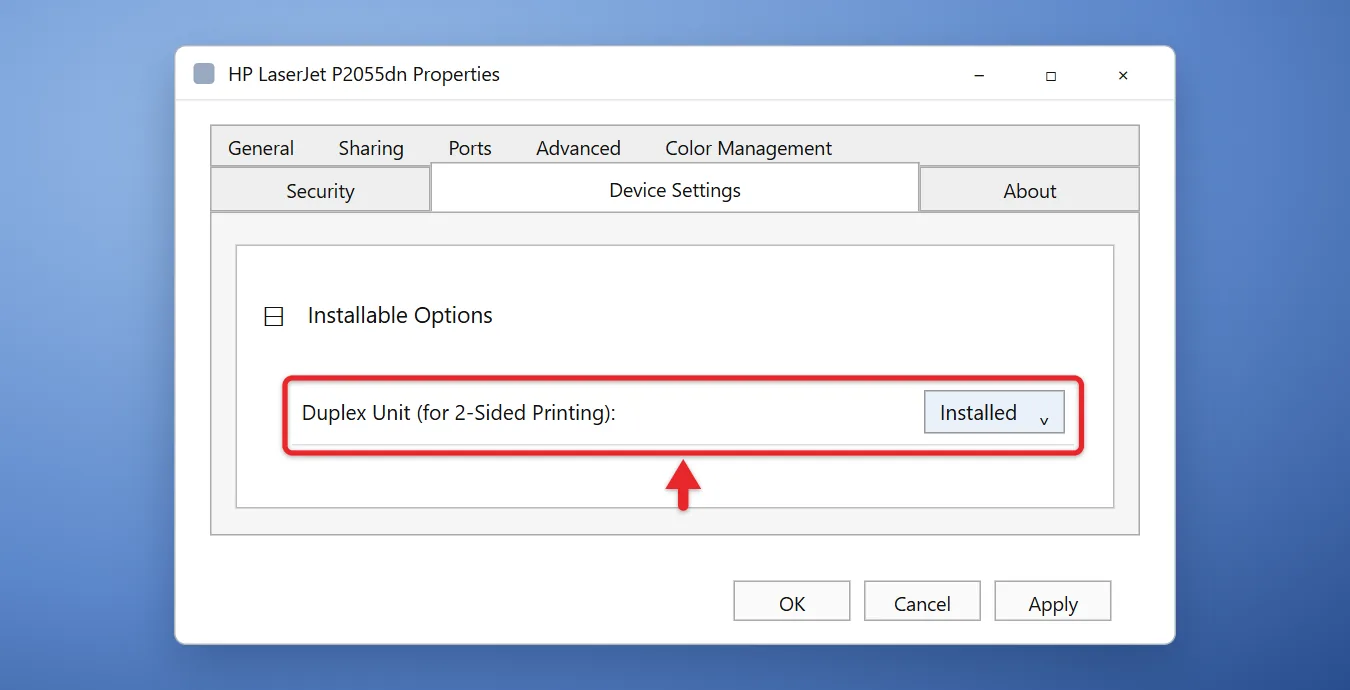
The driver now sends two-sided jobs to the duplexer instead of asking you to flip the paper.
If you use the HP Universal Print Driver, HP’s Unable to auto-duplex and 2-sided printing fails article also describes setting Automatic Configuration to Update Now on the same tab and clicking Apply. The driver then reads the printer’s installed options by itself. If that doesn’t work, set the Duplex Unit option by hand as above.
Don’t see a Device Settings tab, or the options look generic? You may be using the basic driver Windows installed on its own. According to an HP-recommended answer on HP’s support forum, the generic Windows driver lacks the commands the P2055 needs, so use HP’s own software instead. You can get the HP LaserJet P2055dn driver directly, or update the printer driver in Windows 11.
Step 2: Print a Document on Both Sides
- Open the document and click File > Print, or press Ctrl + P.
- Select the HP LaserJet P2055, then click Printer Properties or Preferences. Some apps call this button Properties or More settings.
- Click the Finishing tab.
- Check Print on both sides.
- For pages you’ll bind along the top, like a notepad, also check Flip pages up. Leave it unchecked for normal book-style pages bound on the left.

- Click OK, then Print.
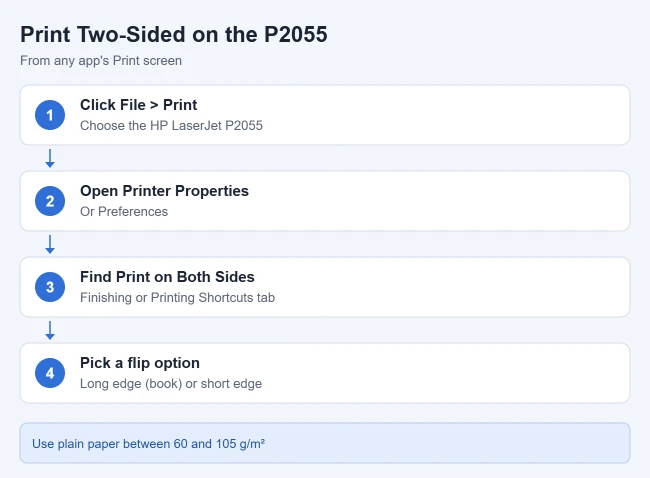
The printer prints the first side, pulls the sheet back in, and prints the second side without any help from you. If you use the HP Universal Print Driver or a different HP driver, the same choice may be on a Layout or Features tab and labeled Print on Both Sides with Flip on Long Edge (book style) or Flip on Short Edge (top binding).
The same Printer properties window is also where you adjust the print spooler on the HP LaserJet P2055dn.
Make two-sided printing the default
A change in an app’s print window only lasts for that job. To print two-sided every time:
- Open Settings > Bluetooth & devices > Printers & scanners and select the printer.
- Select Printing preferences.
- On the Finishing tab, check Print on both sides, then click OK.
New jobs from every app now start as two-sided. This is the same window you’d use to change printer settings to black and white.
Other HP drivers use the same Printing preferences window for job-wide settings, such as the watermark option on the HP Color LaserJet CP1215.
Go back to one-sided printing
Open the same print settings or Printing preferences, uncheck Print on both sides, and click OK.
How to Print Two-Sided on a Mac
Apple’s Print double-sided pages on Mac steps work with the P2055d and P2055dn:
- With the document open, choose File > Print.
- In the Double-sided pop-up menu, choose On. For top-edge binding, choose On (Short Edge).
- Click Print.
HP’s P2055 user guide, written for older versions of macOS, shows this choice under the Layout menu as Two-Sided with Long-Edge Binding or Short-Edge Binding. Print options depend on the printer and app, so if you don’t see a double-sided choice, check that the printer’s driver is installed and that its options include the duplex unit.
How to Print on Both Sides With a P2055 (No Duplexer)
The base P2055 can still print on both sides with your help. In HP’s guide, the second side always goes through Tray 1.
- In the print window, open the printer properties and the Finishing tab.
- Choose the manual two-sided option. In Windows, it’s Print on both sides (manually). On a Mac, it’s Manually Print on 2nd Side.
- Click Print. The printer prints the first side of every sheet and shows instructions on your computer.
- Remove any blank paper from Tray 1.
- Put the printed stack in Tray 1 printed side up, top edge first, as HP’s guide directs.
- Press the button on the printer’s control panel if it asks you to continue.
The printer then prints the second side of each sheet.
If It Still Asks You to Flip the Pages
- Check the option name. If the driver only offers Print on both sides (manually), it doesn’t know the duplexer is there. Repeat Step 1.
- Turn off manual duplexing. On some driver versions, the Device Settings tab also has Allow Manual Duplexing. Setting it to Disabled stops the manual prompt on a d or dn model.
- Check the paper. Use Letter, Legal or A4 plain paper and set the paper-width lever to match. Special paper can trigger a manual prompt.
- Check for a jam. Open the duplex jam-release door at the back and remove any stuck paper.
- Reinstall the driver. Remove and reinstall HP’s driver if two-sided jobs still print on separate sheets.
A status page after every job is a separate problem, and you can stop an HP LaserJet from printing status notifications.
P2055 Duplex Printing Questions
Can every HP LaserJet P2055 print on both sides automatically?
No. Automatic two-sided printing is available on the P2055d and P2055dn. The plain P2055 prints two-sided only with the manual method.
What does flip pages up mean?
It sets the back of each page for top-edge binding, like a notepad or a wall calendar. Leave it off for normal documents that turn like a book.
Why did duplexing stop after I moved to a new computer?
The new PC installed a fresh driver that doesn’t know about the duplex unit, or it installed the generic Windows driver. Install HP’s driver, then set Duplex Unit (for 2-Sided Printing) to Installed.
Is the duplex setting saved in the printer or on the computer?
On the computer. Each PC that prints to the P2055 needs its own driver setting, so repeat Step 1 on every computer.
If your P2055 prints a stray page with “GET /DevMgmt/DiscoveryTree.xml” on it, follow the steps to make the HP LaserJet P2055 stop printing an extra page.

Matthew Burleigh is the founder, head writer, and editor of Solve Your Tech, which he launched in 2012. He has written technology tutorials since 2008 and worked in IT since 2003, including small-business support, IT management, and consulting. He holds Bachelor’s and Master’s degrees in Computer Science from Arizona State University.
Matthew writes practical guides for Windows, iPhone and iPad, Microsoft Office, Outlook, Google apps, and Android. Solve Your Tech’s guides are checked step by step against the device or app maker’s own documentation and tested on his own devices whenever he has the hardware or software, with clear steps, sources, and update dates.
Read more about Matthew and how Solve Your Tech writes and updates its guides, or report a correction.