To add a watermark on the HP Color LaserJet CP1215, open the Print window in your program, select the printer, click Properties or Preferences, open the Effects tab, and pick an option from the Watermarks drop-down list. Click OK, then print.
A watermark is a short notice, such as “Confidential” or “Draft,” that prints faintly in the background of a page. On this printer it is a feature of the Windows printer driver (the software that lets Windows talk to the printer), so the printer adds it as the page prints. Your original file is not changed.

What You Need First
The steps below come from the HP Color LaserJet CP1210 Series User Guide, which covers the CP1215. A few things need to be in place before the watermark option appears.
- A Windows computer. HP’s guide gives the watermark steps for the Windows driver only.
- The HP driver for this printer. The Effects tab belongs to HP’s own CP1215 driver. If Windows is using a different or generic driver, the tab may be missing. See how to get the HP Color LaserJet CP1215 driver if you need to reinstall it.
- A document open in a program that can print. The driver watermark works from any program that uses the standard Windows print window.
The CP1215 is an older model, and HP’s guide was written for Windows 2000, XP, Server 2003, and Vista. The tab names in the driver are the same ones the guide describes, but the route to the driver window differs on newer versions of Windows. Both routes are covered below.
How to Add a Watermark for One Print Job
Use this method when you want a watermark on the document you are printing right now. Settings changed this way last until you close the program, so other programs and later print jobs are not affected.
- Open the document, then click File and choose Print. The Print window opens.
- Select HP Color LaserJet CP1215 as the printer.
- Click Properties or Preferences. The button name depends on the program. In Microsoft Word it is called Printer Properties. The driver window opens with a row of tabs across the top.
- Click the Effects tab.
- Click the Watermarks drop-down list and choose the watermark you want.
- To print the watermark on the first page only, check First Page Only. Leave it unchecked to print the watermark on every page.
- Click OK to close the driver window, then click Print or OK in the Print window.
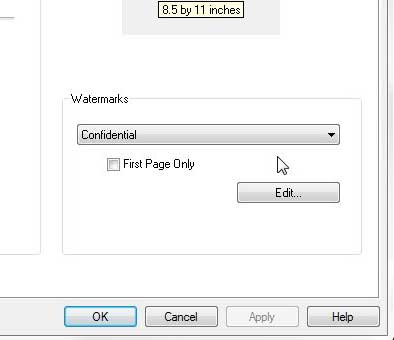
The watermark does not always appear in a program’s own print preview, because the driver adds it after the program sends the page. Print a single page first to confirm it looks the way you expect.
How to Add a Watermark to Every Print Job
If every document sent to the CP1215 should carry the same watermark, change the driver’s default settings instead. This is done from Windows, not from a program.
Warning: a watermark set this way prints on every job from every program until you turn it off. That includes documents you may not want marked, and it applies to anyone else who prints from the same Windows account. Switch it back to (none) when you are finished.
Windows 11 and Windows 10
- Open Settings.
- In Windows 11, click Bluetooth & devices, then Printers & scanners. In Windows 10, click Devices, then Printers & scanners.
- Click HP Color LaserJet CP1215. In Windows 10, click Manage next.
- Click Printing preferences. The same driver window opens.
- Click the Effects tab, choose an option from the Watermarks list, and check First Page Only if you want that.
- Click Apply, then OK.
Windows 7 and Earlier
- Click Start, then click Devices and Printers. In Windows Vista, click Start, Control Panel, then Printer. In Windows XP, look for Printers and Faxes.
- Right-click the HP Color LaserJet CP1215 icon and click Printing Preferences.
- Click the Effects tab and choose a watermark from the Watermarks list.
- Click Apply, then OK.
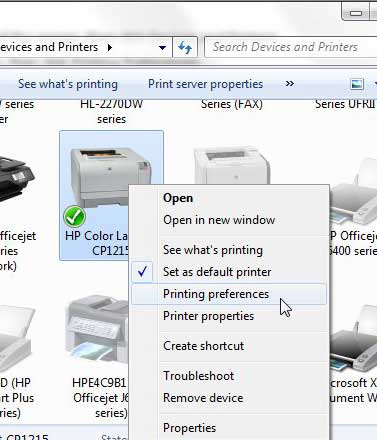
Be sure to choose Printing Preferences and not Printer Properties. Printer Properties holds device settings such as ports and sharing. It is also where you can set an available time for the CP1215, but it does not open on the Effects tab.
How to Create a Custom Watermark
The driver comes with a short list of ready-made watermarks. If none of them fits, you can make your own.
- Open the driver window using either method above and click the Effects tab.
- In the Watermarks section, click Edit. A watermark details window opens.
- Click New, then type the words you want to print.
- Adjust the angle and the font settings if you want the text to look different.
- Click OK. The new watermark is added to the Watermarks list, where you can select it.
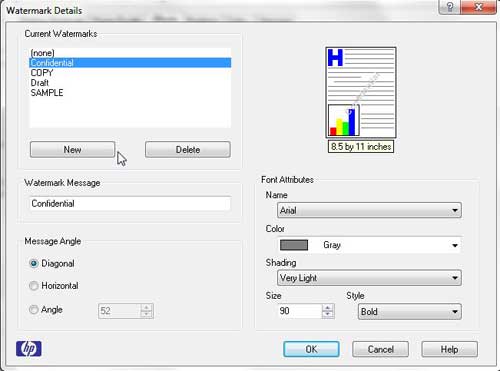
HP’s guide confirms the Edit button is how you create a new watermark, but it does not list every option in that window, so the exact fields can differ slightly by driver version. You can also select one of the existing watermarks in that window and change its settings. The options shown are for text. If you need a logo or picture behind your text, add it in the document itself, as described in the next section.
Printer Watermark or Word Watermark?
The driver watermark is not the only choice. Microsoft Word has its own watermark feature on the Design tab, under Watermark. The two behave differently, so pick the one that matches what you need.

- Use the printer driver when you want to mark paper copies without changing the file, or when the program you print from has no watermark feature.
- Use Word when the watermark should stay with the document, appear when someone else opens or prints it, or use a picture. Microsoft’s Insert a watermark in Word page shows the steps, including Custom Watermark and Picture watermark.
Use one method at a time. If a Word document already has a watermark and you also turn one on in the driver, both can print on the same page.
How to Remove the Watermark
Go back to the same place where you turned the watermark on.
- Open the driver window, either from the Print window or from Printing preferences in Windows.
- Click the Effects tab.
- In the Watermarks drop-down list, choose (none).
- Click OK.
If you set the watermark as a default in Windows, you must remove it there. Changing it in one program’s Print window only affects that program until it is closed. To clear every custom driver setting at once, you can also restore default settings on the HP Color LaserJet CP1215.
Troubleshooting
There Is No Effects Tab
The Effects tab is part of HP’s driver for this printer. If you only see a few basic tabs, Windows is probably using a different driver. Check HP’s CP1215 software and driver page to see what HP offers for your version of Windows, then reinstall the printer with that driver. HP notes that available print settings vary by printer model, driver type, and the app you print from.
There Is No Properties or Preferences Button
Some newer apps use a simplified print screen. Look for a link such as More settings at the bottom of the list. If you cannot find the driver window from the app, set the watermark from Printing preferences in Windows Settings instead, print, and then set it back to (none).
The Watermark Prints on Everything
The watermark was saved as a default. Open Printing preferences from Windows, go to the Effects tab, choose (none), and click Apply.
The Watermark Does Not Print
Confirm that the CP1215 was the selected printer when you changed the setting, and that you clicked OK in the driver window before printing. HP’s guide also explains that settings in a program’s Page Setup and Print windows take priority over driver settings, so a program can sometimes override what you chose. Try the same watermark from a different program to check.
The Watermark Is Too Dark or Covers the Text
Open Edit in the Watermarks section and try a lighter shade, a smaller size, or a different angle if your driver version offers those options. A shorter message is also easier to read through.
Frequently Asked Questions
Can the HP Color LaserJet CP1215 print a picture or logo as a watermark?
HP’s user guide describes the CP1215 watermark as a notice, such as “Confidential,” and the driver’s watermark options are for text. HP does not document a picture watermark for this driver. To print a logo behind your text, add a picture watermark in the document itself, for example with Word’s Picture watermark option.
Does the watermark get saved in my document?
No. A watermark chosen on the driver’s Effects tab is added by the printer driver during printing. The file on your computer stays the same, and the watermark will not appear if the file is emailed or printed on another printer.
Can I put the watermark on just the first page?
Yes. Check First Page Only on the Effects tab. With the box unchecked, the watermark prints on every page of the job.
Does a watermark stop people from copying my document?
No. A printed watermark is a visible label that shows a page is a draft, a copy, or confidential. It does not prevent photocopying or scanning.
Does the watermark use color toner?
That depends on the shade or color chosen for the watermark and on your color settings. If you want to save color toner, HP’s guide says the Print all Text as Black option on the Paper/Quality tab makes the printer use only the black cartridge for black text. You can also read how to change printer settings to black and white.
Where is HP’s official guide for this printer?
HP lists the HP Color LaserJet CP1210 Series User Guide as a PDF on its CP1215 setup and user guides page. The watermark steps are in the print tasks chapter. HP’s general print settings guide explains how to open the driver window from current Windows apps.
Next Step
Print one test page with the watermark you chose. If it looks right, print the full job, then return to the Effects tab and set Watermarks back to (none) so it does not carry over to documents that should not be marked.

Matthew Burleigh has been writing tech tutorials since 2008. His writing has appeared on dozens of different websites and been read hundreds of millions of times.
After receiving his Bachelor’s and Master’s degrees in Computer Science he spent several years working in IT management for small businesses. However, he now works full time writing content online and creating websites.
His main writing topics include iPhones, Microsoft Office, Google Apps, Android, and Photoshop, but he has also written about many other tech topics as well.