To set an available time for the HP Color LaserJet CP1215, open the printer’s Printer properties window in Windows, select the Advanced tab, choose Available from, pick a start time and an end time, then select Apply and OK. Documents sent outside those hours are not lost. Windows holds them in the print queue and prints them when the printer becomes available again.
The schedule is a Windows print queue setting, not something stored inside the printer. That means the steps are the same for almost any printer installed in Windows, and the setting only affects the computer where you change it.
What the Available Time Setting Does
Every printer installed in Windows has a print queue, which is the list of documents waiting to print. By default the queue is set to Always available, so a document prints as soon as it reaches the top of the list.
When you switch to Available from, the queue only releases documents during the hours you choose. Microsoft’s documentation describes it this way: if you send a document when the printer is unavailable, the document is held (spooled) until the printer becomes available. Spooling means Windows saves the print job on the computer first and passes it to the printer afterward. The same tab also holds the spooling options, which we explain in how to adjust the print spooler on the HP LaserJet P2055dn.

There are a few limits to know before you change anything:
- One window per queue. Windows stores a single start time and a single end time for each printer, so you cannot schedule a lunch break in the middle of the day.
- No warning for users. People who print outside the window can still send documents. The jobs simply wait in the queue, which can look like a printer fault.
- It is not a security lock. The schedule delays printing through this queue. It does not switch the printer off or stop someone with permission from changing the setting back.
Before You Start
- The CP1215 must already be installed on the computer and showing in the Windows printer list. If it is missing, see our guide to the HP Color LaserJet CP1215 driver first.
- You need permission to manage the printer. On a work computer that may mean an administrator account.
- Check that the clock and time zone on the computer are correct, because the schedule follows the computer’s time.
- Tell the people who use the printer about the new hours before you save the change.
How to Set an Available Time in Windows 11
- Select Start, then Settings.
- Select Bluetooth & devices, then Printers & scanners.
- Select the HP Color LaserJet CP1215 in the list. The exact name can differ slightly depending on the driver that is installed.
- Select Printer properties. A separate window opens with a row of tabs across the top. Do not choose Printing preferences, which only holds paper and quality options. That window is where you would add a watermark on the HP Color LaserJet CP1215, for example.
- Select the Advanced tab.
- Select Available from instead of Always available.
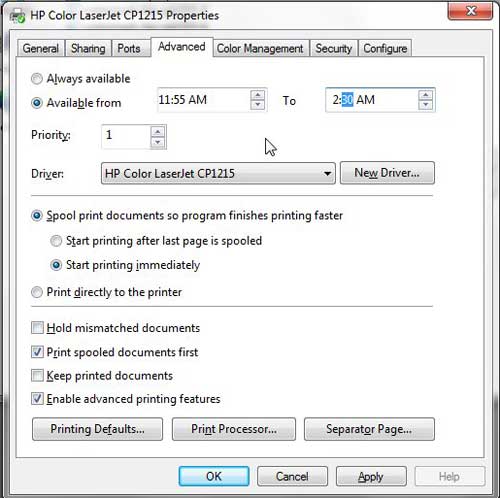
- Set the start time in the first box and the end time in the To box. The arrows move the time in steps. For a more exact time, click the hour or minute and type the number.
- Select Apply, then OK.

Microsoft lists the same Settings > Bluetooth & devices > Printers & scanners > Printer properties route in its printer sharing instructions for Windows 11 and Windows 10.
How to Set an Available Time in Windows 10
- Select Start, then Settings.
- Select Devices, then Printers & scanners.
- Select the HP Color LaserJet CP1215, then select Manage.
- Select Printer properties.
- Select the Advanced tab, choose Available from, and set the start and end times.
- Select Apply, then OK.
Older Windows Versions and the Control Panel Route
On Windows 7, and on other versions where the classic Devices and Printers window is still offered in Control Panel, the route is slightly different:
- Select Start, then Devices and Printers.
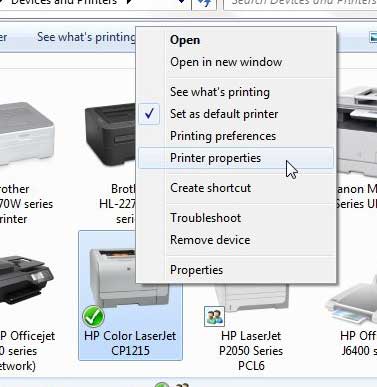
- Right-click the HP Color LaserJet CP1215 icon and select Printer properties. The menu also has a plain Properties entry, which opens a different window.
- Select the Advanced tab, choose Available from, set the two times, then select Apply and OK.
The Advanced tab looks much the same in every version. The schedule options sit at the top of the tab.
Set the Schedule From a Command Prompt
If you manage several computers, Windows 11 and Windows 10 include a script named prncnfg that can set the same schedule. Microsoft’s prncnfg reference documents two options for it:
-stsets the time of day the printer becomes available.-utsets the time of day the printer is no longer available.
Both use a 24-hour clock, so 9:00 AM is 0900 and 5:00 PM is 1700. The script is stored in the %WINdir%\System32\Printing_Admin_Scripts folder, inside a language subfolder such as en-US. You run it with cscript, add -t to configure a printer, and name the printer with -P, using quotation marks if the name contains spaces. This route is meant for administrators. For a single computer, the Advanced tab is simpler and shows the result right away.
How to Confirm It Worked
- Reopen Printer properties and the Advanced tab. Available from should still be selected, with the times you chose.
- Send a one-page test document outside the window.
- Open the print queue. In Windows 11, select the printer in Printers & scanners, then Open print queue. In Windows 10, select Open queue. The test document should be listed and waiting.
- Leave the computer and the printer on. The document should print once the start time arrives.
The held job waits in the print queue on the computer. Plan for the computer to be on and signed in as usual when the window opens, or the waiting documents may not print until it is.
How to Remove the Schedule
Go back to Printer properties, select the Advanced tab, choose Always available, then select Apply and OK. Any documents that were waiting should start printing in order.
If you only need one waiting document sooner, changing the setting back is the dependable route. If you no longer want the waiting documents at all, cancel them in the queue instead. Our guide on how to clear the printer queue in Windows 11 or 10 covers that. Cancelled jobs have to be sent again, so cancel only what you mean to discard.
Troubleshooting
The Advanced tab options are grayed out
This usually means your account does not have permission to manage the printer. Look on the General tab for a Change properties button and approve the administrator prompt if you are allowed to. On a work computer, ask your administrator to make the change.
There is no Advanced tab
You have probably opened Printing preferences or Hardware properties rather than Printer properties. Go back one step and pick Printer properties.
Documents are not printing and nothing looks wrong
Check the schedule first. A document sent outside the window stays in the queue without an error. If the time is inside the window and the queue is still stuck, the cause is something else. Our guide on getting a printer online in Windows 11 or 10 walks through paused queues and offline status.
Jobs print at the wrong time
Confirm the clock, date and time zone on the computer, then reopen the Advanced tab and check both times, including AM and PM.
Other computers ignore the schedule
The setting belongs to the print queue on one computer. If the CP1215 is shared from one PC to others on the network, set the schedule on the PC that the printer is attached to. A computer with its own separate installation of the printer keeps its own setting.
The printer still shows a warning light
The schedule does not affect toner, paper or hardware errors. Use HP’s CP1215 user guide and manuals page to look up what the lights on the printer mean.
Frequently Asked Questions
Will documents sent outside the available time be deleted?
No. Microsoft’s documentation says a document sent while the printer is unavailable is held until the printer becomes available. It stays in the print queue and prints when the window opens.
Can I set two available periods in one day?
Not on one queue. Windows keeps a single start time and a single end time per printer. Microsoft’s developer documentation describes a workaround used in offices: more than one queue can point to the same printer, each with its own hours. That takes a second installation of the printer and is best left to whoever manages the computers.
Does the available time turn the printer off?
No. It only controls when Windows sends documents from this queue. The printer’s own power and sleep behavior are separate.
Is this setting specific to the CP1215?
No. It is part of the Windows printer properties window, so the same steps apply to other printers. Only the printer name in the list changes.
Does the setting change the printer’s own settings?
No. It is saved in Windows. If you want to reset the options stored on the printer itself, see how to restore default settings on the HP Color LaserJet CP1215.
Next Step
Once the schedule is saved, send a short test document outside the window and confirm it waits in the queue. Then let everyone who uses the printer know the hours, so a waiting document is not mistaken for a broken printer.

Matthew Burleigh has been writing tech tutorials since 2008. His writing has appeared on dozens of different websites and been read hundreds of millions of times.
After receiving his Bachelor’s and Master’s degrees in Computer Science he spent several years working in IT management for small businesses. However, he now works full time writing content online and creating websites.
His main writing topics include iPhones, Microsoft Office, Google Apps, Android, and Photoshop, but he has also written about many other tech topics as well.