To insert a watermark in Word, open the Design tab, click Watermark, and pick a ready-made one such as DRAFT or CONFIDENTIAL. For your own words or a logo, choose Watermark > Custom Watermark instead.
These steps cover the Word desktop app in Microsoft 365, Word 2024, 2021, 2019 and 2016 on Windows, plus Word for Mac. Word 2013 uses the same Design tab. In Word 2010 and 2007, the Watermark button is on the Page Layout tab instead.
Before You Start
- Use the desktop app. Microsoft’s Insert a watermark article explains that Word for the web shows watermarks already in a document but can’t add or change them. In Word for the web, click Open in Word (it may sit under the Editing menu) to switch to the desktop app.
- Use Print Layout view. A watermark lives in the page header, and Draft view hides headers. Click View > Print Layout if you don’t see it.
- Know what a watermark does. It is faint text or a picture that sits behind the body text, usually on every page. It labels a document. It doesn’t lock it or stop anyone from copying it.
How to Add a Ready-Made Watermark
- Open your document in Word.
- Click the Design tab on the ribbon.
- Click Watermark in the Page Background group at the right end of the tab. A gallery of watermarks opens.
- Click the one you want, such as DRAFT, CONFIDENTIAL, DO NOT COPY, SAMPLE or URGENT.
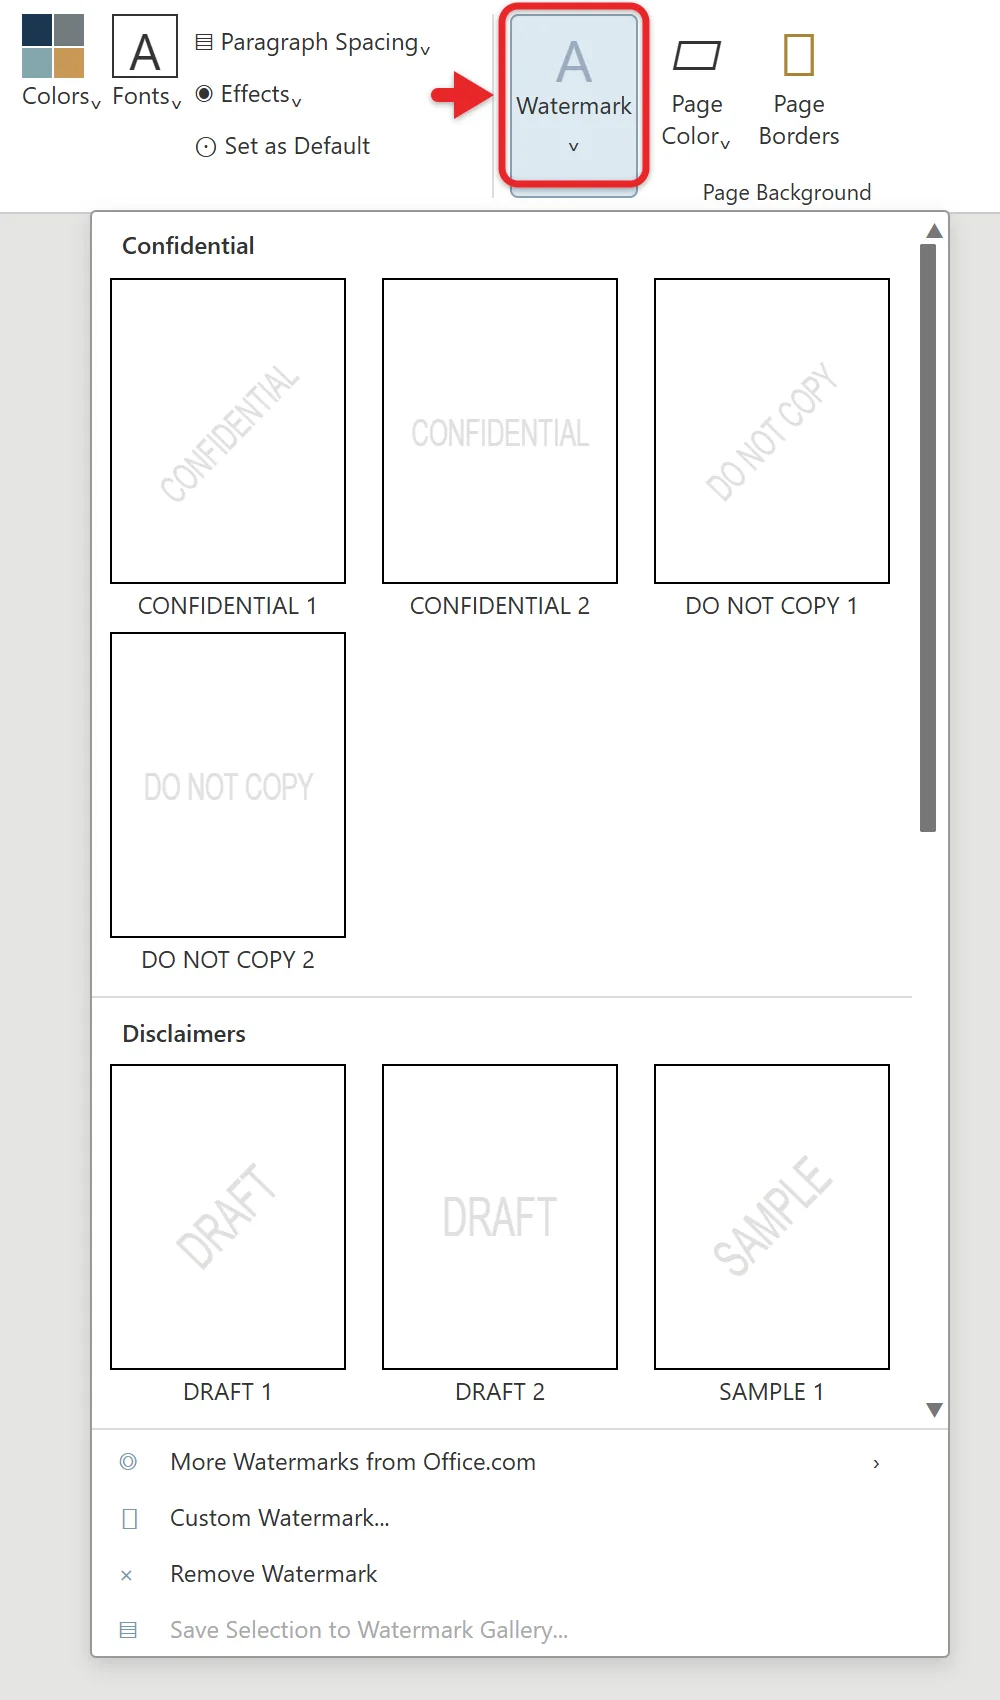
The word appears in pale gray behind your text on every page of the document. If you change your mind, pick a different one from the gallery and it replaces the first.
How to Make a Custom Text Watermark
Use this when you need your own wording, such as a client name, “Internal Use Only,” or a version number.
On Windows
- Click Design > Watermark > Custom Watermark. The Printed Watermark box opens.
- Select Text watermark.
- Type your words in the Text box, or pick one from its list.
- Choose a Font, Size and Color. Leave Size on Auto to let Word fit the text to the page.
- Keep Semitransparent checked so the text stays faint.
- Choose Diagonal or Horizontal for the layout.
- Click Apply to preview it on the page, then click OK (or Close).
Your words now appear behind the text on every page.
On a Mac
- Click Design > Watermark. On a Mac this opens the Insert Watermark box rather than a gallery.
- Select Text and type your wording, or pick one such as DRAFT from the list.
- Set the font, layout, size, colors and orientation.
- Click OK.
If the watermark doesn’t show on a Mac, Microsoft suggests View > Print Layout, which also shows how it will print.
How to Add a Logo or Picture Watermark
- Click Design > Watermark > Custom Watermark. On a Mac, click Design > Watermark.
- Select Picture watermark (Picture on a Mac).
- Click Select Picture. You can pick a file from your computer or OneDrive, or search Bing images.
- Select your image and click Insert.
- Leave Scale on Auto to fit the picture to the page, or pick a percentage such as 100% for its original size.
- Keep Washout checked so the picture fades behind the text. Clear it only if you want the image at full strength.
- Click Apply, then OK.
The picture sits centered behind the text on each page. Microsoft’s picture watermark article covers the same steps.
For the cleanest result, use a high-resolution PNG with a transparent background. A JPG works, but its white box can show once the image is washed out, and a small image looks blurry when Word scales it up to fill the page.
If you want a picture beside your paragraphs instead of behind them, learn how to wrap text around a picture in Word.
Which Watermark Type Should You Use?
| You want to | Use |
|---|---|
| Mark a file as a draft or confidential quickly | A ready-made watermark from the gallery |
| Show your own wording, such as a client or version | Custom text watermark |
| Brand pages with a company logo | Picture watermark with Washout on |
| Mark only the paper copies, not the file | Your printer’s watermark setting |
A watermark you add in Word is saved in the file, so it shows up for anyone who opens or prints it. If you only want to stamp the printed pages, some printer drivers have their own option, such as the watermark setting on the HP Color LaserJet CP1215.
How to Put a Watermark on Just One Page
- Click anywhere on the page that needs the watermark.
- Click Design > Watermark.
- Right-click the watermark you want in the gallery.
- Choose Insert at Current Document Position.
Microsoft’s one-page watermark article notes that Word places it as a text box on that page only. If the document already has a watermark on every page, remove that one first, or you will see two on the same page.
How to Move, Resize or Fade a Watermark
A watermark shows in the middle of the page, but Word stores it in the header. That’s why you can’t click it while you’re typing in the body.
- Double-click near the top of the page to open the header.
- Point at the watermark until the pointer turns into a four-headed arrow, then click it.
- Drag it to a new spot, or drag a corner handle to resize it.
- Double-click the body of the page, or click Close Header and Footer, to get back to your text.
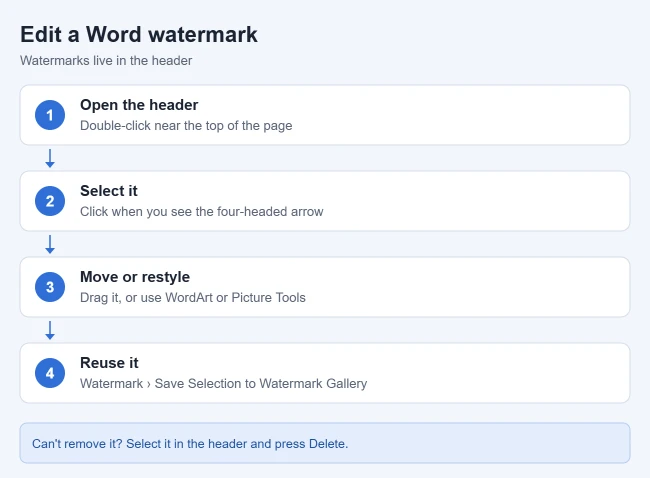
To make it lighter or darker on Windows, select it while the header is open:
- Text watermark: on the Shape Format tab (WordArt Tools > Format in older versions), click Shape Fill, then More Fill Colors, and drag the Transparency slider.
- Picture watermark: on the Picture Format tab, use Color to recolor it or Corrections to change brightness and contrast.
The quicker fix is often to reopen Custom Watermark and turn Semitransparent or Washout on or off. Microsoft’s washout article lists the same controls.
If you want a visible title or logo instead of a faint mark, learn how to repeat text at the top of every page with a header.
How to Save a Custom Watermark for Other Documents
- Double-click near the top of the page to open the header.
- Click the watermark to select it.
- Click Design > Watermark > Save Selection to Watermark Gallery.
- Type a name and click OK.
Your watermark now appears under General in the Watermark gallery, ready for any document. See Microsoft’s custom watermark article.
How to Remove a Watermark
Click Design > Watermark > Remove Watermark. On a Mac, choose No watermark in the Insert Watermark box and click OK. If it stays, Microsoft’s removal article says to open the header, select the watermark and press Delete, repeating for any others. For more fixes, read about removing a watermark in Word.
Troubleshooting
- No Design tab: in Word 2010 and 2007, look on Page Layout. If the ribbon shows only tab names, click Design to open it.
- Watermark doesn’t show: switch to View > Print Layout. Draft and Web Layout views don’t show headers, so they hide the watermark too.
- You can’t find a way to add one online: Word for the web can’t add watermarks. Use Open in Word.
- Watermark is on some pages but not others: the document probably has sections with separate headers, or a different first page. Open the header on a page without it and look at the Header & Footer tab. If Different First Page is checked or Link to Previous is off, that page has its own header, so click on it and add the watermark there too.
- Can’t select it: open the header first, then point exactly at the watermark until the four-headed arrow appears.
- The logo won’t go away with Remove Watermark: someone may have pasted it into the header as an ordinary picture. Open the header, click the picture and press Delete.
Frequently Asked Questions
Will the watermark print?
Yes. A Word watermark prints with the page. Check File > Print before printing to see how faint it looks, since it can look lighter on paper than on screen.
Does a watermark stop people from copying my document?
No. It is a visible label. Anyone with an editable copy can remove it in a few clicks. Send a PDF or restrict editing if you need more control.
Can I add a watermark in Word for the web?
No. Word for the web shows existing watermarks, but you need the desktop app to add, change or remove one.
Can I use a picture and text together?
Not with one watermark. Word lets you pick either a picture or text. To get both, use a logo image that already includes the words.
Next, if your watermark needs to change for a final version, swap it for a new one from the same gallery so you don’t end up with two.

Matthew Burleigh is the founder, head writer, and editor of Solve Your Tech, which he launched in 2012. He has written technology tutorials since 2008 and worked in IT since 2003, including small-business support, IT management, and consulting. He holds Bachelor’s and Master’s degrees in Computer Science from Arizona State University.
Matthew writes practical guides for Windows, iPhone and iPad, Microsoft Office, Outlook, Google apps, and Android. Solve Your Tech’s guides are checked step by step against the device or app maker’s own documentation and tested on his own devices whenever he has the hardware or software, with clear steps, sources, and update dates.
Read more about Matthew and how Solve Your Tech writes and updates its guides, or report a correction.