Document watermarks provide a simple way to visually identify a document without reading it.
This is beneficial if your workspace contains a lot of different documents and you are looking for a specific one. It can also help to identify documents that are not final copies, or that should not be used outside of your company or institution.
Word 2013 has a feature that makes it simple to add watermarks to a document, and even includes a number of popular default choices.
But you can customize your document watermark and make it say anything that you want. So check out our tutorial below to learn how to add a watermark to your Word document.
Have you tried out the Read Aloud feature in Word? Our how to change Word read aloud voice guide can show you where to find it and how to customize it.
Making a Watermark in Word 2013
The steps below will teach you how to create a text watermark on a document using the Microsoft Word 2013 application.
We will be creating a custom watermark that says “For Internal Use Only” and is light gray in color.
There are some default options available that can be entered more quickly, however, and you can check the sample watermarks to see if one of those options is more suitable for your needs. You can also insert a picture as a watermark by following the steps in this article.
Step 1: Open your document in Microsoft Word 2013.
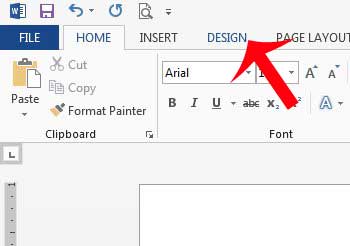
Step 2: Click the Design tab at the top of the window.
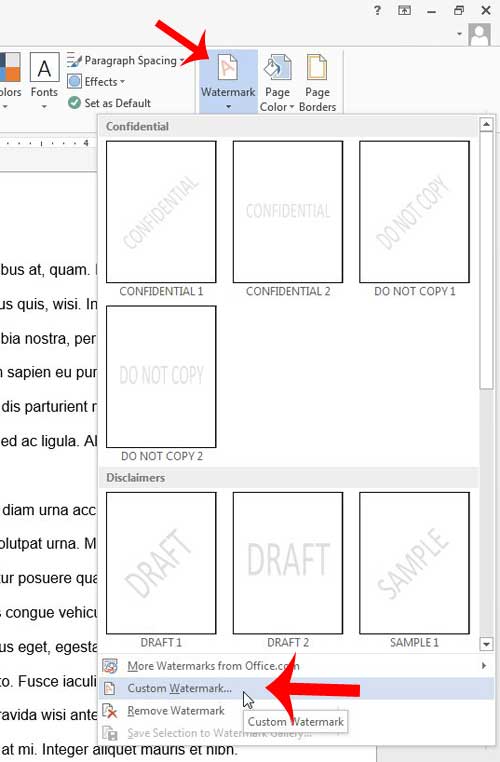
Step 3: Click the Watermark button in the Page Background section of the ribbon, then click the Custom Watermark option at the bottom of the menu. There are some default options available that you can select by simply clicking them on this menu, but we will continue further by creating our own.
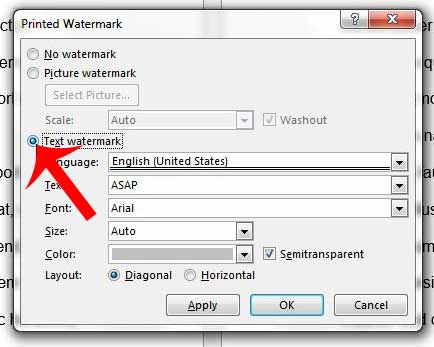
Step 4: Click the Text watermark button at the left side of the window.
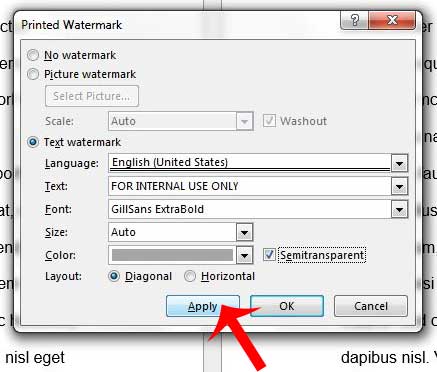
Step 5: Click inside the Text field, delete the current text, and enter the text that you want to use for your watermark. We will be using “FOR INTERNAL USE ONLY” in this example.
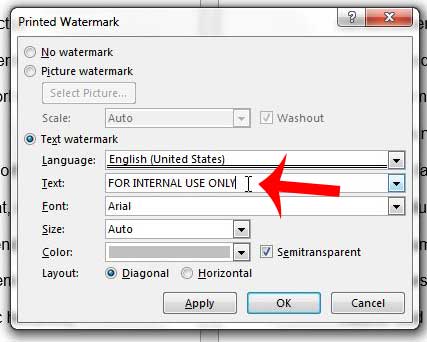
Step 6: Change the font, size, color and layout options as needed, then click the Apply button to add it to the document. Note that you may want to uncheck the Semitransparent box if you find that the watermark is too difficult to read. You can then click the Close button to close this window.
Do you have a document with text that you cannot match to the rest of your document? Learn how to clear formatting in Word 2013 with the click of a button.

Matthew Burleigh has been writing tech tutorials since 2008. His writing has appeared on dozens of different websites and been read over 50 million times.
After receiving his Bachelor’s and Master’s degrees in Computer Science he spent several years working in IT management for small businesses. However, he now works full time writing content online and creating websites.
His main writing topics include iPhones, Microsoft Office, Google Apps, Android, and Photoshop, but he has also written about many other tech topics as well.