The page margins in a Microsoft Word document often need to be set or changed depending on your school or organization’s requirements.
Fortunately, this is one of the more commonly-changed settings in Word documents, so Microsoft has made it something fairly simple to adjust.
Our guide continues below with a tutorial on how to set margins in Word 2010, as well as some additional information that you might want to know about document formatting.
How to Change Page Margins in Microsoft Word 2010
- Open your document in Word 2010.
- Select the Page Layout tab.
- Click the Margins button.
- Choose the desired page margin setting.
Our article continues below with additional information on how to set margins in Word 2010, including pictures of these steps.
Learning how to change page margins in Word 2010 is important for anyone that is unable to work with the default settings for that property. Unlike adjusting text formatting options, such as using all small caps in Word, there are a variety of documents that apply to your document’s layout.
If you have ever written a paper for a high school or college teacher, then you know just how rigid many of them can be when it comes to page layout. Their restrictions typically involve preferred settings for title pages and bibliographies but can also extend to involve the formatting of each page.
Among the page formatting options that many audiences will demand is a specific margin. While their reasoning for keeping margins standard typically involves preventing students from needlessly extending page counts, proper margins can also help in keeping a paper more visually appealing.
Outside of a scholastic setting, however, page margins are also helpful for fitting as much information as possible on one page. This is especially beneficial in situations where a lot can be gained by minimizing the page count of a document, such as when you are creating a resume. You can freely change the margins of your Word 2010 document at any time until you find a setting that you prefer.
If you need to switch the unit of measurement, then check out our guide on how to set 1 inch margins in CM in Microsoft Word.
How to Set Page Margins in Microsoft Word 2010 (Guide with Pictures)
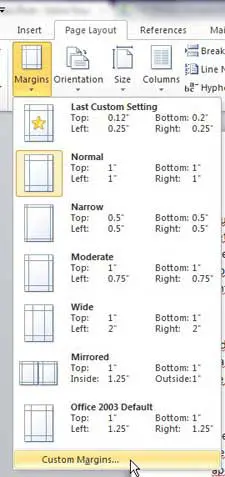
Word 2010 includes several different options for simplifying the setting of your page margins. The default setting is called Normal and features a 1-inch margin on each side of the page.
There are also preset options to make the margins smaller or larger and, in most cases, one of these options will be suitable for your needs. However, there is also the option to set custom margins, which can allow you to customize the document as much as necessary.
Step 1: Begin changing your page margins in Microsoft Word 2010 by double-clicking your document file to open it in Word.
Step 2: Once the document is open, click the Page Layout tab at the top of the window.
At the top of this view is a horizontal bar, called the ribbon, that features most of the options that you will need to modify the layout of your page.
Step 3: Click the Margins drop-down menu in the Page Setup section of the ribbon, then choose the margin option that suits your needs.
If none of the presets offer an option that you prefer, click the Custom Margins option at the bottom of the menu.
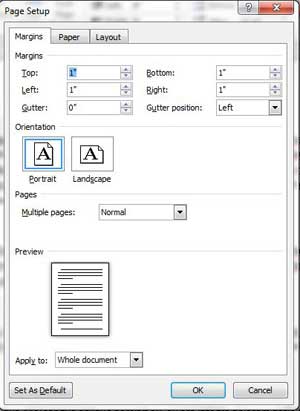
Step 4: Verify that the Margins tab at the top of the window is selected, then enter your custom margin settings into the fields at the top of the window.
Note that if you choose a small margin setting (generally anything less than .5 inches) you may receive a warning when you go to print the document that there is a problem with the margins being outside of the print area. Some printers may still be able to print anyway but if your document does not print correctly, you may need to increase the margin size.
After you have entered margin settings on this menu, click the OK button at the bottom of the window to apply the settings to your document.
Now that you know how to set margins in Word 2010, you will be able to return to this menu and make adjustments when you have a document with incorrect margin settings.
If you decide later that you do not like the layout of your pages with the current margin settings, you can return to this menu to change them.
Note that changing margin settings can affect the page count of your document, as reducing or increasing the margin size will increase or decrease the amount of text that can fit on each page.
Summary – How to Change Word 2010 Document Margins
- Click the Page Layout tab.
- Click the Margins button in the Page Setup section of the ribbon.
- Click your desired margin setting, or click Custom Margins to create your own.
The assorted margin settings available by default provide most of the options needed to set margins or change margins in Word 2010 and comply with common formatting requirements.
But if your situation requires margin settings that can only be set via the Custom Margins menu, then you might want to consider using the Set as Default button at the bottom-left of the Custom Margins menu.
Not only will this make new documents use the margins that you require, it can also help you avoid potential penalties in the future if you accidentally forgot to adjust your margins.
Do you need to change your page orientation a lot, and you are looking for a way to stop? Learn how to set landscape as default in Word 2010 so that every new document you create has the long edge of the paper at the top.

Matthew Burleigh has been writing tech tutorials since 2008. His writing has appeared on dozens of different websites and been read over 50 million times.
After receiving his Bachelor’s and Master’s degrees in Computer Science he spent several years working in IT management for small businesses. However, he now works full time writing content online and creating websites.
His main writing topics include iPhones, Microsoft Office, Google Apps, Android, and Photoshop, but he has also written about many other tech topics as well.


