iPhone pictures usually look blurry in texts for one of three reasons: Send Low Quality Photo Previews is on, Low Data Mode is on, or the photo went out as an SMS/MMS message (green bubble) instead of iMessage or RCS. Fix the first two in Settings, then check which kind of message the conversation uses.
These steps are for the Messages app on iPhone with iOS 27, and they also match iOS 26 and iOS 18, where Messages settings live under Settings > Apps. On iOS 17 and earlier, open Settings > Messages directly, and look for Low Quality Image Mode, the older name for the photo quality setting.
First, Find Out Where the Blur Starts
Open the photo in the Photos app on your iPhone and zoom in. If it looks sharp there, the problem happens when it’s sent, and the fixes below apply. If it’s already blurry in Photos, sending isn’t the cause. Wipe the camera lens with a soft cloth, tap your subject on the screen to focus before you take the next shot, and hold the phone steady. If the camera won’t take a photo at all, see what to do when your iPhone won’t take pictures.
You can also check the file itself. Open the photo and swipe up (or tap the Info button) to see its size in megapixels and pixels. A screenshot, a photo saved from social media, or a shot taken at heavy digital zoom has less detail to begin with, and no Messages setting can add it back.
1. Turn Off Send Low Quality Photo Previews
Apple says this setting sends a smaller preview first so the other person gets it right away, before the full-resolution photo arrives. When Low Data Mode is on, only the preview is sent.
The setting exists to save data; here is how to see how much data Messages uses on your iPhone.
- Open Settings.
- Tap Apps, then Messages.
- Scroll down and turn off Send Low Quality Photo Previews. On iOS 17 and earlier, turn off Low Quality Image Mode instead.
Your iPhone sends the full-resolution photo instead of a preview first.

2. Turn Off Low Data Mode
Low Data Mode restricts background network use, and you can turn it on separately for Wi-Fi and cellular. Check both:
- Wi-Fi: Go to Settings > Wi-Fi, tap the Info button next to your network, and turn off Low Data Mode.
- Cellular (LTE/4G): Go to Settings > Cellular > Cellular Data Options and turn off Low Data Mode.
- Cellular (5G): Go to Settings > Cellular > Cellular Data Options > Data Mode and choose Standard instead of Low Data Mode.
- Dual SIM: Go to Settings > Cellular, tap a number, and turn off Low Data Mode.
Messages can send full photos again. The exact Low Data Mode settings can vary by carrier.
On an iPad, the Wi-Fi Low Data Mode switch is in the same place: Settings > Wi-Fi, tap the Info button next to your network, and turn it off.
Low Power Mode is a separate setting. Apple’s list of what it limits doesn’t mention Messages photo quality, but it does temporarily pause iCloud Photos. If you use Optimize iPhone Storage (see section 5), turn off Low Power Mode while you send. Here is how to turn Low Power Mode on or off.
3. Check for Green Bubbles
The bubble color tells you how the message was sent. iMessage (blue bubbles) and RCS (green bubbles) can both send high resolution photos. SMS/MMS messages also appear green. Your carrier may set size limits for attachments, and your iPhone may compress photos when necessary.
To learn why a conversation turns green, read about what blue and green texts mean on iPhone.
- Texting another iPhone? Make sure iMessage is on in Settings > Apps > Messages.
- Texting an Android phone? Turn on RCS in Settings > Apps > Messages > RCS Messaging. You need iOS 18 or later and a carrier that supports RCS. If the setting doesn’t appear, RCS might not be available. See Apple’s RCS article.

RCS only works when the other person’s phone and carrier support it too. If their messages still arrive as SMS/MMS, your photos stay limited by the carrier’s MMS size cap. Group texts that include an Android user follow the same rule: if the group falls back to MMS, every photo in it can look soft. If pictures won’t go through at all, the fix for “MMS Messaging needs to be enabled” may help.
4. Give It a Moment
If previews are on, the other person may see the smaller version first, with the full-resolution photo arriving after. On a slow connection, wait a bit and tap the photo again. The same goes for the person receiving: ask them to open the photo and give it a few seconds before judging it, since what they see in the conversation may still be the preview.
5. Check iCloud Photos Optimized Storage
If iCloud Photos is on with Optimize iPhone Storage, your iPhone keeps smaller versions of many photos and downloads the full-size original from iCloud when you open or share one. On a slow connection, that download can take a while. Open the photo in Photos and wait until it looks sharp before you send it. If you have the space, go to Settings > [your name] > iCloud > Photos and choose Download and Keep Originals.
To find where that choice sits in iOS 27, read about turning iCloud Photos on or off on iPhone.
If only the background looks blurry while the subject is sharp, the photo was probably taken in Portrait mode. You can remove the Portrait effect in Photos before you send it.
6. Restart and Reset Network Settings
If every setting above is right and photos still arrive blurry, restart your iPhone and send the photo again. A restart clears temporary connection problems.
If that doesn’t help, reset the network settings. This erases saved Wi-Fi networks and passwords, cellular settings, and VPN settings, so have your Wi-Fi password ready.
- Open Settings and tap General.
- Tap Transfer or Reset iPhone, then Reset.
- Tap Reset Network Settings and enter your passcode.
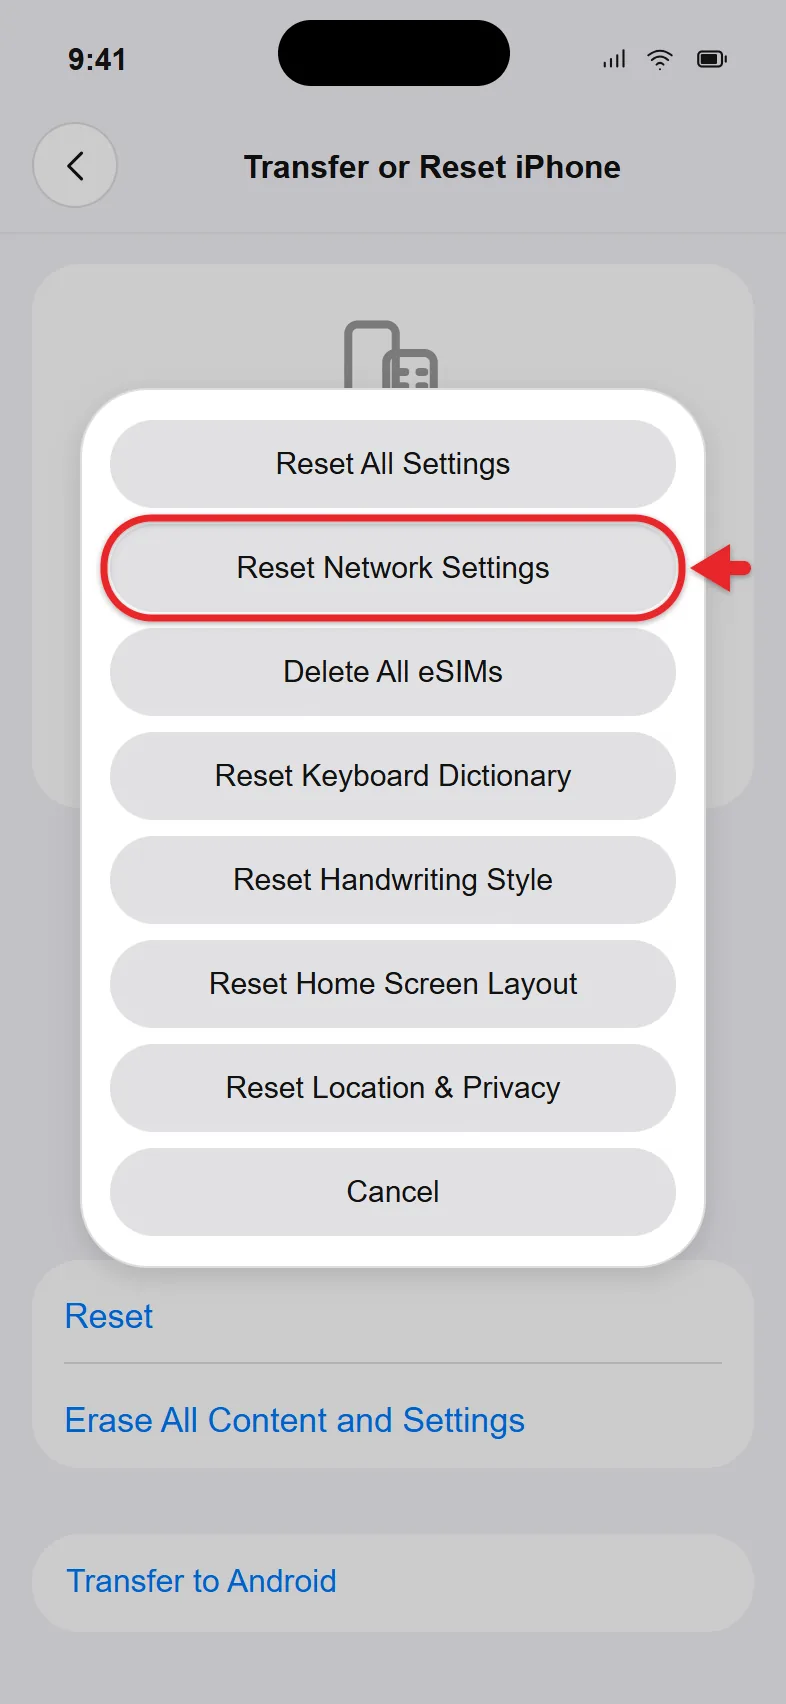
Your iPhone restarts. Reconnect to Wi-Fi and send a test photo.
Other Ways to Send a Full-Quality Photo
When a text keeps shrinking a photo that matters, such as a document scan or a print you’re ordering, use a method that doesn’t go through MMS:
- AirDrop: for a nearby iPhone, iPad or Mac. Open the photo, tap the Share button, tap AirDrop, and pick the device. It doesn’t use your carrier, so MMS limits don’t apply.
- iCloud link: with iCloud Photos on, tap Share in Photos and choose the iCloud link option (on some versions it’s under Options). The other person opens the link in a browser. iCloud links expire after 30 days.
- Email: attach the photo in Mail. Email services have their own attachment size limits.
How to Send a Photo in Messages
- Open a conversation in Messages.
- Tap the Add button, then tap Photos.
- Tap the photos you want to send.
- Tap Done, add a comment if you like, then tap the Send button.
The photo sends as iMessage, RCS or SMS/MMS, depending on the conversation. To crop or adjust it first, tap the image in the message bubble, then tap Edit. iMessage uses cellular data when Wi-Fi isn’t available, so data rates might apply.
If you send the wrong photo, here is how to delete a picture message from an iPhone.
Blurry Picture Questions
Why are only some of my photos blurry?
Check the bubble color for that conversation. Photos to people you text over SMS/MMS can be limited by your carrier, while iMessage and RCS conversations can send high resolution photos.
Does Low Data Mode affect anything else?
Yes. It turns off Background App Refresh, reduces streaming quality, pauses automatic downloads and backups, and pauses iCloud Photos updates. You can also turn Background App Refresh on or off on its own.
Why do photos look sharp on my iPhone but blurry on theirs?
Your iPhone shows the original file, while the other person gets whatever version was sent. That’s usually a preview or an MMS copy. Turn off the preview setting, check for Low Data Mode, and see whether the conversation is green.
Can I fix a blurry photo after it’s been sent?
No. The person keeps the copy they received. Fix the setting, then send the photo again, or share it with AirDrop or an iCloud link.
Related: how to turn on iMessage, how to free up storage on iPhone, and how to share contacts on iPhone.

Matthew Burleigh is the founder, head writer, and editor of Solve Your Tech, which he launched in 2012. He has written technology tutorials since 2008 and worked in IT since 2003, including small-business support, IT management, and consulting. He holds Bachelor’s and Master’s degrees in Computer Science from Arizona State University.
Matthew writes practical guides for Windows, iPhone and iPad, Microsoft Office, Outlook, Google apps, and Android. Solve Your Tech’s guides are checked step by step against the device or app maker’s own documentation and tested on his own devices whenever he has the hardware or software, with clear steps, sources, and update dates.
Read more about Matthew and how Solve Your Tech writes and updates its guides, or report a correction.