To print 4 slides per page in Google Slides, click File > Print preview, open the layout menu in the preview toolbar (it says 1 slide without notes), and choose Handout – 4 slides per page. Then click Print. You can also click File > Print and set Pages per sheet to 4 under More settings.
This guide is for Google Slides in a web browser on a computer. Google’s Print a file help page calls the preview command Print settings and preview, while the File menu in Slides shows it as Print preview. Both names open the same screen.
What you need before you start
- A computer with a browser. Google’s printing instructions are written for Chrome, with a separate route for Firefox and Safari.
- A presentation you can open in Google Slides. You do not need edit access to print it, as long as the owner has not turned off printing for viewers.
- A printer that your computer can already print to, or no printer at all if you only want a PDF.
A handout is a printed page that shows several small slides instead of one large one. Printing a handout does not change your presentation. It only changes how the slides are arranged on paper.
How to print 4 slides per page with a handout layout
This is the shortest reliable route, because the layout is set inside Google Slides and does not depend on your printer.
- Open the presentation in Google Slides.
- Click File at the top left, then click Print preview. The editor is replaced by a preview with its own toolbar.
- Click the layout menu at the left of that toolbar. By default it reads 1 slide without notes.
- Choose Handout – 4 slides per page. The preview redraws with four slides on each page. The same menu has other handout layouts with more or fewer slides.
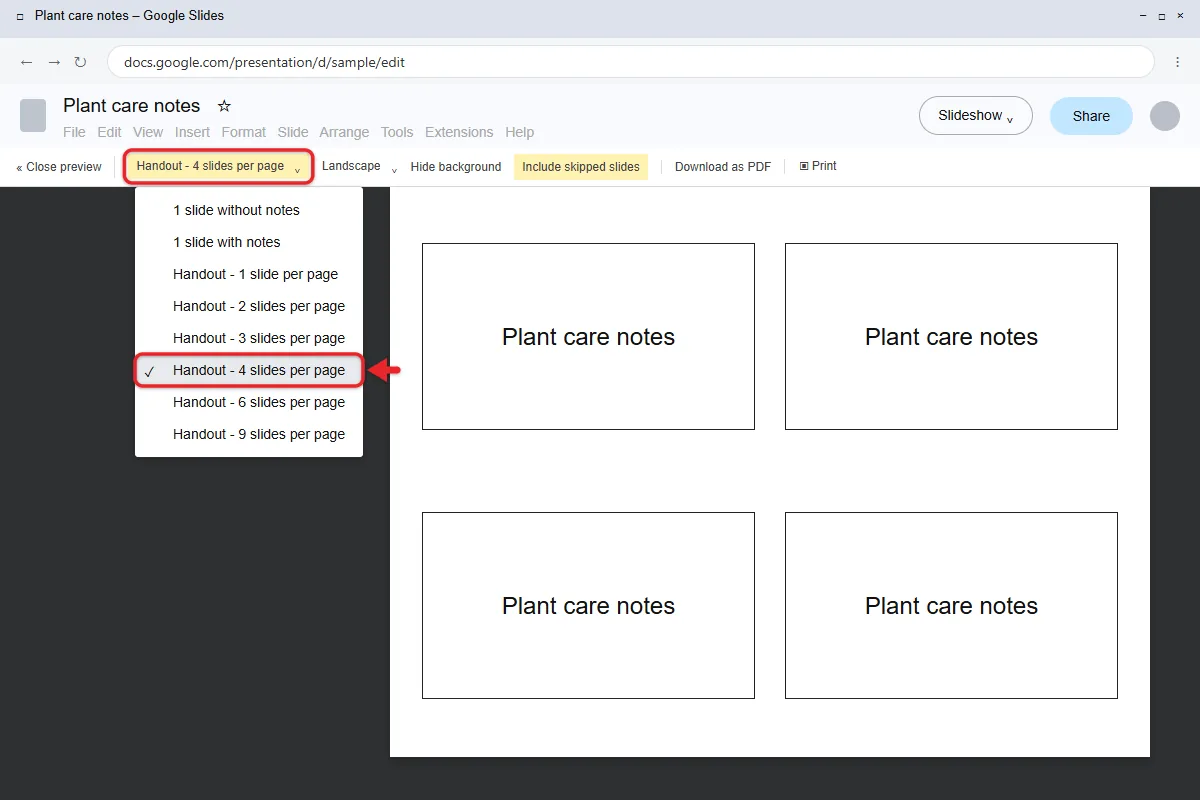
- Pick Portrait or Landscape in the orientation menu next to it. Landscape gives each slide a little more width, so try it first if the text looks cramped.
- Scroll through the preview and check that the text on each slide is still readable.
- Click Print in the toolbar. In the window that opens, choose your printer and settings, then click Print again.

To leave without printing, close the preview from its toolbar. Your slides go back to the normal editing view.
Another way: set Pages per sheet in the print window
Chrome’s own print window can also place several pages on one sheet. This is a quick option when you are already in the print window. It is also suggested in the Google Docs Editors Community.
- Click File > Print, or press Ctrl + P (Command + P on a Mac). Google lists both shortcuts on its Print from Chrome page.
- In the print window, choose your printer.
- Expand More settings.
- Set Pages per sheet to 4.
- Look at the preview. If the slides look small or cut off, change the Scale setting in the same section. Fit to printable area is the safest choice. A custom scale above 100 can push slides past the edge of the paper without any warning.
- Click Print.

Which method should you use?
Use the handout layout when you want the same result on any printer, or when you want a PDF of the handout. Use Pages per sheet when you are already in the print window and only need a quick paper copy.
Pick one method, not both. If you choose a 4-slide handout and also set Pages per sheet to 4, the print window shrinks four handout pages onto one sheet, and each slide ends up far too small to read.

Other options in the print preview
The preview toolbar has a few more controls that matter for handouts.
- Hide background: prints the slides without their background, which saves ink on dark or colorful themes. Text and pictures on the slide still print.
- Include skipped slides: turn this off to leave out slides you have skipped. To skip one, right-click it in the list at the left and click Skip Slide, as described on Google’s Add, delete & organize slides page. Click Skip Slide again to bring it back.
- 1 slide with notes: prints one slide per page with your speaker notes. This layout is meant for printing notes. It is separate from the handout layouts, so you cannot combine notes with a 4-slide handout in this menu.
- Download as PDF: saves the handout as a PDF file instead of sending it to a printer.
If you only need an ordinary one-slide-per-page PDF, convert Google Slides to PDF instead.
Print only part of the handout
The print window’s Pages setting counts printed pages, not slides. With a 4-slide handout, page 1 holds slides 1 to 4, page 2 holds slides 5 to 8, and so on. To print slides 5 through 12, choose Custom under Pages and type 2-3.
Divide the slide number by 4 and round up to find its page. Slide 10, for example, is on page 3. If you skip slides and turn off Include skipped slides, the remaining slides move up, so check the preview before you type page numbers.
Make 4 slides per page easier to read
Each slide prints at roughly a quarter of its normal size, so small text can become hard to read.
- Scroll the preview and zoom in on your busiest slide. If you have to squint on screen, it will be worse on paper.
- Print one page as a test before you print copies for a whole room.
- Turn on Hide background for dark themes. Light text on a dark background is often the first thing to blur.
- If a few slides carry dense tables or long lists, consider a handout layout with fewer slides per page for that printout.
Printing from Firefox or Safari
When you click File > Print in Firefox or Safari, a PDF file downloads automatically instead of a print window opening. Open that file, go to File > Print in your PDF viewer, choose your settings, and click Print.
To get four slides per page this way, choose the 4-slide handout in Print preview first and click Download as PDF, so the PDF already has the layout you want.
How to confirm it worked and how to undo it
Before you click the final Print button, look at the preview. Each page should show four slides, so a 20-slide presentation should come to 5 pages. If every page still shows one large slide, the layout was not applied.
There is nothing to undo in the presentation itself. Close the preview, and if you used the second method, check that Pages per sheet is back at 1 the next time you print.
Troubleshooting
- You do not see the layout menu: you probably clicked File > Print. The handout layouts are only in File > Print preview.
- Slides are too small to read: switch between portrait and landscape, or pick a handout layout with fewer slides. Also check that Pages per sheet is set to 1 when you use a handout layout.
- Slides are cut off at the edges: in the print window, open More settings and set Scale to Fit to printable area, and make sure the paper size matches the paper in the printer.
- Pages per sheet is missing: that setting belongs to the browser’s print window, not to Google Slides. If your browser or printer software does not offer it, use the handout layout instead.
- Print is grayed out or missing: the owner may have turned off printing for people who can only view or comment. Ask the owner for edit access or for a printed copy.
- The wrong slides printed: the Pages box counts handout pages, not slides. See the page math above.
- Dark slides use too much ink: turn on Hide background, or choose black and white printing in the print window if your printer offers it.
For a lighter look on screen and on paper, you can change the background in Google Slides to a pale color.
Frequently asked questions
Can I print 4 slides per page from my phone?
Google’s instructions for the Slides app on Android, iPhone, and iPad only cover tapping More > Share & export > Print and choosing a printer. They do not mention handout layouts, so set up a 4-slide handout on a computer, or download it there as a PDF and print that file from your phone. Printing from a phone works the same way as printing from Google Docs on iPhone or Android.
Can I save the 4-slide handout as a PDF?
Yes. In Print preview, choose the handout layout and click Download as PDF instead of Print. You can then email the file or print it later from any PDF viewer.
Can I print only some of the slides?
Yes. Skip the slides you do not want and turn off Include skipped slides in the preview toolbar, or type a page range under Pages in the print window.
Does printing a handout change my presentation?
No. The layout you pick in Print preview only affects the printout or PDF. Your slides, their size, and their order stay the same.
Next step
Once the handout looks right, you may want to tidy up the presentation itself. You can add and organize slides in Google Slides or change layer order in Google Slides.
Handouts pair well with a live talk. When you are ready to stand up, here is how to present a Google Slides presentation.

Matthew Burleigh is the founder, head writer, and editor of Solve Your Tech, which he launched in 2012. He has written technology tutorials since 2008 and worked in IT since 2003, including small-business support, IT management, and consulting. He holds Bachelor’s and Master’s degrees in Computer Science from Arizona State University.
Matthew writes practical guides for Windows, iPhone and iPad, Microsoft Office, Outlook, Google apps, and Android. Solve Your Tech’s guides are checked step by step against the device or app maker’s own documentation and tested on his own devices whenever he has the hardware or software, with clear steps, sources, and update dates.
Read more about Matthew and how Solve Your Tech writes and updates its guides, or report a correction.