To crop a picture in Google Slides, click the image, click the Crop button in the toolbar, drag the blue squares around the border to trim the edges, and press Enter. The same toolbar and the Format options panel let you mask the picture into a shape, add a border, recolor it, change its opacity and brightness, and reset it to the original. For a document instead of a presentation, follow the steps to insert and crop pictures in Google Docs.
These steps follow Google’s Crop & adjust images help article. They work in Google Slides in any web browser on a computer, with a section for the Slides app on phones and tablets.
Before You Start
- You need edit access. If the presentation was shared with you as a viewer or commenter, the image toolbar does not appear. Ask the owner for edit access or make a copy with File > Make a copy.
- Add the picture first. Click Insert > Image and choose a source, such as Upload from computer, Drive, Photos, By URL, or Camera. You can also drag an image file from your computer onto the slide.
- Crop and mask are different tools. Cropping trims the straight edges of a picture. Masking fits the picture inside a shape, such as a circle or arrow. You can use both on the same image.
How to Crop a Picture in Google Slides
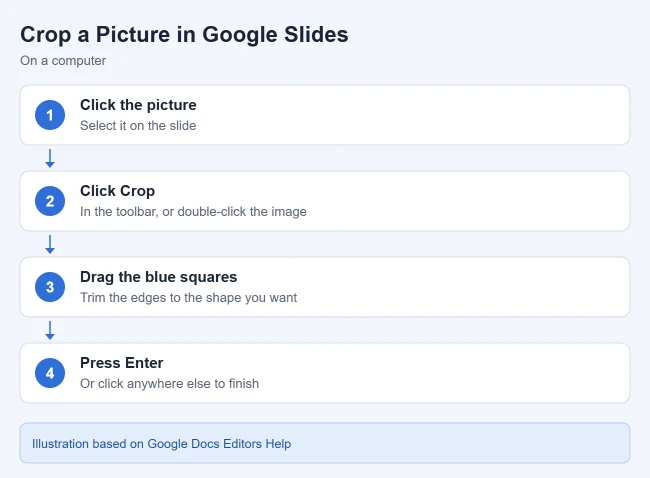
- Open your presentation and click the picture you want to crop.
- Click Crop in the toolbar. You can also double-click the image. Crop handles appear around the border.
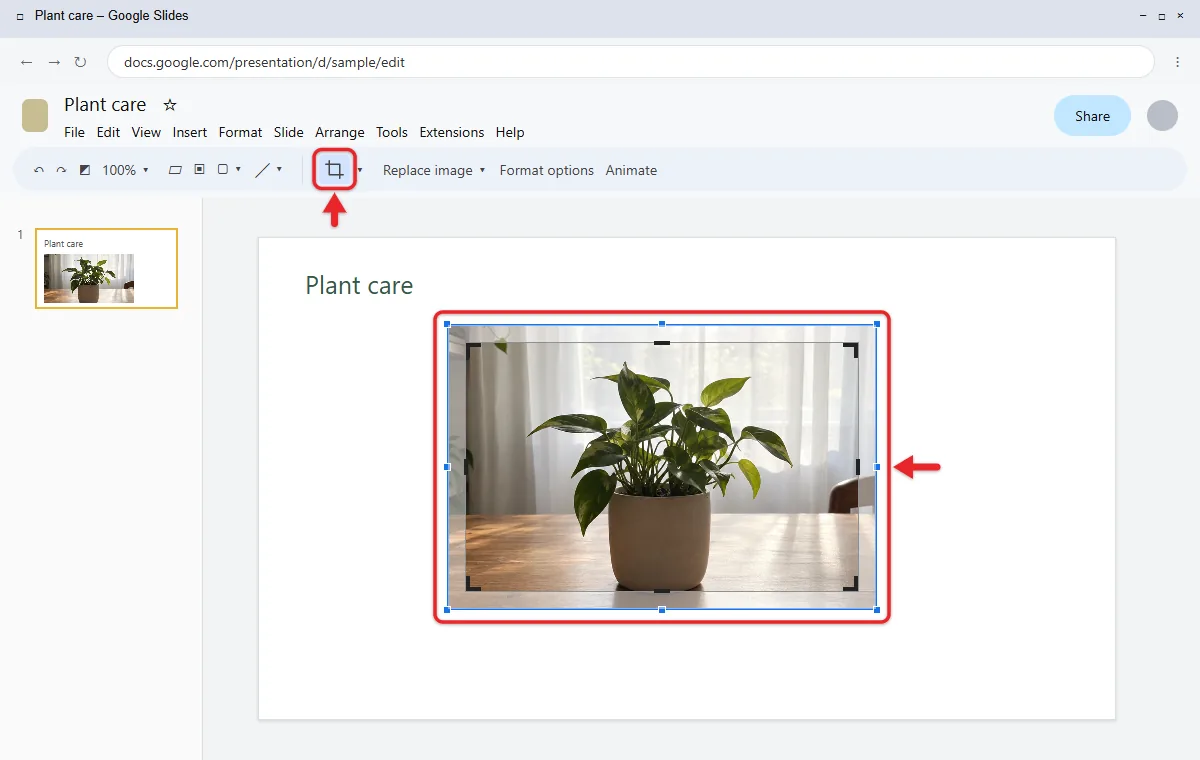
- Drag the blue squares around the border inward to trim the edges you do not want. A side handle trims one edge; a corner handle trims two edges at once.
- To change which part of the picture shows inside the crop frame, drag the picture itself while you are still in crop mode.
- Press Enter, click Crop again, or click anywhere else on the slide. Only the cropped area shows.
Cropping hides the trimmed parts instead of deleting them. To bring them back, select the picture, click Crop again, and drag the handles outward. To undo a crop you just made, press Ctrl + Z (Cmd + Z on a Mac).
Crop to an exact size
Slides has no box for typing crop measurements. To get a picture to a precise size, crop it by eye first, then click Format > Format options, open Size & Rotation, and type the width and height. Check Lock aspect ratio so the picture does not stretch. Text boxes use the same panel, so you can also resize a text box to an exact size in Google Slides.
How to Crop a Picture Into a Shape (Mask)
Google calls this masking. It is the closest thing Slides has to a freehand crop, since there is no tool for drawing your own crop outline.
- Click the image.
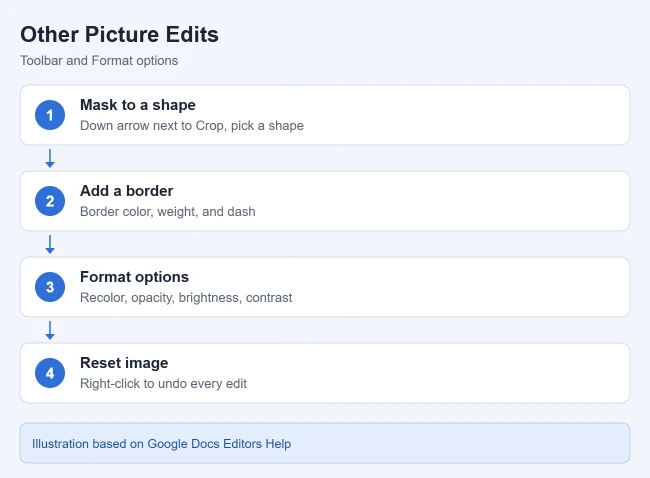
- Click the down arrow next to Crop.
- Point to Shapes, Arrows, Callouts, or Equation and pick a shape, such as an oval, rounded rectangle, star, or arrow. The picture now shows only inside that shape.
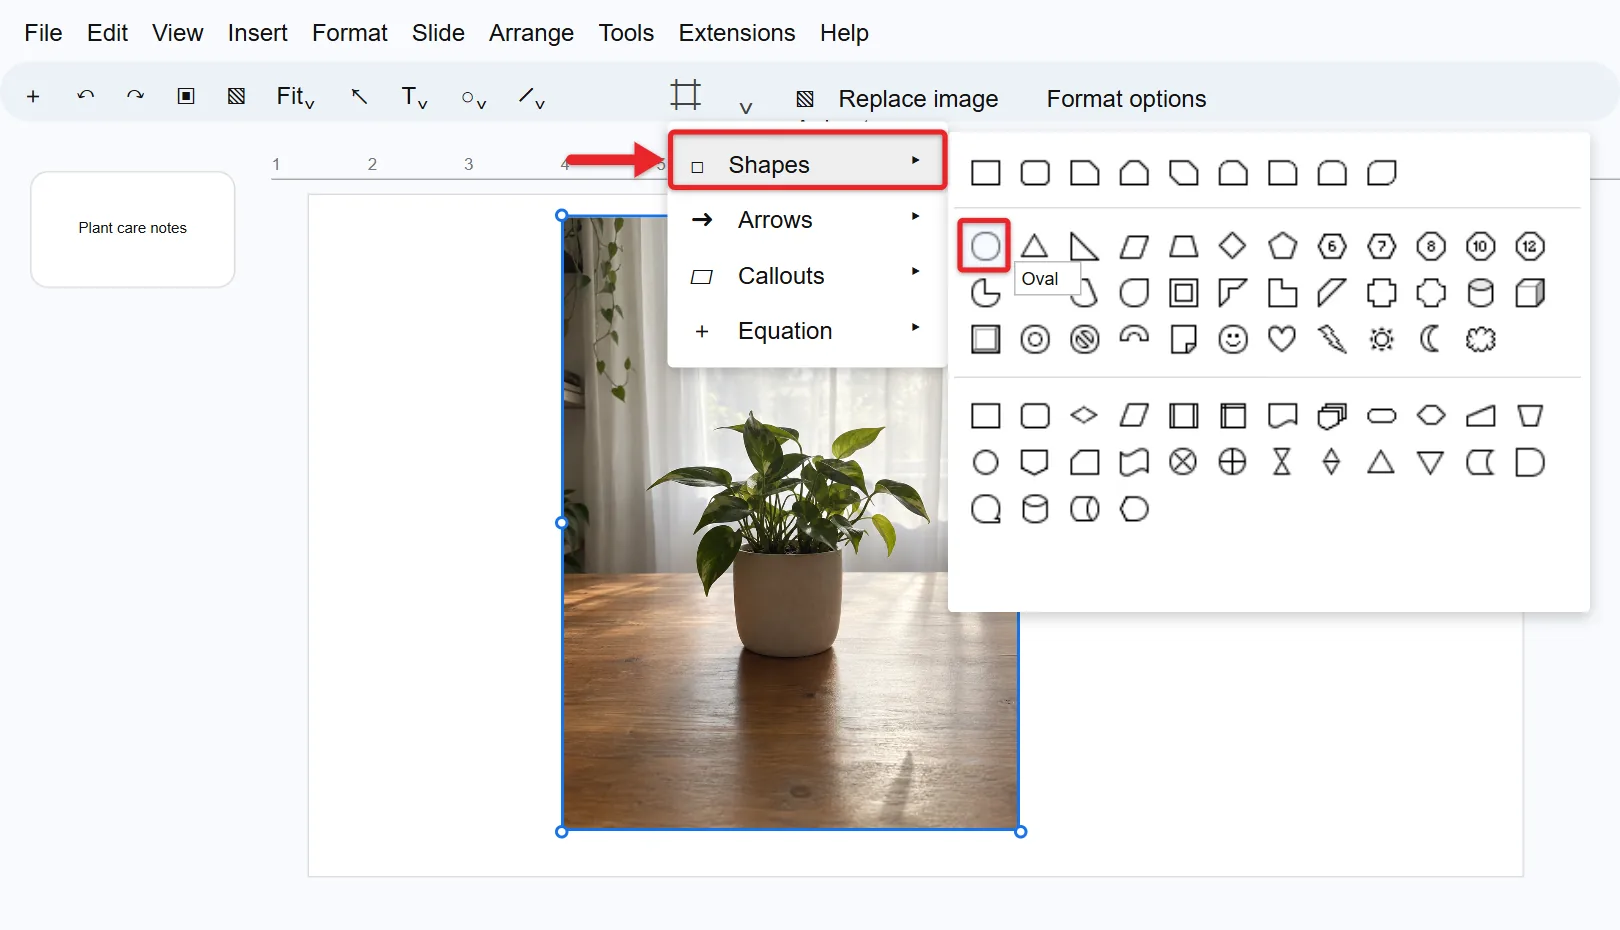
- Drag the colored handles to adjust the shape.
- Click Crop if you want to move the picture inside the shape, then press Enter.
If you want an arrow that points at part of the picture rather than an arrow-shaped crop, add an arrow in Google Slides as a separate shape.
Make a perfect circle
The oval mask follows the picture’s proportions, so a wide photo turns into a wide oval. For a true circle, which works well for profile photos:
- Crop the picture to a square first. Drag the handles until the width and height look equal, or check the numbers in Format options > Size & Rotation.
- Press Enter to finish the crop.
- Click the down arrow next to Crop and choose Shapes > Oval.
- To resize the circle later, hold Shift while you drag a corner handle. Google lists Shift + drag as the shortcut that keeps an object’s aspect ratio.
Other Ways to Edit a Picture
Add a border
- Click the picture.
- Click Border color in the toolbar and choose a color.
- Use Border weight and Border dash to change the thickness and style.
A border on a masked picture follows the shape, so a circle mask gets a round border.
Recolor or adjust the picture
- Click the picture, then click Format > Format options. You can also right-click the picture and choose Format options.
- Under Recolor, pick a color filter. The default is No recolor, and the list includes grayscale, sepia, and light and dark tints based on your theme colors.
- Under Adjustments, change Opacity (how much of the slide shows behind the image), Brightness, and Contrast. Changes appear as you edit.
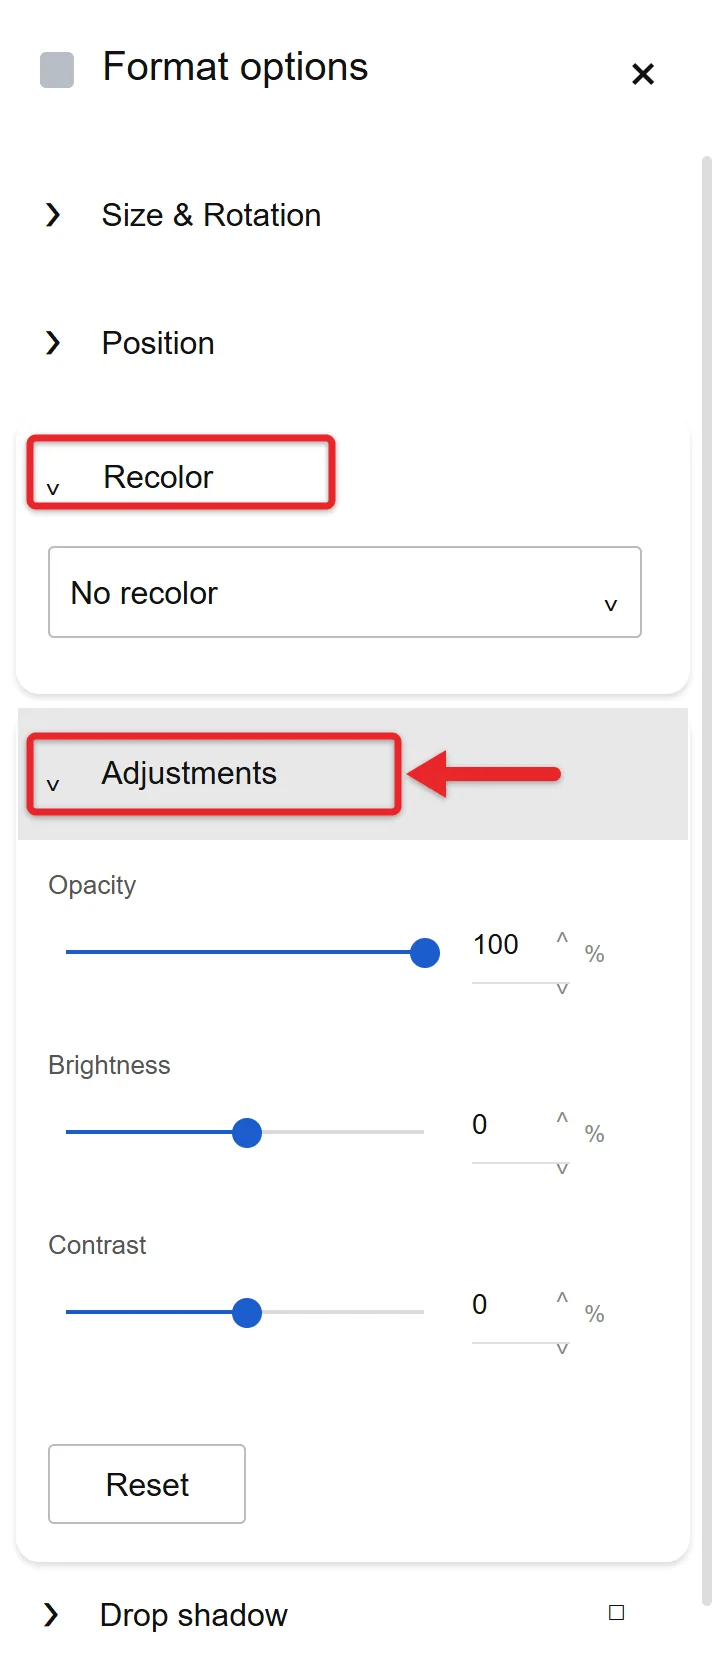
To undo only these adjustments, click Reset in the Adjustments section. Lowering opacity is a quick way to turn a photo into a faded background behind text.
For fixes Slides does not offer, such as sharpening or exposure, edit the image online for free first and then insert the saved file.
Add a drop shadow or reflection
In the same Format options panel, check Drop shadow or Reflection. Each one opens sliders for settings such as transparency, distance, and size or blur. Uncheck the box to remove the effect.
Rotate, flip, or center a picture
- Rotate: drag the round handle above the picture, or click Arrange > Rotate. Hold Shift while dragging to rotate in 15-degree steps.
- Flip: click Arrange > Rotate > Flip vertically or Flip horizontally.
- Center: click Arrange > Center on page > Horizontally or Vertically.
- Nudge: with the picture selected, press the arrow keys to move it one pixel at a time, or Shift + arrow keys for bigger steps.
When a picture covers text or another image, change which one sits on top with layer order in Google Slides.
Replace, reset, delete, or add alt text
- Replace: right-click the picture and choose Replace image to swap in a new picture in the same spot on the slide.
- Reset: right-click the picture and choose Reset image. The edited image returns to the original photo you added, so this removes the crop and mask as well as color changes.
- Delete: click the picture and press Delete or Backspace.
- Alt text: right-click the picture and choose Alt text, then type a short description for screen readers. The shortcut is Ctrl + Alt + Y (Cmd + Option + Y on a Mac).
How to Crop a Picture in the Google Slides App
- On your iPhone, iPad, or Android device, open the Google Slides app and open a presentation.
- Tap the image, then tap Crop. On Android, the Crop icon is at the bottom of the screen.
- Touch and drag the border to crop. To mask it instead, tap Mask and choose a shape.
- Tap elsewhere on the slide to finish.
You can also resize the picture by dragging the squares on its edges, rotate it with the attached circle, and tap Format to add a border. Google’s iPhone and iPad instructions say adjusting colors and resetting an image need Slides in a browser on a computer. Google’s Android instructions list Recolor, Adjustments, and Drop shadow under Format, but the same page says reset needs a computer, so use a computer if you do not see those options in the app.
How to Check or Undo Your Changes
Click the picture and click Crop to see the full original image with the hidden areas shaded. From there you can drag the handles back out. If you want to start over completely, right-click the picture and choose Reset image. To see an earlier version of the whole presentation, open File > Version history.
Troubleshooting
- There is no Crop button. Make sure you clicked a picture, not a shape, text box, or video. If the toolbar shows only a few buttons, you may have view or comment access only.
- You can’t select the picture at all. It may be part of the slide’s layout or theme rather than placed on the slide. Open Slide > Edit theme to change images that appear on every slide, or check whether another object is on top of it.
- The picture is a slide background. Backgrounds can’t be cropped. Crop the picture as a normal image instead, or edit it before you set it as the background. To change the background image, read about changing the theme or background in Google Slides.
- The cropped picture looks blurry. Cropping keeps only part of the original pixels, so enlarging a small cropped area makes it soft. Start with a higher-resolution photo if you need to zoom in that far.
- The circle crop looks like an oval. The picture was not square before you applied the oval mask. Follow the circle steps above.
Frequently Asked Questions
Does cropping in Google Slides change the original picture file?
No. The crop is stored in the presentation. The copy on your computer, in Drive, or in Google Photos stays the same, and the trimmed areas can be restored until you replace the image.
Can I crop a picture in Google Docs the same way?
On a computer, yes. The same crop steps work in Docs, though masking into shapes is a Slides feature. Cropping in the Docs mobile app is not supported.
Can I remove the background from a picture in Google Slides?
Slides has no background removal tool. Use a picture that already has a transparent background, such as a PNG file, or remove the background in another app before you insert it.
Can I crop several pictures at once?
No. Crop each picture on its own. If you need the same size for several pictures, crop them, then type the same width and height in Format options > Size & Rotation.
How do I make a picture fill the whole slide?
Drag the corner handles until the picture covers the slide, then crop away anything that spills past the edges. For a picture behind everything else, set it as the slide background instead.
Related Guides
- How to change layer order in Google Slides
- How to make a picture fly in on Google Slides
- How to change the theme or background in Google Slides
Next step: share one finished slide as an image file by saving a Google Slides slide as a picture.

Matthew Burleigh is the founder, head writer, and editor of Solve Your Tech, which he launched in 2012. He has written technology tutorials since 2008 and worked in IT since 2003, including small-business support, IT management, and consulting. He holds Bachelor’s and Master’s degrees in Computer Science from Arizona State University.
Matthew writes practical guides for Windows, iPhone and iPad, Microsoft Office, Outlook, Google apps, and Android. Solve Your Tech’s guides are checked step by step against the device or app maker’s own documentation and tested on his own devices whenever he has the hardware or software, with clear steps, sources, and update dates.
Read more about Matthew and how Solve Your Tech writes and updates its guides, or report a correction.