To crop many pictures at once in Photoshop, record the crop on one picture as an action, then run that action on a whole folder with File > Automate > Batch. Photoshop opens each file, applies the same crop, saves it to a folder you choose, and closes it.
These steps are for Photoshop 2026 (version 27) on Windows and Mac, and the same path works back to CS5. The method suits similar pictures, such as product shots from one tripod position. Adobe documents the Batch command in Batch-process files in Photoshop.
Before You Start
Set up two folders so Photoshop never saves over your originals.
- Create a folder for the pictures you want to crop, such as to-crop, and copy the pictures into it. On Windows, right-click the desktop and choose New > Folder. On a Mac, right-click the desktop and choose New Folder.
- Create a second, empty folder for the finished files, such as cropped.
Work on copies, not your only versions. A batch runs on every file in the folder, and a mistake in the action repeats on every picture.
Record the Crop Action
An action is a recording of steps you can play back on other files. You’ll record a selection, the crop, a deselect, and a save, and nothing else. Adobe’s Record actions in Photoshop page covers the Actions panel and recording options.
- In Photoshop, choose File > Open and open one picture from your to-crop folder.
- Choose Window > Actions. The Actions panel opens, with the Default Actions set already in it.
- Click the Create new set button (the folder icon) at the bottom of the panel, name the set something like My Actions, and click OK. Batch lists actions by set, so keeping yours in its own set makes it easy to find.
- With the new set selected, click the Create new action button (the plus icon). Give the action a descriptive name, such as crop-800×600, and click Record. The round record button at the bottom of the panel turns red.
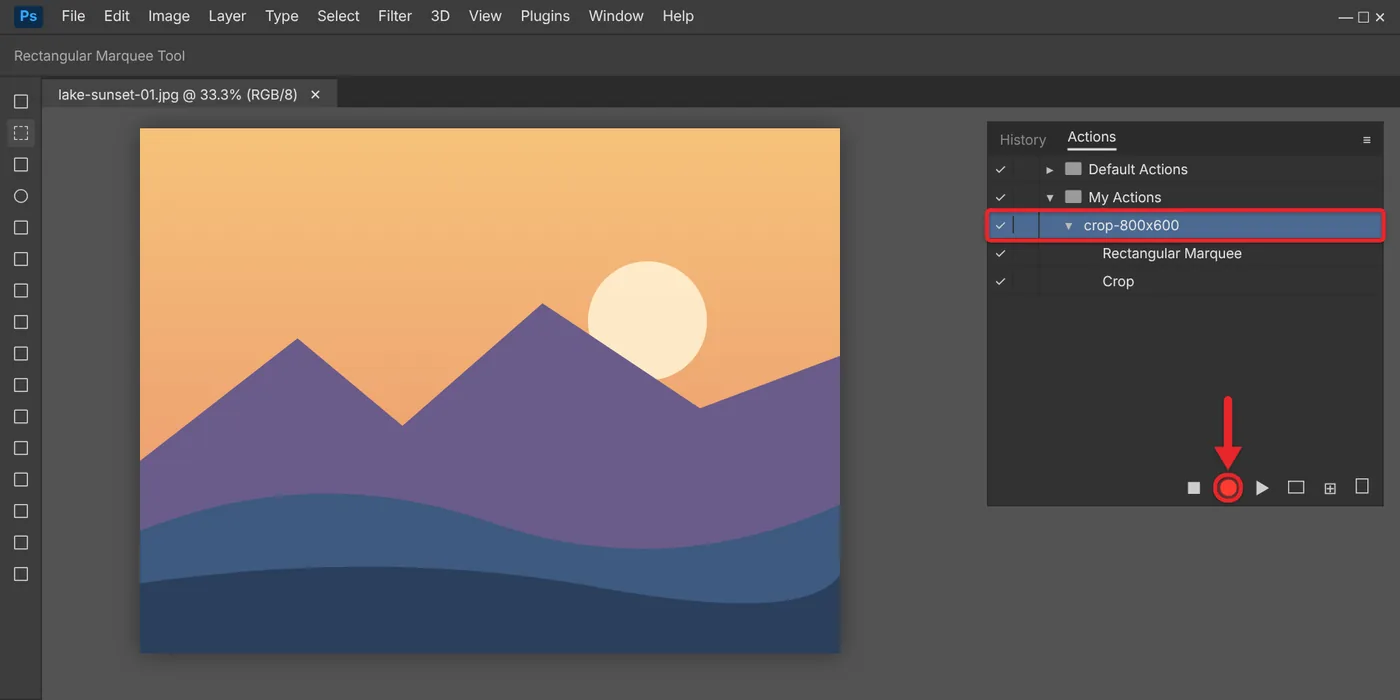
- Select the Rectangular Marquee Tool in the toolbar, or press M.
- To crop every picture to an exact size, open the Style menu in the options bar at the top of the window, choose Fixed Size, and type the Width and Height in pixels. Leave Style set to Normal if you’d rather drag any shape.
- Click or drag on the picture to place the selection over the area you want to keep. With Fixed Size, a single click places the box, and you can drag inside it to move it.
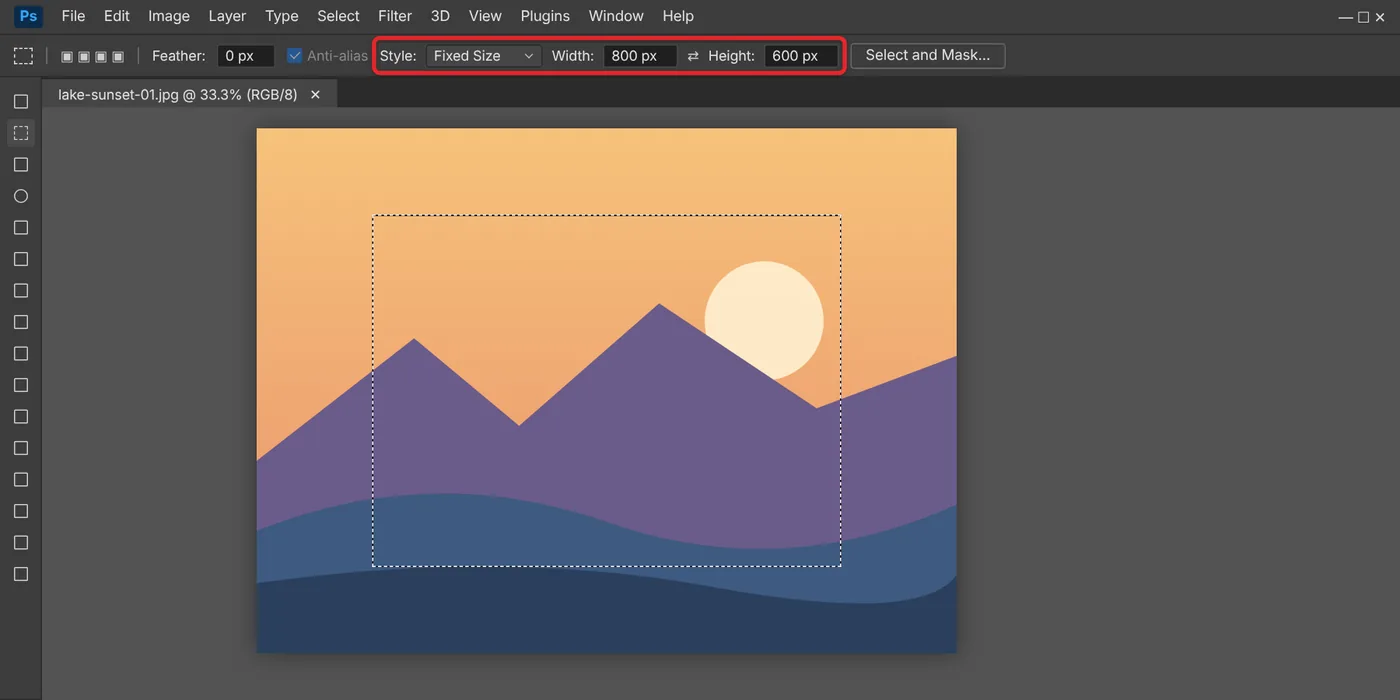
- Choose Image > Crop. Everything outside the selection is removed.
- Choose Select > Deselect (Ctrl+D on Windows, Command+D on Mac).
- Choose File > Save As, open your cropped folder, pick a format such as JPEG, and click Save. If you choose JPEG, pick a Quality setting in the JPEG Options box and click OK. Saving into the cropped folder means the recorded step can’t overwrite your original.
- Click the square Stop playing/recording button at the bottom of the Actions panel.
- Close the picture without saving it again.
Expand the action in the Actions panel by clicking the arrow next to its name. You should see steps like Set Selection, Crop, Set Selection (the deselect), and Save. If you see extra steps you didn’t intend, such as a Zoom or a second selection, click one and drag it to the trash icon at the bottom of the panel.
If the Actions panel or other panels have gone missing or moved, here is how to reset the workspace in Photoshop.
Prefer the Crop Tool? You can record it instead of steps 5 through 8. Press C, drag the handles to frame the picture, and press Enter (Windows) or Return (Mac). The Marquee method is easier to make exact, because you type the size instead of dragging to it.
Run the Action on a Folder With Batch
- Choose File > Automate > Batch. The Batch dialog box opens.
- Under Play, choose your set in the Set menu and your crop action in the Action menu.
- Set Source to Folder, click Choose, and select your to-crop folder.
- Leave Override Action “Open” Commands unchecked. Your action has no Open step, and checking this box can make the batch fail.
- Check Suppress File Open Options Dialogs and Suppress Color Profile Warnings so the batch doesn’t stop on every file to ask a question. Check Include All Subfolders only if your pictures are spread across subfolders.
- Set Destination to Folder, click Choose, and select your cropped folder.
- Check Override Action “Save As” Commands. This tells Photoshop to use the folder and file names from the Batch dialog instead of the one file name that was recorded in your action. Without it, every picture saves over the same file.
- In the File Naming section, set the first box to Document Name and the second box to extension. Each cropped file keeps its original name. To tell them apart from the originals, you can type a suffix such as -cropped in the second box and move extension to the third box.
- Under Errors, choose Log Errors To File and click Save As to pick a location for the log if you’re processing hundreds of files. The batch then keeps going past a bad file instead of stopping. Stop For Errors is fine for a small folder.
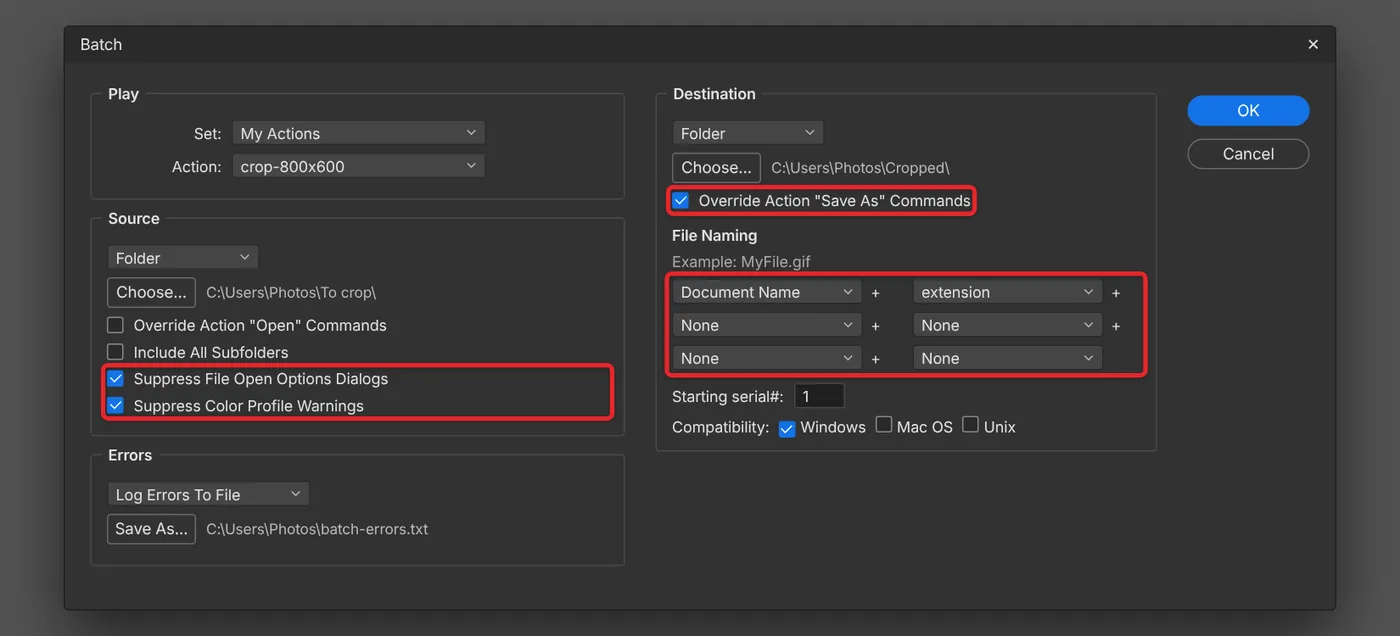
- Click OK. Photoshop opens, crops, saves, and closes each picture in turn. Don’t use Photoshop until it finishes.
When it’s done, open the cropped folder and check a few files. They should have the new dimensions and the same names as the originals. Test with a folder of three to five pictures first if you’re about to process a large set.
Adobe’s Batch-process files guide and its page on Batch and droplet processing options describe every setting in the dialog.
Cropping Pictures of Different Sizes
A recorded crop plays back the same way on every file, so the result depends on how alike your pictures are. Choose the approach that fits your folder:
- All pictures are the same size. The steps above work as written.
- Pictures are different sizes, and you want the same part of each one. Before you record, press Ctrl+R (Command+R on Mac) to show the rulers, right-click a ruler, and choose Percent. A selection you draw while the rulers use percent is recorded as a position relative to the picture, so a crop of the middle 80 percent stays the middle 80 percent on a larger or smaller photo. You can switch the rulers back to pixels after recording.
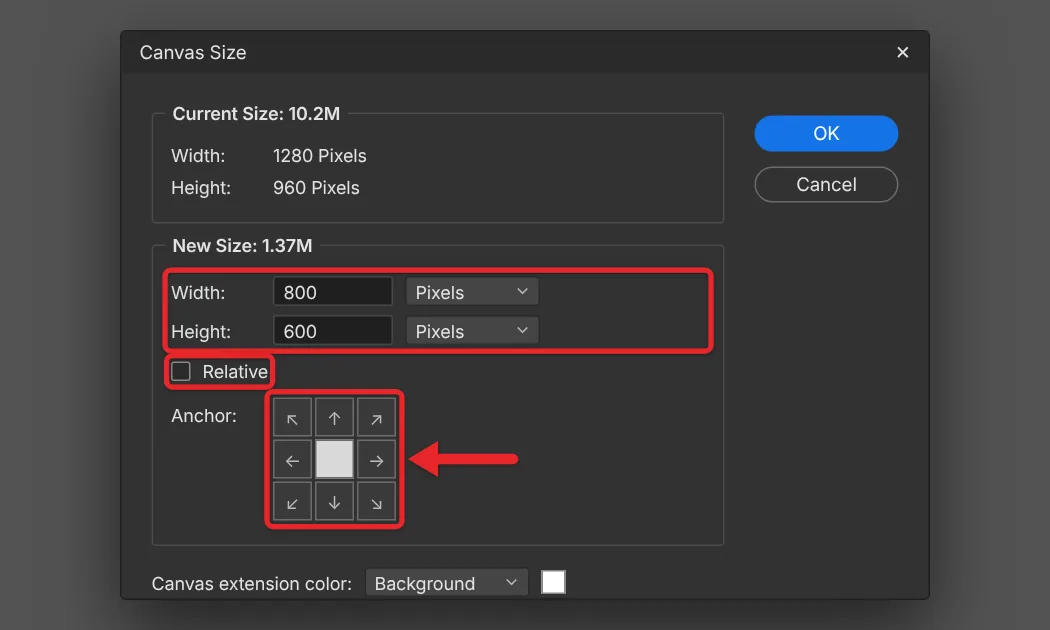
- You want every picture trimmed to the same exact pixel size from the center. Record Image > Canvas Size instead of a crop. Uncheck Relative, type the width and height, click the center square in the Anchor grid, and click OK. Photoshop warns that the new canvas is smaller and will clip the image; click Proceed. This trims equal amounts from each side of every picture, as long as each original is at least as big as the size you typed.
- Portrait and landscape pictures are mixed. Put them in separate folders and record a separate action for each orientation.
If you need to shrink the pictures rather than cut parts away, record Image > Image Size in place of the crop, or use File > Scripts > Image Processor, which resizes and converts a folder without an action.
If you only have one or two pictures and no Photoshop, you can crop and resize images online for free instead.
Cropping Several Photos From One Scan
If you scanned several prints on the scanner glass at once, Photoshop has a separate tool for that. Open the scan and choose File > Automate > Crop and Straighten Photos. Photoshop finds each photo, straightens it, and opens it in its own window, where you can save it. Leave a gap between the prints when you scan so Photoshop can tell them apart. It works on one scan at a time, so use it for prints and the Batch method for folders of digital pictures.
If the Batch Doesn’t Work
- Your action isn’t in the Action menu. Make sure the action is inside a set and that the same set is chosen in the Set menu. If it still doesn’t show, open any picture, click the action in the Actions panel, close the picture, and reopen the Batch dialog.
- You get “The command is not currently available.” Uncheck Override Action “Open” Commands. Adobe community experts point to this checkbox as the cause when the action has no Open step.
- Every picture saves over one file. Check Override Action “Save As” Commands and set Destination to Folder.
- Nothing appears in the cropped folder. The override only redirects a Save step that already exists, so the action must include File > Save As. Expand the action and look for a Save step. If it’s missing, select the last step, click the record button, do the Save As, and click Stop.
- Photoshop stops at every file to ask about JPEG quality or color profiles. Check both Suppress boxes in the Source section. If a JPEG Options box still appears, make sure the Save step was recorded with a quality setting.
- The crop is in the wrong place on some pictures. Those files are a different size or orientation. Use percent rulers or Canvas Size as described above, or split the folder.
- Layered files won’t save as JPEG. If your originals are PSD or TIFF files with layers, add Layer > Flatten Image to the action just before the Save step so every picture saves in the format you recorded.
Frequently Asked Questions
Can I undo a batch crop?
Not inside Photoshop. Batch saves and closes each file, so there’s nothing to undo. That’s why you save to a separate folder and keep the originals in place. If something went wrong, delete the cropped folder’s contents, fix the action, and run it again.
Does this work in Photoshop on the iPad or on the web?
Use the desktop app. The Actions panel and the File > Automate menu that this method needs are part of Photoshop for Windows and Mac.
What is a droplet?
A droplet is a small app that runs an action on any files you drag onto its icon. Choose File > Automate > Create Droplet, pick your action, and set the same destination and naming options as in the Batch dialog. It’s handy if you crop new batches often and don’t want to open the Batch dialog each time.
Can I crop pictures that are open in Photoshop instead of in a folder?
Yes. Open the pictures, then in the Batch dialog set Source to Opened Files. Everything else stays the same.
How do I crop layers inside a single Photoshop file instead?
Batch works on separate files. If your pictures are layers in one document, first export the layers as separate images, then run the batch on that folder. Once your product photos are cropped, you can also improve a product picture quickly with a Levels adjustment.

Matthew Burleigh is the founder, head writer, and editor of Solve Your Tech, which he launched in 2012. He has written technology tutorials since 2008 and worked in IT since 2003, including small-business support, IT management, and consulting. He holds Bachelor’s and Master’s degrees in Computer Science from Arizona State University.
Matthew writes practical guides for Windows, iPhone and iPad, Microsoft Office, Outlook, Google apps, and Android. Solve Your Tech’s guides are checked step by step against the device or app maker’s own documentation and tested on his own devices whenever he has the hardware or software, with clear steps, sources, and update dates.
Read more about Matthew and how Solve Your Tech writes and updates its guides, or report a correction.