To add an arrow in Google Slides, click Insert > Line > Arrow, then click and drag on the slide where you want it. The arrow points in the direction you dragged, and you can change its color, thickness and arrowheads from the toolbar.
These steps are for Google Slides in a web browser on a computer, based on Google’s insert and arrange shapes and lines help page and its Google Slides keyboard shortcuts list. The Slides app on phones and tablets has fewer line options, covered near the end.
Which Kind of Arrow Do You Need?
| You want | Use | Where to find it |
|---|---|---|
| A thin arrow pointing at something | Arrow | Insert > Line > Arrow |
| An arrow that stays attached to two boxes | Elbow or curved connector | Insert > Line |
| A bold, filled arrow that can hold text | Block arrow shape | Insert > Shape > Arrows |
How to Add an Arrow in Google Slides
- Open your presentation and click the slide you want in the filmstrip on the left.
- Click Insert in the menu bar, then point to Line. You can also click the small arrow next to the Line button in the toolbar.
- Click Arrow. Your pointer turns into a crosshair.
- Click where you want the tail of the arrow, hold the mouse button, and drag toward the spot it should point to.
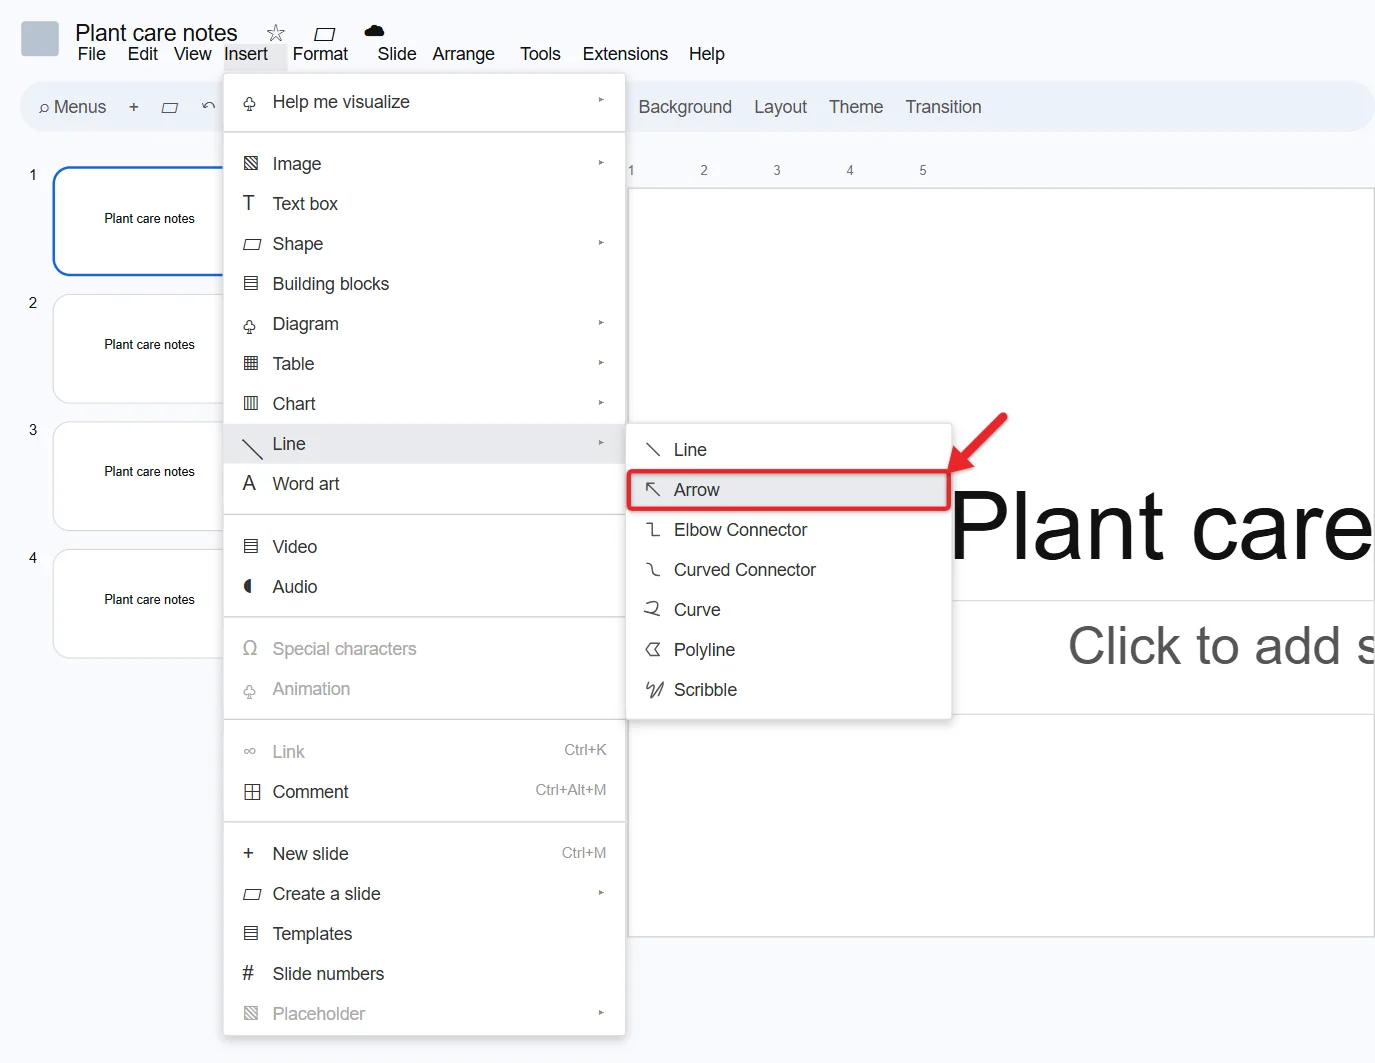
- Release the mouse button. The arrow appears with an arrowhead at the end where you stopped.
To keep the arrow perfectly straight, hold Shift while you drag. This locks the line to 15-degree steps, so it snaps to horizontal, vertical or a clean diagonal.
To change the length or direction later, click the arrow and drag either end point. To move the whole arrow, drag it from the middle of the line.
How to Change an Arrow’s Color, Thickness and Arrowheads
Click the arrow to select it. The line options appear in the toolbar:
- Line color: pick a color from the palette, or click Custom for your own shade.
- Line weight: choose a thicker or thinner line.
- Line dash: switch between a solid, dashed or dotted line.
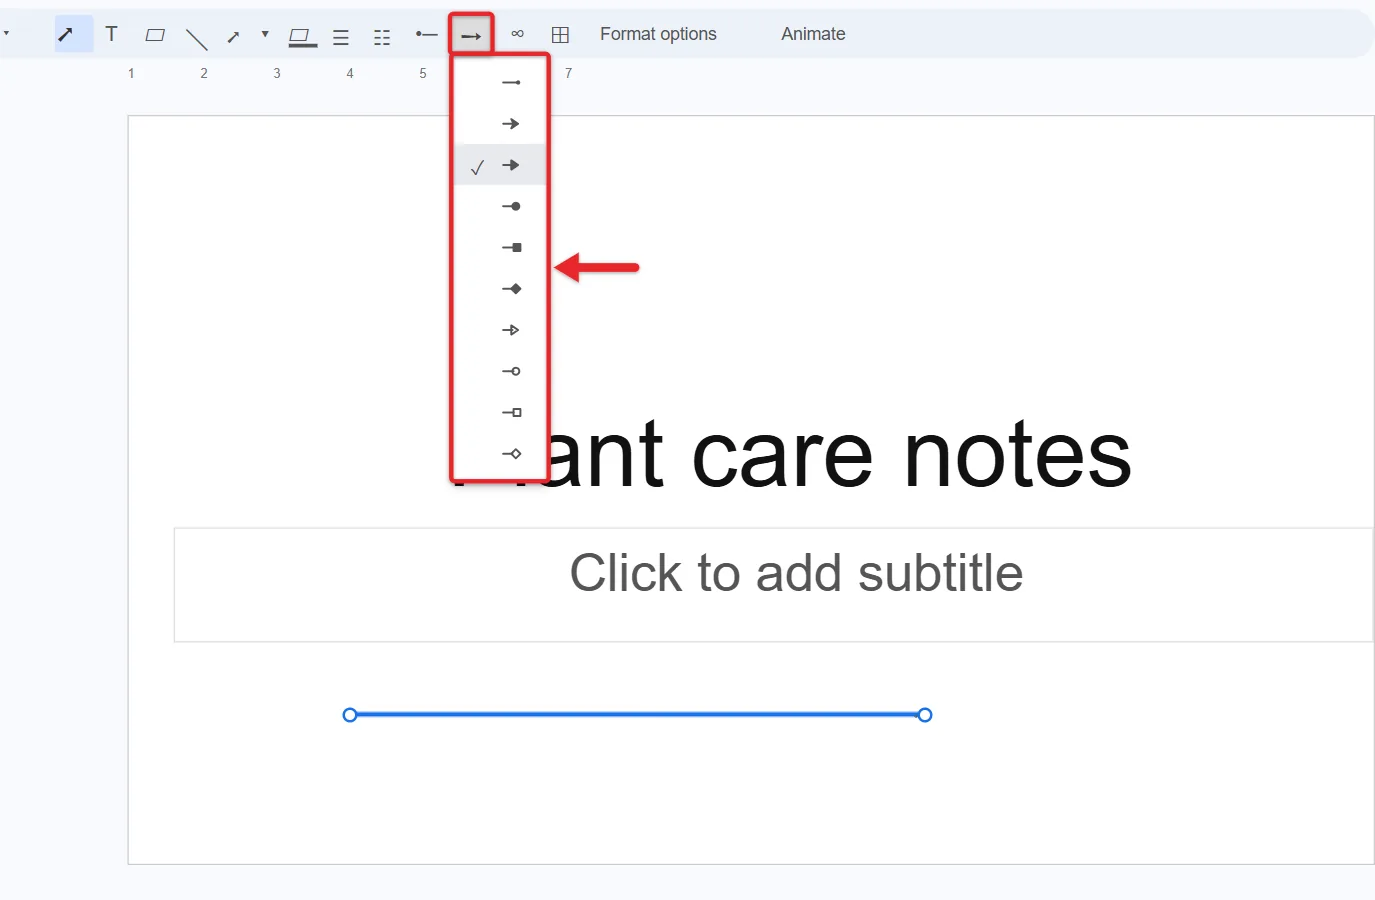
- Line start and Line end: choose the style for each end, such as an arrowhead, a circle, a square, a diamond or none.
The start of a line is the end where you began dragging. That means you can turn a plain line into an arrow by setting Line end to an arrowhead, or make a two-way arrow by setting both Line start and Line end. To flip which way an arrow points, swap the two settings.
To format several arrows at once, hold Shift and click each one, then change the setting. Pick a color with strong contrast against your slide background so the arrow is easy to see from the back of a room.
Building the same diagram in a spreadsheet? Here is how to insert an arrow in Excel.
How to Connect an Arrow to Boxes
For a flowchart or process diagram, use a connector so the arrow stays attached when you move the boxes.
- Click Insert > Line and choose Elbow connector (right-angle bends) or Curved connector.
- Hover over the first shape or text box. Small dots appear on its border.
- Click one of those dots and drag to a dot on the second object.
- Release the mouse. The connector is now attached to both objects.
- Set Line end to an arrowhead if you want it to show direction.
If no dots appear, you probably picked Arrow, Curve, Polyline or Scribble, which draw freely instead of connecting.
How to Add a Thick Block Arrow
- Click Insert > Shape > Arrows.
- Pick a style, such as a right arrow, a curved arrow or a two-way arrow.
- Click and drag on the slide to draw it.
A block arrow is a shape, not a line, so you change its color with Fill color and its outline with Border color. Unlike a line arrow, you can type in it: double-click the shape and start typing.
How to Rotate, Align and Group Arrows
- Rotate: drag the round handle above a block arrow, or select any arrow and click Arrange > Rotate. Hold Alt (Option on a Mac) and press the left or right arrow key to rotate 15 degrees at a time.
- Nudge: press the arrow keys to move a selected arrow one pixel, or Shift plus an arrow key to move it farther.
- Center: click Arrange > Center on page > Horizontally or Vertically. For a straight vertical line down the middle of a slide, draw a line while holding Shift, then center it horizontally.
- Group: select the arrow and the objects it points to, then click Arrange > Group (Ctrl + Alt + G, or Command + Option + G on a Mac) so they move together.
- Layer order: if a box covers your arrow, use Arrange > Order. For what each option does, read about changing layer order in Google Slides.
How to Line Up Arrows With Guides
- Snap to Guides is on by default. Colored lines appear as you drag an arrow to show what it lines up with.
- To add your own guide, click View > Guides, choose an option, and drag the guide where you want it.
- To delete one guide, right-click it and choose Delete guide. To remove them all, click View > Guides > Clear guides.
- Hold Alt (Command on a Mac) while moving an object to stop it snapping, or hold Shift to keep the movement straight.
Make an Arrow Clickable or Animated
To make an arrow jump to another slide during a presentation, select it, press Ctrl + K (Command + K on a Mac), choose the slide under Slides in this presentation, and apply the link.
To have an arrow appear on cue, select it and click Insert > Animation, then choose an effect like Fly in. The steps are the same as when you make a picture fly in on Google Slides.
Add an Arrow in the Google Slides App
On an iPhone, iPad or Android device, open the presentation in the Google Slides app, tap Add (the plus sign), then tap Line for a line or Shape for a block arrow shape. Google’s app help doesn’t list arrowhead or connector settings, so use Slides in a browser on a computer for Line start, Line end and connectors.
Troubleshooting
- The line options don’t appear in the toolbar. The arrow isn’t selected. Click directly on the line; for a thin line, click exactly on it or drag a selection box around it.
- The arrow points the wrong way. Swap the Line start and Line end settings, or drag the ends to new positions.
- The arrow won’t stay straight. Hold Shift while you draw or drag an end point.
- The connector doesn’t move with the boxes. It wasn’t attached to the connection dots. Delete it and redraw it from dot to dot.
- You can’t insert anything. You may only have view or comment access. Ask the owner for edit access.
Frequently Asked Questions
How do I make a curved arrow?
To link two objects with a curve, use Curved connector and set Line end to an arrowhead. For a freeform curve, choose Curve in the Line menu, click at each bend, and double-click to finish. A curved block arrow is also under Insert > Shape > Arrows.
How do I add text to an arrow?
A line arrow can’t hold text, so place a text box next to it. A block arrow shape can: double-click it and type.
How do I delete an arrow?
Click it, then press Delete or Backspace, or click Edit > Delete. Press Ctrl + Z (Command + Z on a Mac) to undo.
How do I copy an arrow with the same formatting?
Select it and press Ctrl + D (Command + D on a Mac) to duplicate it, then drag the copy into place.

Matthew Burleigh is the founder, head writer, and editor of Solve Your Tech, which he launched in 2012. He has written technology tutorials since 2008 and worked in IT since 2003, including small-business support, IT management, and consulting. He holds Bachelor’s and Master’s degrees in Computer Science from Arizona State University.
Matthew writes practical guides for Windows, iPhone and iPad, Microsoft Office, Outlook, Google apps, and Android. Solve Your Tech’s guides are checked step by step against the device or app maker’s own documentation and tested on his own devices whenever he has the hardware or software, with clear steps, sources, and update dates.
Read more about Matthew and how Solve Your Tech writes and updates its guides, or report a correction.