While much of the content that you might be adding to your spreadsheets is going to be letters and numbers, you might occasionally need to include some media.
One specific type of file that you might want to add is a picture.
Whether you’re making an inventory or product listing, or you want to include your company logo in your work, it’s helpful to know how ot include these types of objects in a Google spreadsheet.
Our tutorial below will show you how to insert a picture in Google Sheets from your computer or a number of various online sources.
How to Add a Picture to a Google Spreadsheet
- Open your Google Sheets file.
- Click the Insert tab.
- Select Image.
- Browse to and select the image.
- Use the options on the border of the picture to move or resize it.
Our guide continues below with additional information on how to insert a picture in Google Sheets, including images of these steps.
Read this Google Sheets download guide if you need your spreadsheets in different file types, such as the Microsoft Excel .xlsx option.
Google Sheets shares many of the characteristics of Microsoft Excel that have helped to make it such a popular application. Along with the ability to store, sort, and manipulate data, Google Sheets lets you add pictures to your spreadsheets too.
But if you are mainly familiar with Excel and new to Google Sheets, you may be having trouble determining exactly how to put your images into your spreadsheets. Our guide below will show you where this option is located so that you can generate the data and image layout that you require.
If you’ve decided to use the Google calendar app instead of the Apple one, then our add calendar to Google Calendar iPhone article can show you how to do it.
How to Put a Picture in a Cell in Google Sheets (Guide with Pictures)
The steps in this article are going to show you how to add a picture to a spreadsheet that you are editing in Google Sheets. This specific guide is going to focus on adding a picture that is saved to your computer’s hard drive, but you are also able to add pictures from your Google Drive, or with a URL from a picture you found online.
Note that you might have better luck with your layout if you merge a few cells and insert the picture into that merged cell.
Step 1: Open your Google Drive at https://drive.google.com/drive/my-drive and open the spreadsheet file to which you want to add a picture.
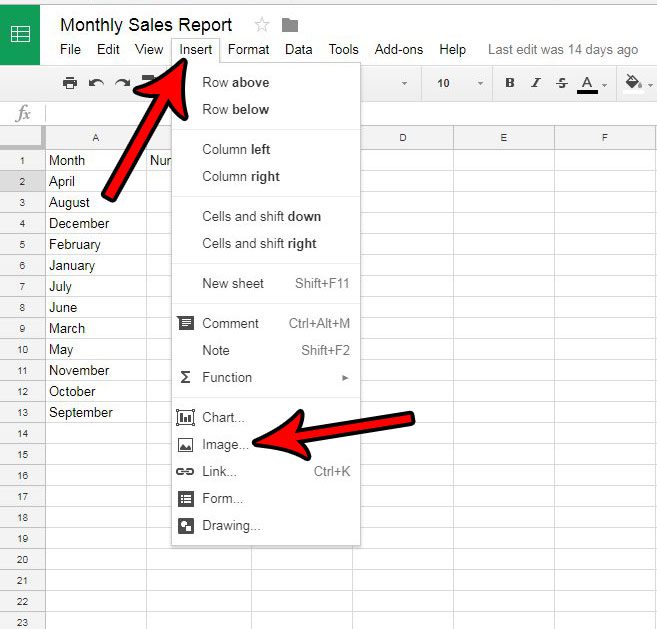
Step 2: Click the Insert tab at the top of the window, then click the Image option.

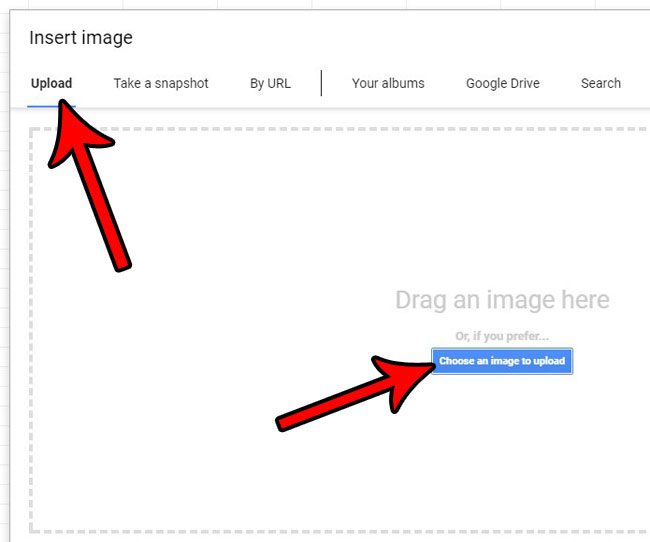
Step 3: Select the type of picture that you want to add from the options at the top of the pop-up window, then follow the instructions for that tab.

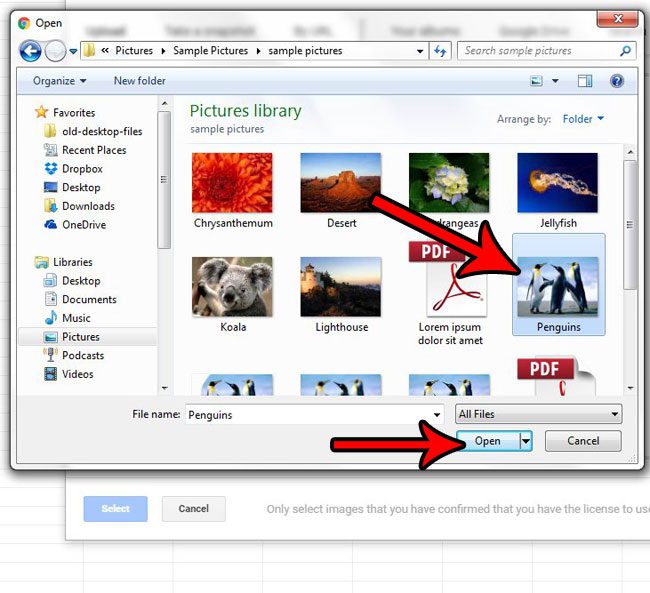
Step 4: Choose the picture that you wish to add to the spreadsheet.
If you are adding one from your computer, then click the Open button after selecting the picture.

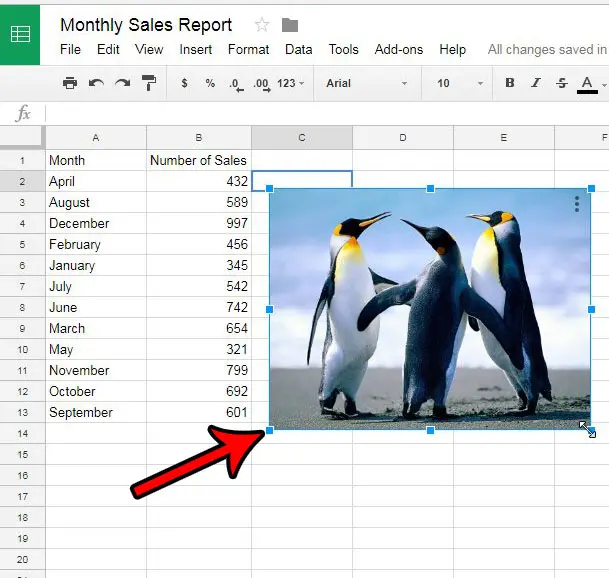
Step 5: You can resize the picture by clicking on it, then dragging the blue handles on the border of the image.
You can also click on the picture and drag it to the desired place in the spreadsheet.

Now that you know how to insert a picture in Google Sheets you will be able to customize your spreadsheets with helpful images, examples of data, or even charts or graphs that you have created in other files or applications.
You can use a similar method to insert a picture in Google Docs. The process is nearly identical for both applications.
Continue Reading
- How to merge cells in Google Sheets
- How to wrap text in Google Sheets
- How to alphabetize in Google Sheets
- How to subtract in Google Sheets
- How to change row height in Google Sheets

Matthew Burleigh has been writing tech tutorials since 2008. His writing has appeared on dozens of different websites and been read over 50 million times.
After receiving his Bachelor’s and Master’s degrees in Computer Science he spent several years working in IT management for small businesses. However, he now works full time writing content online and creating websites.
His main writing topics include iPhones, Microsoft Office, Google Apps, Android, and Photoshop, but he has also written about many other tech topics as well.