Word documents can take a lot of shapes and sizes, but it is not unusual to include pictures when you are editing something in the program.
For example, you might even copy and paste cells from Excel as a picture, which allows you to easily move the data around without fear that it will accidentally be edited.
But the ease with which you can copy and paste pictures directly from other programs like Excel or a Web browser could leave you in a situation where you need to edit a picture or share a picture with someone through email, but the only copy of the image that you have is in the Word document.
Fortunately, you can save pictures in Word 2010 as separate image files by following our guide below.
Create a Picture File from an Image in a Word 2010 Document
The steps below will assume that you have a picture in your Word document and that you want to create a separate image file of only that picture.
If you would instead prefer to save the entire Word document as an image, then consider saving the document as a PDF. This will provide you with a file that is more easily editable in image programs like Photoshop.
- Step 1: Open the document containing the image that you wish to save as its’ own file.
- Step 2: Locate the picture.

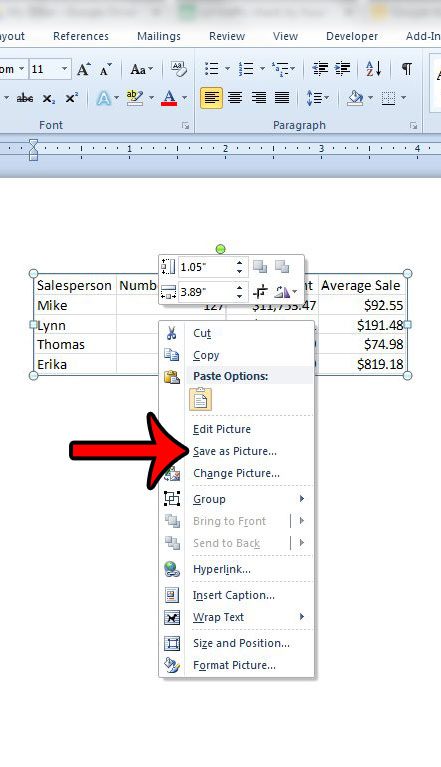
- Step 3: Right-click the picture, then click the Save as picture option.

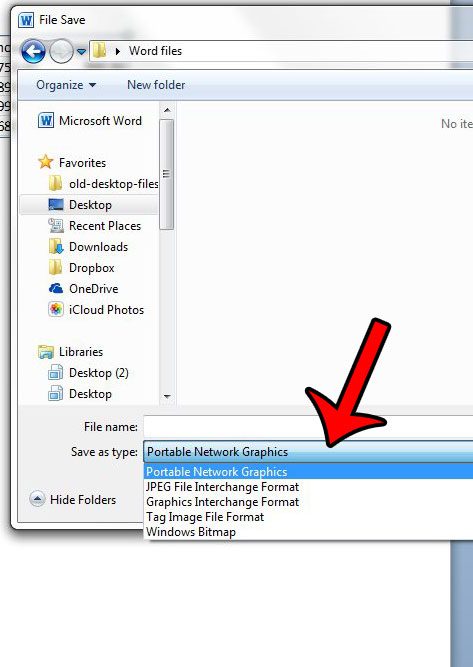
- Step 4: Select the location where you wish to save the file, then click the drop-down menu to the right of Save as type, and select an image file type. If you are unsure about which type of file you need, then the safest choice is typically Portable Network Graphics (.png) or JPEG File Interchange Format (.jpg), as those can be used easily with most other programs.

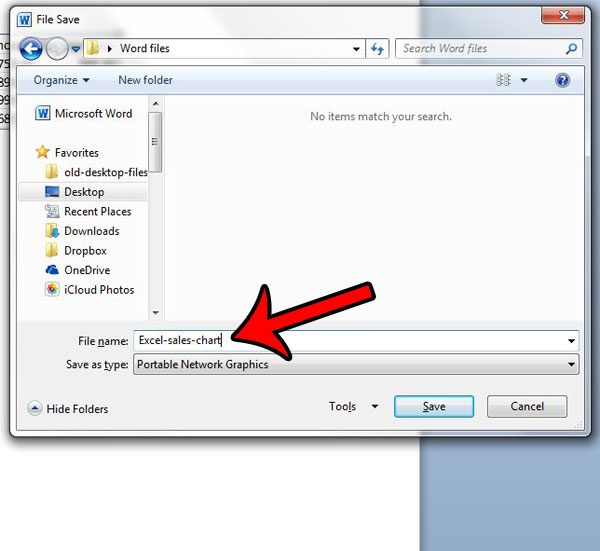
- Step 5: Type a name for the new file into the File Name field, then click the Save button.

Now that you know how to save a picture as a new file in Word 2010, you can create a separate copy of that image so that you can share it or use it in other projects.
You should then open the image file before closing the Word document to confirm that the image appears the way that you want. If the image is too large or too small, then you might need to resize it. You can read this article to learn more about resizing images in a Word 2010 document.

Matthew Burleigh has been writing tech tutorials since 2008. His writing has appeared on dozens of different websites and been read over 50 million times.
After receiving his Bachelor’s and Master’s degrees in Computer Science he spent several years working in IT management for small businesses. However, he now works full time writing content online and creating websites.
His main writing topics include iPhones, Microsoft Office, Google Apps, Android, and Photoshop, but he has also written about many other tech topics as well.