Customizing the header area in a Microsoft Word document is something that you may have done before if you wanted to add page numbers or your last name to every page.
Putting content into a document header will automatically add that content to every page in the document without needing to worry about entering that information manually.
You can include a picture in a Word 2010 header by going to the Insert tab, selecting the Header button then the Blank option, then clicking the Picture button on the Insert tab and selecting the one you want.
Microsoft Word provides you with the ability to add many types of content to your document. Whether it’s a media file like a picture or a video, or something else like a comment, you can really expand on simple text.
There are several ways to insert pictures into the background of a document in Microsoft Word 2010, and each option is appropriate for different situations.
But if you have had difficulty adding an image as a watermark or as a background image, then another option to consider is adding a picture to the header section.
Adding an image to the header section in Word 2010 will add the picture to the top of the document. That picture will then appear in that location at the top of every page of the document.
Our article below will show you the steps that you need to follow to achieve this result.
How to Put a Picture in a Word 2010 Header
- Open the document.
- Select the Insert tab.
- Choose the Header button, then the Blank option.
- Click the Picture button.
- Select the picture, then click Insert.
Our guide continues below with additional information about adding pictures to a header in Microsoft Word, including pictures of these steps.
Inserting a Picture Into the Header in Word 2010 (Guide with Pictures)
The steps in this article will show you how to add an image to the header section of your document. That picture will display behind any text that you have entered into the document.
Step 1: Open your document in Word 2010.
Step 2: Click the Insert tab at the top of the window.

Step 3: Click the Header button in the Header & Footer section of the Office ribbon, then click the Blank option.
Alternatively you can select the Blank (Three Columns) option if you would prefer to insert the picture into a different section of the header.

Step 4: Click the Picture button in the Insert section of the Office ribbon.
If you do not see this option, then make sure that the Design tab under Header & Footer Tools is selected at the top of the window.

Step 5: Select the picture that you want to insert, then click the Insert button at the bottom of the window.
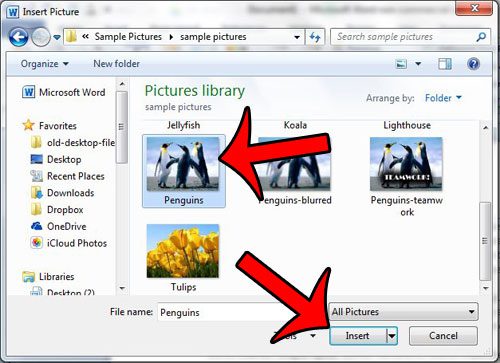
Our tutorial continues below with additional discussion about working with images and headers in the Microsoft Word 2010 application.
More Information on How to Insert Picture into Word Document Header
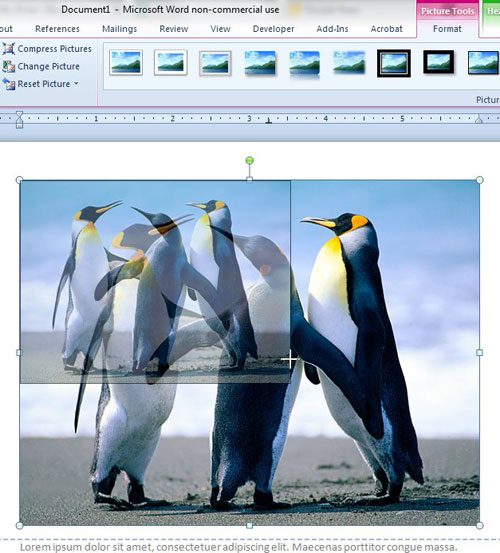
If your picture pushes down the body of your document, then you can click a corner of the image and drag it to adjust the size of the picture,
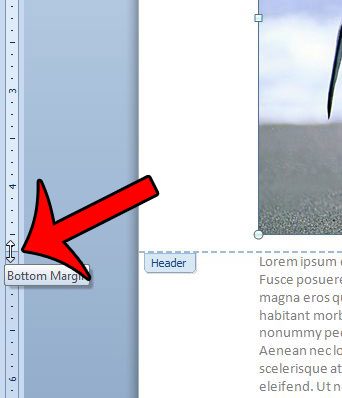
Or you can drag the bottom margin of the header section up by placing your cursor on the bottom margin in the ruler at the left side of the screen, then clicking the margin and dragging it up.
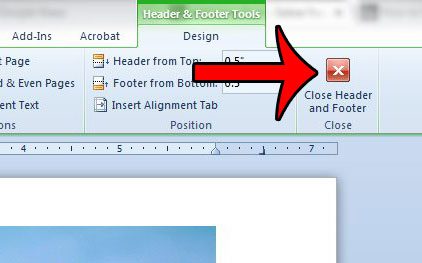
You can exit the Header and Footer view by clicking the Close Header and Footer button in the Office ribbon.
If you need to insert a picture into Word document bodies, then you can skip the step above where we created a header in our Word document. You simply need to put your cursor at the point in the document where you want the picture, then click the Insert tab and the Picture button.
You can use the various options on the Picture tools tab if you need to customize the appearance of the picture you have added. This can be useful if you want to put a border around the picture, or if you want to increase the transparency of the image so that it looks more like a watermark.
Speaking of watermarks, that is another way that you can add a picture to a location where you might want it. Watermarks appear in the background of the document, “behind” the content.
You can add a picture watermark by going to the Design tab, clicking the Watermark option, then choosing Custom watermark and using the Picture option there.
Do you have a picture in the background of your document, but it isn’t printing? You need to change a setting in Word 2010 to make background pictures or colors print. Click here and learn how to find that option.

Matthew Burleigh has been writing tech tutorials since 2008. His writing has appeared on dozens of different websites and been read over 50 million times.
After receiving his Bachelor’s and Master’s degrees in Computer Science he spent several years working in IT management for small businesses. However, he now works full time writing content online and creating websites.
His main writing topics include iPhones, Microsoft Office, Google Apps, Android, and Photoshop, but he has also written about many other tech topics as well.