Most of the popular email providers and email applications provide you with a way to include an email signature at the end of your message. If you have never set up an email signature in Outlook 2010, or any other email application that you have used, then you are missing out on a simple way to ensure that email contacts have multiple ways to reach you.
Learning how to make an Outlook 2010 signature is a great way to make yourself appear more professional, while simultaneously simplifying your email habits. If you are using Microsoft Outlook 2010 to send emails for your business, then it is usually important for the people receiving those emails to be able to contact you as easily as possible. While they could obviously just return your email, they might wish to have a phone conversation with you, send you physical mail, or send a fax.
Rather than wasting time sending an email asking for this information, you can expedite the process by creating an email signature in Outlook 2010. Your Outlook 2010 signature will be added to the end of every message that you send, which eliminates the need for you to manually enter this information for every message.
Your Outlook signature does not just need to be a list of your contact information. You can also include disclosure information, disclaimers, images, or important information that your email recipients might want to know.
How to Make a Signature in Outlook 2010
- Create a new email message.
- Click the Signature button, then select the Signatures option.
- Click the New button under Select signature to edit.
- Enter a name for the Outlook 2010 signature, then click OK.
- Enter your signature information into the field at the bottom of the window, then click the OK button when you are finished.
Our article continues below with additional information on setting up a signature in Outlook 2010, including pictures of these steps.
How to Make an Outlook 2010 Signature (Guide with Pictures)
This is a question that is almost universally asked by someone that is new to Outlook 2010, or business emailing in general. Continuously typing the same information at the end of an email message is tedious, prone to error, and, due to the presence of the signature function in Outlook, pointless. So you can follow the procedure below to learn how to create a signature in Microsoft Outlook 2010.
This guide can show you how to create a distribution list in Outlook if you regularly email the same group of people and are looking for a way to avoid manually adding each of them every time.
Step 1: Begin by opening Outlook 2010.
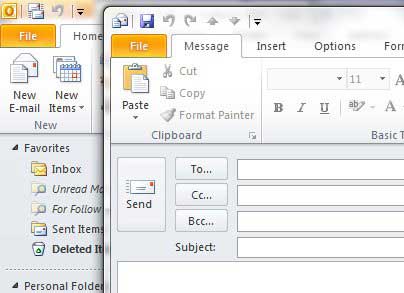
Step 2: Click the New E-mail button at the top-left corner of the window to open a Message window.
You just need the options on this screen. You will not actually be sending a message if you don’t want to.
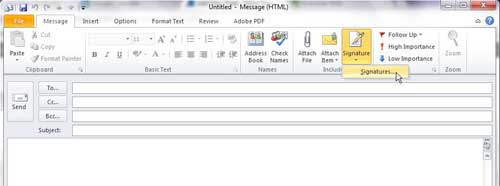
Step 3: Click the Signature icon in the Include section of the ribbon at the top of the window, then click the Signatures option.
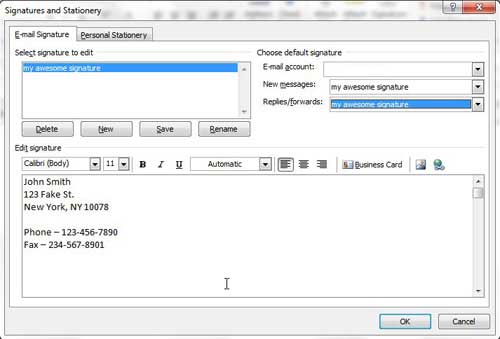
Step 4: Click the New button under the Select signature to edit section, type a name for the signature into the pop-up window, then click the OK button.
The signature that you just created will be selected, so you can begin customizing its appearance. In the image below, I have configured a fake signature.
Step 5: Once all of the settings have been applied, click the OK button at the bottom of the window to save your changes.
You can then close the blank email message that you had opened previously.
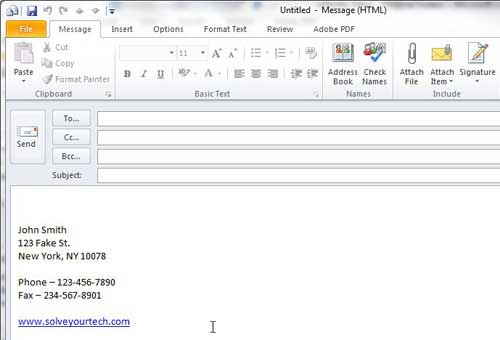
The next time you go to send an email, you will be greeted with an email message similar to the one below, with your signature pre-populated in the window.
More Information About How to Set Up Signature in Outlook 2010
You can click inside the Edit signature section of the Signatures and Stationery window and type the body of your email signature. Note the icons above the text field, as they include options for changing the font, font size, text justification, and color. There are also Business Card, Image, and Hyperlink options if you want to include one of those items in your signature. For example, I could have included a link to www.solveyourtech.com at the bottom of my signature.
At the top-right corner of this window are drop-down menus to the right of New messages and Replies/forwards. They are listed as options in the “Choose Default Signature” section of the menu.
If you want to include your signature on those types of messages, click the drop-down menu, then choose the signature that you have created. Note that I have selected to include my signature with both types of messages, but you should consider whether it is necessary to include your signature on replies and forwards. This is especially true of long signatures or signatures with images in them because they can dramatically increase the size of your email messages. However, the choice is up to you and you can always change the content or format of the signature you want to include in the emails that you send.
You can have multiple signatures in Outlook, so feel free to create multiple email signatures if you aren’t sure which one you want to include with a new message, or replies or forwards that you type. You can always click the Signatures button in the future to open this menu again and select the signature that you think is best for a situation. This also provides you with the ability to experiment with a different email signature and see if there is one that looks better or generates better responses from your contacts.
Many email providers and applications will automatically remove embedded images (such as one that you may be adding to your signature.) In some cases that image could be included as an attachment instead.
You can also add a link to an Outlook 2010 signature if you want to give people the ability to click over to your website, or any other online page that you would like to include in the emails you send.
Conclusion – Setting Up an Email Signature in Outlook
If you find that you are often manually typing a signature at the end of most of your emails, then choosing to create a signature in Outlook can save you quite a bit of tie, and reduce potentially embarrassing typos.
The ability to create your signature in the application, or add a signature if you already have one, can help you to look more professional, and it can give your contacts an easy way to find your contact information, as well as provide additional content in your messages that they can use in searches.
If you’ve been thinking about creating a new signature, or if you need to choose default signature options based on the type of email you are sending, then Outlook 2010 provides you with the tools to accomplish that goal.

Matthew Burleigh has been writing tech tutorials since 2008. His writing has appeared on dozens of different websites and been read over 50 million times.
After receiving his Bachelor’s and Master’s degrees in Computer Science he spent several years working in IT management for small businesses. However, he now works full time writing content online and creating websites.
His main writing topics include iPhones, Microsoft Office, Google Apps, Android, and Photoshop, but he has also written about many other tech topics as well.


