Learning how to add a link to your Outlook signature can provide you with some additional marketing options when you send emails.
Your current signature might already include information like your phone number or address, but including a hyperlink in your signature can let people visit your website or social media profile and find out more about you or your company.
If you use Microsoft Outlook 2010 to manage an email account that corresponds with a lot of new people, then you want those people to be able to reach you in as many ways as possible.
Traditionally this might have meant adding your phone number, fax number, and address, but now many people might be easiest to reach through a website or social media profile.
Fortunately, you can incorporate this into Outlook by adding a website link to your Outlook signature.
This gives recipients of your email the ability to click the link in your email and automatically be redirected to the website of your choosing.
If you add a Facebook link to your Outlook signature, for example, then your email recipients can click the link, add you as a friend, and choose to contact you that way instead.
How to Add a Link to Your Signature in Outlook 2010
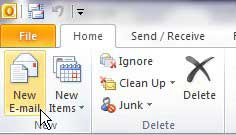
- Click the New Email button.
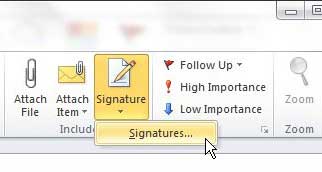
- Click the Signature button, then select the Signatures option.
- Click inside the field under Edit signature, then type the “anchor text” for your signature hyperlink.
- Select the text you just typed.
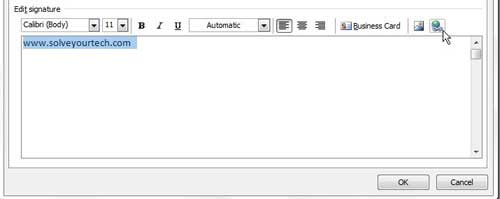
- Click the Hyperlink button.
- Type the address of the Web page for the hyperlink into the Address field, then click the OK button.
Our guide continues below with additional information on adding a hyperlink to an Outlook signature, including pictures of these steps.
How to Add a Hyperlink to an Outlook 2010 Email Signature (Guide with Pictures)
If you have only dabbled with customizing your signature in Outlook 2010, then you might not yet be aware of exactly how useful a tool it can be. Outlook 2010 has a lot of signature editing options and you can essentially customize your signature in any way that you would want.
Step 1: Begin by launching Microsoft Outlook 2010.
Step 2: Click the New E-mail button in the ribbon at the top-left corner of the window.
Step 3: Click the Signature drop-down button in the Include section of the ribbon, then click the Signatures option to create a new signature.
Step 4: Click inside the signature body section at the bottom of the window, then type the anchor text for the link that you want to include in your signature.
The anchor text is the word that is actually going to be hyperlinked. For example, if you were creating a Facebook link in your Outlook signature, you might type “Facebook” as your anchor text.
Step 5: Use your mouse to select the anchor text that you just entered.
Step 6: Click the Hyperlink button at the right side of the Edit signature box window.
Step 7: Type the URL of the website address to which you want the signature link to point into the Address field at the bottom of the window. Click the OK button when you are done.
Step 8: Click the OK button at the bottom of the Signatures and Stationery window to apply your changes, then close out of the Outlook dialog box message window that you opened previously.
Now that you know how to add a hyperlink to your email signature in Outlook 2010, you can easily provide your contacts with links to the sites and profiles you want them to be able to see.
The next time you insert that signature into your Outlook message, the link will be shown with the rest of the signature text.
Editing Signature in Outlook 2010
After you have added an email signature link, it’s a good idea to send a test email to yourself or a close friend or family member to make sure that everything is working properly.
If you discover that some information is incorrect or that your hyperlink isn’t working, then you will need to go back in and edit the signature. You can do this by going to:
New Email > Include > Signature > and select the signature you just created
You can then make any of the changes that you need to make and click OK to save them.
The Signatures and Stationery dialog box allow you to customize your Outlook email signature with a signature image, text formatting, or a variety of other options that let you add the contact information that you need for your email signatures.
Note that an edited signature in Outlook won’t affect its inclusion in a previous email message. Messages that were already sent will have the original link icon, web image, or previous URL that was created. The desired hyperlink URL will only be included in emails that you send after making the edit.
More Information on How to Add Hyperlink in Outlook Signature
One of the more common reasons that people add hyperlinks to their Outlook signatures is to make a social media account or a company Web address easier to access for their contacts. When someone gets an email from your and they can see your signature, then they can simply click on that link to open the page that you want.
If you are including a social media link, whether it’s Facebook, Twitter, Pinterest, or any other social media account that you prefer, then it’s best to make sure that you are using the direct link to your profile rather than a generic link to the homepage for that account.
To get this link simply navigate to your social media account in a browser, then copy the address from the address bar at the top of the screen. You will also want to make sure that your account isn’t set to private; otherwise, people won’t be able to see it when they click your link.
To ensure that the email you created will be included in your messages, be sure that you have set the correct default signature for new messages and replies/forwards.
If you need to know how to create a signature so that you can include a hyperlink in it, then read our guide to creating an Outlook 2010 signature. Signatures can be a very helpful component in Outlook 2010, and it is important to have one if you often communicate with people that might be looking for additional methods to contact you.

Matthew Burleigh has been writing tech tutorials since 2008. His writing has appeared on dozens of different websites and been read over 50 million times.
After receiving his Bachelor’s and Master’s degrees in Computer Science he spent several years working in IT management for small businesses. However, he now works full time writing content online and creating websites.
His main writing topics include iPhones, Microsoft Office, Google Apps, Android, and Photoshop, but he has also written about many other tech topics as well.


