If you have a really interesting desktop background picture on your computer, you might not like how all of your desktop icons are hiding it.
While you could rearrange them in a way that the object of the image isn’t covered or even delete the icons, another option is to hide them.
Our tutorial below will show you how to hide desktop icons in Windows 7 with just a couple of short steps.
How to Remove Windows 7 Desktop Icons from View
- Navigate to the Windows desktop.
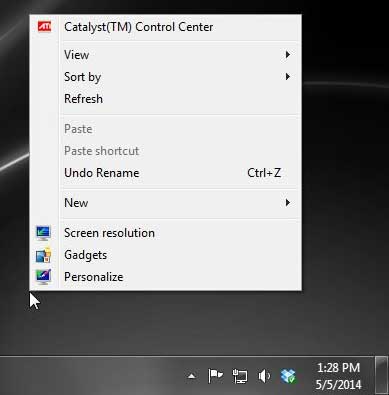
- Right-click in an empty space on the desktop.
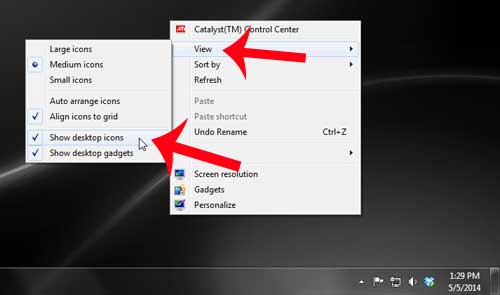
- Choose the Show desktop icons option to clear the check mark.
Our guide continues below with additional information on how to hide desktop icons in Windows 7, including pictures of these steps.
The desktop is one of the most frequently accessed locations for many Windows users, and people like to put shortcut icons and files there because it is easy to remember the location.
Many programs will also install shortcut icons on the desktop by default in another effort to improve the usability of their product.
But this can lead to a very crowded desktop, making it difficult to locate the files you want or to see the picture that you have set as your background.
Rather than deleting or moving the files from the desktop, however, you can instead choose to hide icons on the Desktop.
The files and shortcuts that are there will still be accessible from within programs, files and folders, but they will no longer be visible when you are viewing your desktop.
Related: If you’ve been trying to capture images on your screen, then our how to screenshot on Acer laptop tutorial can help you out.
How to Stop Displaying Windows 7 Desktop Icons (Guide with Pictures)
Note that the files and icons that you have on your desktop are still there; they just are not visible when you are viewing the desktop.
But if you browse to them through Windows Explorer, you will still be able to find the files.
Additionally, you can make the icons visible again by simply following the steps below again.
Step 1: Right-click in an empty space on the desktop to bring up this shortcut menu.

Step 2: Click the View option, then click the Show Desktop Icons option to clear the checkmark.
Note that you can display these icons again by returning to this menu location and clicking the Show Desktop Icons option again.

Now that you know how ot hide desktop icons in Windows 7, you will be able to follow these steps in the future any time that you need to show or hide the things on your desktop.
Do you go to the Control Panel a lot, and wish that you could put an icon for it on the desktop? Learn how to add a control panel icon to your desktop to provide an alternative way of accessing it.

Matthew Burleigh has been writing tech tutorials since 2008. His writing has appeared on dozens of different websites and been read over 50 million times.
After receiving his Bachelor’s and Master’s degrees in Computer Science he spent several years working in IT management for small businesses. However, he now works full time writing content online and creating websites.
His main writing topics include iPhones, Microsoft Office, Google Apps, Android, and Photoshop, but he has also written about many other tech topics as well.