Do you need to add something to your Word 2013 document, but the only way that you can accurately express the information is through a drawing? Fortunately, you can draw in Microsoft Word 2013 with the Scribble shape.
The scribble shape allows you to make a freehand drawing directly in your document. Word will then convert the drawing to a shape object, where you can adjust the appearance of the shape that you just drew.
Note that Word will create a new shape every time that you let go of your mouse with the scribble shape, so you will need to re-select it after letting go. You can also select one of the other shapes on the menu in our guide below if your needs require a specific shape or straight lines.
This article will show you how to draw in Word and provide you with a new way to express your ideas and information that might have otherwise required you to use a different program.
How to Make Drawings in Word
- Click Insert.
- Click the Shapes button, then click the Scribble icon in the Lines section.
- Click and hold down the mouse button, then move the mouse cursor to draw.
- Click the Format tab under Drawing Tools to make any changes to your drawing.
Our article continues below with additional information on how to draw on Word, including pictures of these steps.
How to Make a Freehand Drawing in Microsoft Word 2013 (Guide with Pictures)
The steps in this article will show you how to do freehand drawing in a Microsoft Word document. You will be selecting the “Scribble” shape, which gives you complete control over what is output on your screen. You can also draw freely anywhere in the document, even on top of text that has already been entered.
Please note that drawing in Microsoft Word can be very difficult. If you find that you are having trouble achieving your desired result, then you may have more luck with Microsoft Paint, or with a more advanced tool like Adobe Photoshop.
Step 1: Open a document in Microsoft Word 2013.
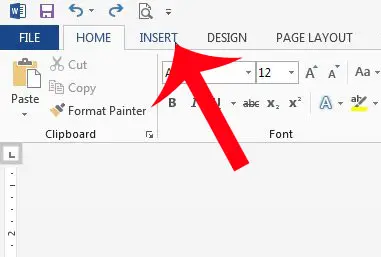
Step 2: Click the Insert tab at the top of the window.
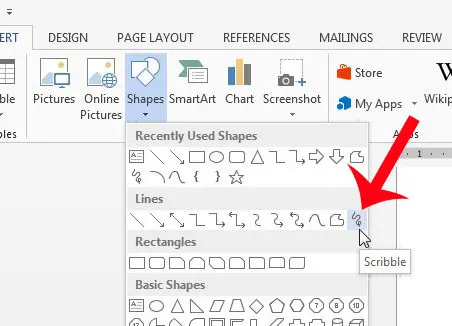
Step 3: Click the Shapes button in the Illustrations section of the navigational ribbon, then click the Scribble button in the Lines section.
Step 4: Use your mouse to draw on the canvas.
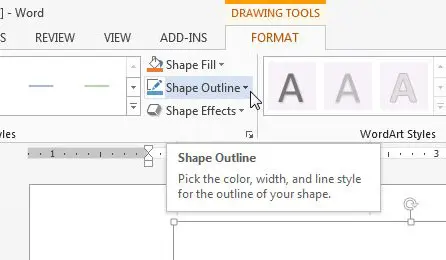
The drawing shape will be completed once you let go of the mouse, which will bring up a new Drawing Tools option. This menu will have options for ways to change the color of the drawing, or to change the fill color.
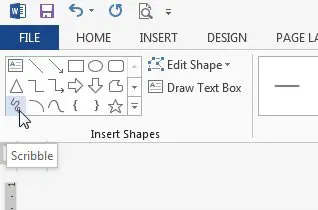
If you need to draw more, then you can re-click the Scribble shape at the left side of the navigational ribbon, as in the image below.
How to Edit the Shape of an Existing Drawing in Word
This section will show you a way to change the shape of your drawing. This method is a little cumbersome, but can be effective if you only need to make minor adjustments to your drawing.
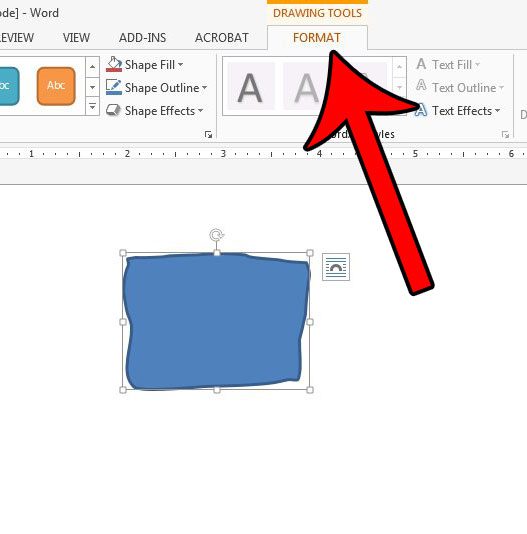
Step 1: Select your drawing, then click the Format tab under Drawing Tools.
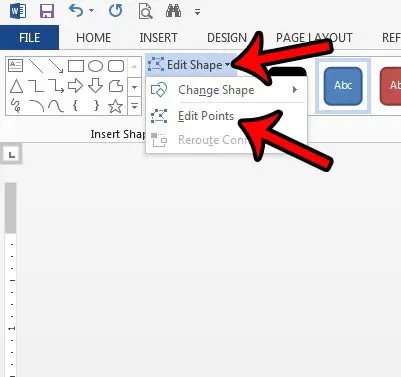
Step 2: Click the Edit Shape button in the Insert Shapes section of the ribbon, then click the Edit Points option.
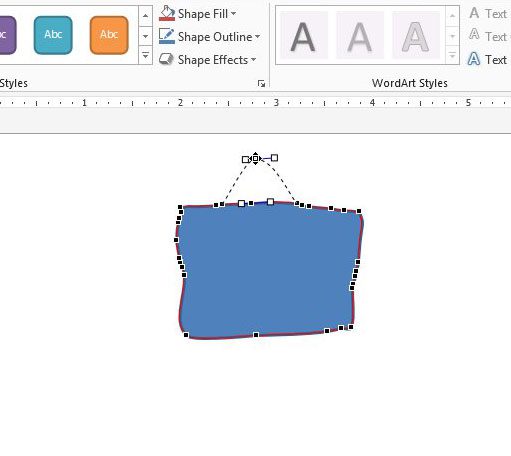
Step 3: Click on one of the points on your drawing, then drag the point to adjust the shape.
Now that you know how to draw in Word 2013, you can use this feature to add hand-drawn elements to your documents whenever you need them.
Making drawings in Word is a helpful option in the application when you need to include a simple drawing in your document and either don’t want to use a dedicated image-editing application or don’t have one at your disposal.
I use the Word drawing tool mainly when I need to make something basic, or when the quality of the drawing isn’t terribly important for the document. I’m also a terrible artist (as indicated by my drawings in the guide above), so I haven’t spent a lot of time getting good with Word’s drawing tools.
Note that drawing in Microsoft Word can be somewhat difficult, even frustrating at times. If you find that the drawing capabilities of Word are limited, then you might have better luck drawing in Microsoft Paint and inserting the saved Paint drawing into your document. This article will show you how to insert a picture in Word 2013.
More Information on How to Draw in Word
While our article above focuses specifically on how to draw on Word using the “scribble” tool, there are other ways that you can draw in your document as well.
When you go to the “Shapes” tool from the Insert tab, there are a lot of different shapes that you can use. For example, if you wanted to draw a line, a square, or a circle, you could select that shape instead. This can be a preferable option if you are struggling to draw a freehand shape, as it can be very difficult to do with a mouse.
You may want to consider getting a USB drawing tablet if you are going to be doing a lot of drawings in Microsoft Word. It can be much easier to use that type of tool, as it allows you to draw in the same manner that you would when drawing on paper.
Where is the Draw Tool in Word?
Finding the Draw tool can be a little tricky, simply because there isn’t a tool that is directly called “Draw” by default. You need to use one of the shape tools, specifically the “scribble” tool that is found on the Shapes menu.
Alternatively, however, you could go to File > Options > Customize Ribbon, then check the box to the left of Draw. This is going to add a new tab to the ribbon where you can find some drawing tools and options.
How Do I Use the Pen Tool in Word?
As we mentioned in the section above, you will need to enable the Drawing tab in the ribbon by opening the Word Optiones menu, then checking the box to the left of Draw.
Once you have the Draw tab in your ribbon you will find an assortment of different drawing tools, including some pen options. While you can use these with a mouse, many people find them easier to use with a touchscreen tablet or laptop, or a drawing tablet accessory.
How Do I Use Handwriting in Word?
You can use handwriting in Microsoft Word with either the scribble tool, then Pen tool on the Draw tab, or with a connected tablet.
Alternatively you could use on of the script fonts found in Word by default, or by downloading a script font from a resource like Google Fonts.
How Do You Get Word Art on Microsoft Word?
The Word Art option is located on the Insert tab, at the right side, in the Text section of the ribbon.
This is going to add a text box with the WordArt style that you selected. You can then customize the appearance of the Word Art by selecting the text in the text box, then choosing a formatting option from the Format Shape tab in the ribbon.
Continue Reading
- How to insert a check mark in Microsoft Word
- How to do small caps in Microsoft Word
- How to center text in Microsoft Word
- How to merge cells in Microsoft Word tables
- How to insert a square root symbol in Microsoft Word

Matthew Burleigh has been writing tech tutorials since 2008. His writing has appeared on dozens of different websites and been read over 50 million times.
After receiving his Bachelor’s and Master’s degrees in Computer Science he spent several years working in IT management for small businesses. However, he now works full time writing content online and creating websites.
His main writing topics include iPhones, Microsoft Office, Google Apps, Android, and Photoshop, but he has also written about many other tech topics as well.