As people are focused more and more on moving to a completely digital lifestyle, it’s becoming apparent that physical media options, like CDs and DVDs, are becoming obsolete.
However, many of the video files and movies that we have created or watched in the past are likely to be on discs like this, so you may encounter a situation where you want to copy video from disc to iTunes.
This is a particularly important task to accomplish for videos that cannot be replicated, such as personal home videos, because it also provides you with a way to back up video files that might only exist on those physical discs, which makes them vulnerable to potential loss.
By using a combination of Windows 7 tools and free downloadable programs, you can easily copy video from disc to iTunes.
Copy Video From Disc to iTunes That Does Not Need to Be Converted
The easiest thing that you can do when attempting to copy video from disc to iTunes is to simply copy a video file from the disc to you computer, then import it into iTunes.
However, this can only be accomplished with videos that exist on the disc in a video format that is compatible with iTunes, which may not be a common situation for a lot of people.
However, instead of attempting to list all of the potential situations where this might occur, as well as listing the video file formats that are directly compatible for copying video from a disc directly into iTunes, the simplest thing to do is try it and see if it works.
Step 1 – Insert the disc into the disc drive on your computer. Note that the disc drive on your computer must support the type of disc that you are inserting. A DVD drive supports CD and DVD discs, while a CD drive will not work with a DVD.
Step 2 – Click the Start button at the bottom-left corner of your screen, then click My Computer.
Step 3 – Right-click the disc icon, then click Open.
Step 4 – Right-click the video file, click Copy.
Step 5 – Click the Start button at the bottom left-corner of the screen, click your user name at the top-right-corner of the Start menu, then double-click the My Videos folder.
Step 6 – Right-click inside the folder, then click Paste. Depending upon the size of your video file, this may take several minutes.
Step 7 – Launch iTunes.
Step 8 – Click File at the top of the window, then click Add File to Library.
Step 9 – Double-click the file that you just copied to the My Videos folder. Once it has been added to iTunes, it will appear in the Movies library in iTunes.
Copy Video From Disc to iTunes That Is Not Compatible With iTunes
Unfortunately not all of the video that you encounter is going to be immediately compatible when you attempt to copy video from disc to iTunes. However, there is an excellent, free video conversion program that you can download to convert video files to an iTunes compatible file format. This video conversion program is called Handbrake, and you can download it from here. Once you have downloaded and installed the program, you can quickly convert the file to an iTunes compatible file format.
Step 1 – Insert the disc containing the video file that you want to import into iTunes.
Step 2 – Launch Handbrake.
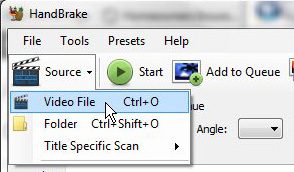
Step 3 – Click the Source button at the top of the window, click the Video File option, then double-click the video file on the disc. If your disc contains an AUDIO_TS and VIDEO_TS folder, then you will need to click the Folder option instead of the Video File option, then select the VIDEO_TS folder.
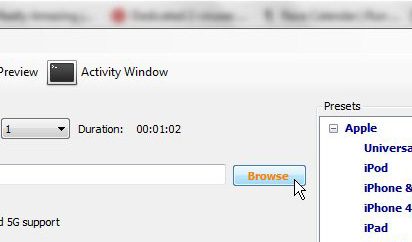
Step 4 – Click the Browse button at the right side of the window, then select the Videos folder. This is where the converted file will be located.
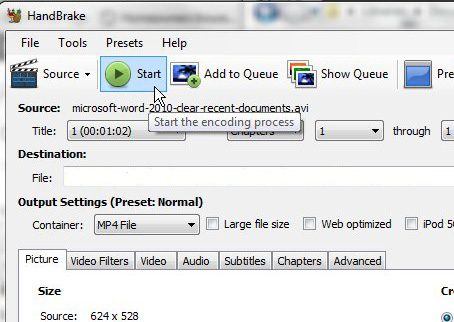
Step 5 – Confirm that the drop-down menu to the right of Container says MP4 file, then click the Start button at the top of the window.
Step 6 – Launch iTunes.
Step 7 – Click File at the top of the window, then click Add File to Library.
Step 8 – Double-click the file that you just copied to the My Videos folder. Once it has been added to iTunes, it will appear in the Movies library in iTunes.
Now that you know how to copy a video from a disc to iTunes, you can use this method to create backups of the movies that you have in case something happens to the discs.

Matthew Burleigh has been writing tech tutorials since 2008. His writing has appeared on dozens of different websites and been read over 50 million times.
After receiving his Bachelor’s and Master’s degrees in Computer Science he spent several years working in IT management for small businesses. However, he now works full time writing content online and creating websites.
His main writing topics include iPhones, Microsoft Office, Google Apps, Android, and Photoshop, but he has also written about many other tech topics as well.


