The SuperDrive for your MacBook Air is a necessary device when you need to access information on a CD or DVD. But when it comes time to remove that disc, you might be wondering how to eject a disc from a SuperDrive.
The MacBook Air does not have a CD or DVD drive, a choice that was made in an effort to keep the weight of the laptop down and make it more portable.
This is actually less of a problem than you might think, if this is the first time that you are encountering a computer without a CD or DVD drive. Most common programs can be downloaded legally, and most movies and songs can be streamed or downloaded from assorted digital media retailers.
However, there are certain situations that you might encounter where these options will not work, and you are forced to use an external disc drive, such as Apple’s USB SuperDrive. But this device does not have an eject button, and you might find yourself wondering how to get a disc out of it.
As an Amazon affiliate, I earn from qualifying purchases.
How to Eject a SuperDrive Disc from a MacBook Air
- Open Finder.
- Find the drive in the left column.
- Click the Eject button.
Our article continues below with additional information on ejecting a CD or DVD from an Apple SuperDrive, including pictures of these steps.
How to Eject a Disc from Apple’s USB SuperDrive (Guide with Pictures)
It is not as obvious as you might think to eject a disc from this device, especially if you are new to the Mac platform. So read below to learn the instructions for doing so.
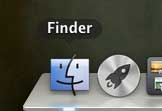
Step 1: Click the Finder icon in the dock at the bottom of your screen.
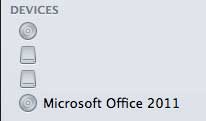
Step 2: Locate the drive in the column at the left side of the window.
In my example image, I need to eject a Microsoft Office 2011 disc.
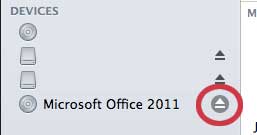
Step 3: Click the Eject button to the right of the disc description.
You can then remove the disc from the SuperDrive and either disconnect the device, or insert the next disc.
Now that you know how to eject a disc from the SuperDrive on a MacBook Air, you can quickly remove a disc that you had previously inserted into the device.
While the MacBook Air is an incredible laptop, there are still some accessories for which you might encounter a need. Check out out article on must-have accessories for the MacBook Air.

Matthew Burleigh has been writing tech tutorials since 2008. His writing has appeared on dozens of different websites and been read over 50 million times.
After receiving his Bachelor’s and Master’s degrees in Computer Science he spent several years working in IT management for small businesses. However, he now works full time writing content online and creating websites.
His main writing topics include iPhones, Microsoft Office, Google Apps, Android, and Photoshop, but he has also written about many other tech topics as well.


