This post contains affiliate links. As an Amazon Associate, solveyourtech.com earns from qualifying purchases, at no extra cost to you.
To connect a 2012 MacBook Air to an HDTV, plug a Mini DisplayPort to HDMI adapter into the Thunderbolt port, run an HDMI cable from the adapter to the TV, and switch the TV to that HDMI input. The 2012 Air has no HDMI port, so the adapter is the one part you need to buy.
With an Apple TV or an AirPlay 2 smart TV, you can connect wirelessly instead. These steps cover the 11-inch and 13-inch Mid 2012 models, which top out at macOS Catalina, so menus use System Preferences.
The Adapter and Cable You Need
- A Mini DisplayPort to HDMI adapter, or a one-piece Mini DisplayPort to HDMI cable. Apple’s tech specs for the 13-inch Mid 2012 MacBook Air list HDMI audio and video output through a third-party Mini DisplayPort to HDMI adapter. The Thunderbolt port on this laptop accepts Mini DisplayPort plugs, so you don’t need a Thunderbolt-specific adapter. Pick one that lists audio support if you want sound to come out of the TV.
- An HDMI cable long enough to reach from where you’ll sit to the TV. Skip this if you bought an adapter cable with an HDMI plug on the end.
- A TV with a free HDMI input, and its remote.
- The MacBook Air’s power adapter if you’ll be watching for more than an hour or plan to close the lid.
A note on resolution: Apple’s specs say the 2012 MacBook Air can drive an external display at up to 2560 by 1600 pixels. That’s plenty for a 720p or 1080p HDTV. A 4K TV will work, but it won’t get a full 4K signal from this laptop.
How to Connect the MacBook Air to a TV With HDMI
- Find the Thunderbolt port. It’s on the right side of the MacBook Air and has a small lightning bolt symbol next to it. It’s the same shape as a Mini DisplayPort.
- Plug the adapter into the Thunderbolt port. Push it in until it sits flush.
- Connect the HDMI cable to the adapter, then plug the other end into an HDMI port on the back or side of your TV. Note the port’s label, such as HDMI 1 or HDMI 2.
- Turn on the TV and choose the matching input. Press the Input or Source button on the TV remote and select the HDMI port you used.
- Wait a few seconds. The MacBook Air screen may flicker once while it detects the TV. Then your desktop wallpaper appears on the TV.
By default, the TV usually becomes an extension of your desktop. That means the TV shows only your wallpaper, and you drag windows onto it. If you’d rather see the same thing on both screens, switch to mirroring in the next section.
How to Set Up the TV in System Preferences
All of these settings are in the Displays pane. The steps follow Apple’s macOS Catalina guides to using your TV as a display and using multiple displays.
Mirror your screen on the TV
- Click the Apple menu in the top-left corner and choose System Preferences.
- Click Displays. A Displays window opens on each screen.
- In the window on the MacBook Air, click the Arrangement tab. You’ll see two blue rectangles, one for each screen.
- Check Mirror Displays. The TV now shows the same thing as your laptop screen.
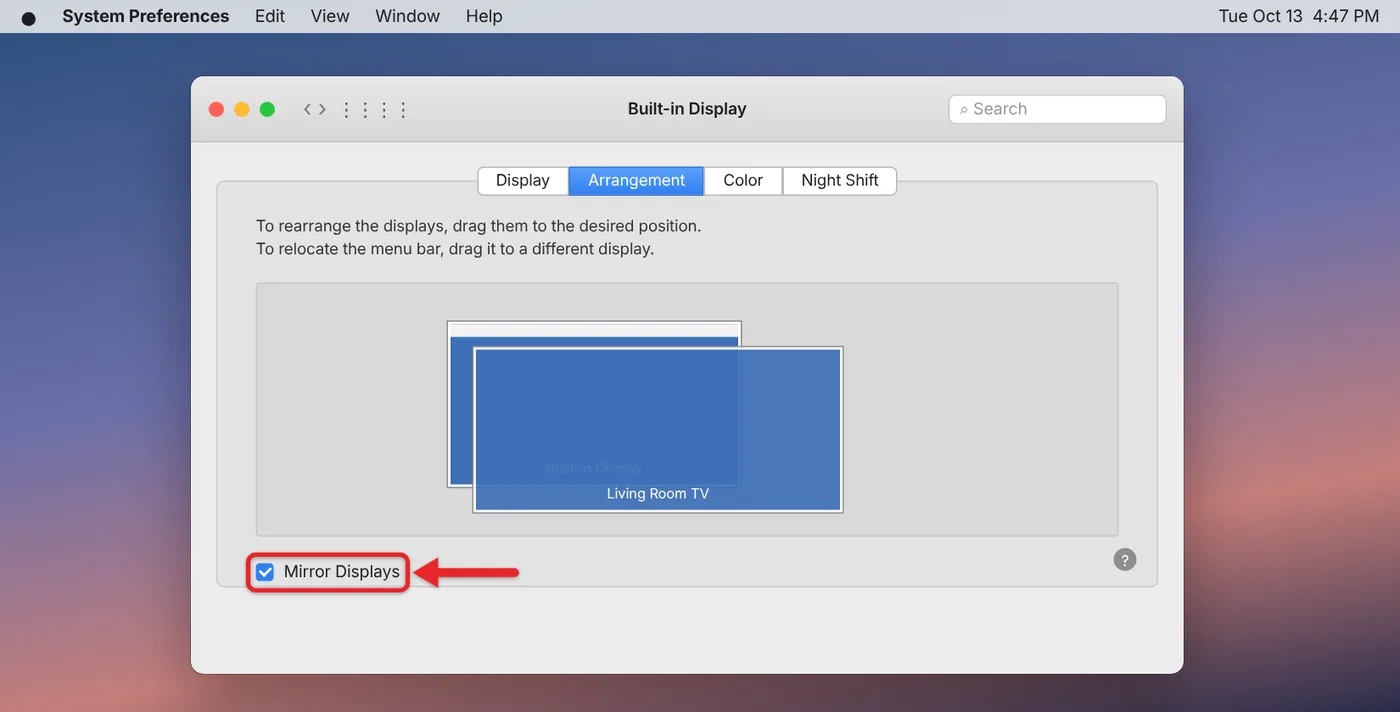
Apple suggests setting both screens to the same resolution first. In practice, mirroring often makes the TV picture look soft or boxed in, because the 11-inch Air’s screen is 1366 by 768 and the 13-inch is 1440 by 900, while most HDTVs are 1920 by 1080. For movies and slideshows, an extended desktop usually looks better.
If you’re playing a DVD from an external drive, here’s how to eject the disc from a SuperDrive when the movie ends.
Use the TV as a second screen
- Open System Preferences > Displays and click Arrangement.
- Make sure Mirror Displays is unchecked.
- Drag the rectangles so they match where the TV sits relative to your laptop. Your pointer moves between screens across that edge.
- To make the TV your main screen, drag the white menu bar strip from the laptop’s rectangle onto the TV’s rectangle. New windows and the Dock then open on the TV.
Set the TV’s resolution
- In System Preferences > Displays, look at the window that opened on the TV and click the Display tab.
- Select Default for display to let the Mac pick the TV’s best resolution, or select Scaled to choose one yourself. On a 1080p TV, 1920 by 1080 gives the sharpest picture. If text is too small from across the room, a lower setting like 1280 by 720 makes everything bigger.
If the TV goes black after you change the resolution, wait about 15 seconds or press Esc. The Mac goes back to the previous setting.
How to Send the Sound to the TV
- Open System Preferences and click Sound.
- Click the Output tab.
- Select your TV in the list. It’s usually shown by its brand or model name.

Sound now plays through the TV speakers. To switch back, select Internal Speakers in the same list. A cable connected to a Thunderbolt or HDMI port can carry audio to an HDTV, but the adapter has to support it too. If your TV isn’t in the Output list, the adapter is the most likely cause.
To adjust the TV’s volume without opening System Preferences, add the volume button to your menu bar.
Connect Wirelessly With AirPlay
You don’t need a cable if you have an Apple TV, or a smart TV with AirPlay 2 support (many TVs sold since 2019 have it; check for AirPlay in the TV’s settings). The MacBook Air and the TV must be on the same Wi-Fi network.
- Click the AirPlay icon in the menu bar at the top of the screen. It looks like a rectangle with a triangle at the bottom.
- Choose your Apple TV or smart TV from the list. If a code appears on the TV, type it on the Mac.

- To pick how the picture is sized, click the AirPlay icon again and choose whether the desktop should match this Mac or the Apple TV. The icon turns blue while you’re mirroring.
- To stop, click the AirPlay icon and choose the option to turn AirPlay off.
If you don’t see the AirPlay icon in the menu bar, open System Preferences > Displays and turn on Show mirroring options in the menu bar when available.
These steps follow Apple’s Catalina guide to streaming to an Apple TV. AirPlay to smart TVs arrived in macOS Mojave 10.14.5, so update to at least that version (or to Catalina) if only your Apple TV shows up. Wireless mirroring can lag a little, which matters for games but not for movies or photos. If your Apple TV doesn’t appear, check the setting on the TV side. Read about turning AirPlay on or off on an Apple TV to find it.
Use the TV With the Laptop Lid Closed
If you’d like the TV to be your only screen, you can close the MacBook Air and keep working. Apple’s steps for this need a power adapter and an external keyboard and mouse:
- Connect the MacBook Air to its power adapter and to the TV.
- Connect a USB or Bluetooth keyboard and mouse.
- Close the lid. The Mac goes to sleep.
- Press a key or move the mouse. The Mac wakes up and shows the desktop only on the TV.
Newer MacBook Air Models
MacBook Air models from 2018 on have USB-C or Thunderbolt ports instead of the 2012 model’s original Thunderbolt port. They need a USB-C to HDMI adapter or cable, such as Apple’s USB-C Digital AV Multiport Adapter, as described in Apple’s guide to connecting a Mac to an HDMI device. On a newer MacBook Air, the display and sound options are in System Settings > Displays and System Settings > Sound.
If you are thinking about replacing a 2012 model, this list of best-selling laptops by budget covers the current MacBook Air and cheaper options.
If the TV Doesn’t Work
- The TV says “No Signal.” Check the input on the TV first. Then unplug the adapter, plug it back in firmly, and try a different HDMI port on the TV.
- The Mac doesn’t see the TV. Open System Preferences > Displays, hold the Option key, and click Detect Displays. If that doesn’t work, put the Mac to sleep, wait a few seconds, and wake it.
- The picture is cut off at the edges, or has a black border. Open System Preferences > Displays > Display on the TV’s window and look for an Underscan slider or an Overscan option. Not every TV and resolution shows these. If yours doesn’t, change the TV’s own picture size setting. It’s often called something like Screen Fit, Just Scan, or Full Pixel.
- Text looks blurry. Try a different resolution on the Display tab, or read about changing the screen resolution on a MacBook Air.
- There’s no sound from the TV. Select the TV under System Preferences > Sound > Output. If it isn’t listed, your adapter probably doesn’t carry audio. Use an adapter that lists audio support, or connect speakers or headphones to the Mac instead.
- A video stops with an HDCP error. HDCP is copy protection used by some movies and TV shows. This can happen if the Mac sleeps while a video is playing or paused. Quit the app and open it again.
MacBook Air HDTV Questions
Does the 2012 MacBook Air have an HDMI port?
No. It has one Thunderbolt port for video. You need a Mini DisplayPort to HDMI adapter or cable to connect it to an HDMI TV.
Will the TV play sound from my MacBook Air?
Yes, as long as your adapter supports audio. After you connect it, select the TV in System Preferences > Sound > Output.
Can I use a USB-C to HDMI adapter on a 2012 MacBook Air?
No. The 2012 model doesn’t have a USB-C port. USB-C adapters are for MacBook Air models from 2018 and later.
Can I connect my 2012 MacBook Air to a TV without a cable?
Yes, if you have an Apple TV or a smart TV that supports AirPlay 2. Smart TV support needs macOS Mojave 10.14.5 or later, which the 2012 MacBook Air can run.
What’s the highest resolution it can send to a TV?
Up to 2560 by 1600 pixels, according to Apple. That covers 1080p HDTVs fully, but not 4K.

Matthew Burleigh is the founder, head writer, and editor of Solve Your Tech, which he launched in 2012. He has written technology tutorials since 2008 and worked in IT since 2003, including small-business support, IT management, and consulting. He holds Bachelor’s and Master’s degrees in Computer Science from Arizona State University.
Matthew writes practical guides for Windows, iPhone and iPad, Microsoft Office, Outlook, Google apps, and Android. Solve Your Tech’s guides are checked step by step against the device or app maker’s own documentation and tested on his own devices whenever he has the hardware or software, with clear steps, sources, and update dates.
Read more about Matthew and how Solve Your Tech writes and updates its guides, or report a correction.