To make email text bigger in Outlook, hold Ctrl and scroll the mouse wheel in the reading pane, or use Zoom (View > Zoom in new Outlook, or the slider at the bottom right in classic Outlook). To change the font size you type in, use Settings > Mail > Compose and reply in new Outlook or File > Options > Mail > Stationery and Fonts in classic Outlook.
This guide covers new Outlook for Windows, classic Outlook for Windows (Microsoft 365 and recent standalone versions), Outlook on the web and Outlook.com, Outlook for Mac, and the Outlook phone app. It includes message list text, font color, message format, and fixes for tiny text.
First, Check Which Outlook You Have
The menus are different in each version, so start here:
- Classic Outlook: has a File tab at the top left of the ribbon.
- New Outlook for Windows: has no File tab, and a Settings gear sits at the top right. It looks almost the same as Outlook on the web.
- Outlook on the web or Outlook.com: opens in a browser at outlook.com or outlook.office.com.
- Outlook for Mac: uses the Outlook menu in the Mac menu bar.
Settings don’t carry over between versions. A font you set in Outlook on the web doesn’t change classic Outlook on your PC, and the other way around.
Which Setting Changes Which Text
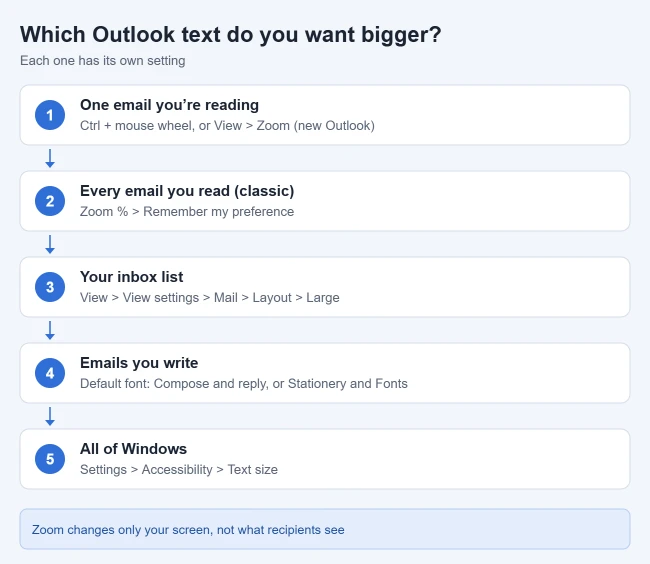
| What you want bigger | Setting to use | Does the recipient see it? |
|---|---|---|
| One email you’re reading | Reading pane zoom or Ctrl + mouse wheel | No |
| Every email you read (classic) | Zoom with Remember my preference | No |
| Sender names and subject lines in the inbox | Message list text size, or Row Font in classic | No |
| Text you type in new emails and replies | Default compose font | Yes |
| Everything on the screen | Windows text size or display scale | No |
Make Emails You Read Bigger
New Outlook and Outlook on the web
- Select a message so it opens in the reading pane.
- Select the View tab, then Zoom. If Zoom is greyed out, select a message first.
- Select + to zoom in or − to zoom out (50% to 200%). Select Reset to go back.

Microsoft notes that this only affects the email you’re viewing; the next one opens at normal size. In a browser, you can also use the browser’s own zoom (Ctrl and + or −), which enlarges the whole Outlook page.
Classic Outlook
- Select the message you want to read.
- Drag the zoom slider in the bottom-right corner of the Outlook window to the right, or hold Ctrl and scroll up. This zoom resets when you pick another message.
- To keep that zoom for every message, select the percentage next to the slider, pick a level or type one in the Percent box, check Remember my preference, and select OK.

These steps come from Microsoft’s default font guide, which also covers reading zoom, and its Outlook zoom guide.
Make the Message List Text Bigger
- New Outlook and Outlook on the web: select View > View settings, then Mail > Layout. Under Text size and spacing, choose Small, Medium or Large and select Save.
- Classic Outlook: select View > View Settings > Other Settings. Use Row Font for subject lines and Column Font for headers like From and Subject. Select OK twice.

Microsoft covers both in its message list font guide.
In classic Outlook, this change applies only to the current view of the folder you’re in. To use it everywhere, select View > Change View > Apply Current View to Other Mail Folders and pick the folders, or repeat the steps in each folder.
Change the Font Size for Emails You Write
New Outlook and Outlook.com
- Select the Settings gear, or View > View settings.
- Select Mail, then Compose and reply (Microsoft also calls it Compose).
- Under Message format, choose the font, size, and style. The sample text updates as you choose.
- Select Save. New emails start in that font and size. If you close the panel without saving, nothing changes.

In this version, one font covers both new emails and replies. If you have more than one account in new Outlook and the Compose page shows an account picker, set the font for each account.
Classic Outlook
- Select File > Options > Mail. Under Compose messages, make sure the format is HTML.
- Select Stationery and Fonts.

- On the Personal Stationery tab, select Font under New mail messages, pick a size, and select OK. Repeat for Replying or forwarding messages and, if you use it, Composing and reading plain text messages.

- Select OK until you’re back in Outlook. The change applies to new messages right away.
New messages and replies have to be set separately. Newer versions start with 12-point Aptos, as a Microsoft moderator notes on Microsoft Q&A; older ones used Calibri. To go back to the old defaults in classic Outlook, choose +Body, Regular, size 11, and Automatic color.
The plain text font also changes how plain text emails you receive look, not only the ones you write.
Outlook’s setting doesn’t carry over to other Office apps, so you’d also change the default font in Excel and set a default font in Word separately.
Outlook for Mac
Microsoft’s Outlook for Mac font guide gives these steps:
- In the menu bar, select Outlook > Settings.
- Select Composing.
- Next to New mail or Reply or forward, select Select….
- Choose a font and size in the Font panel, then select OK.

To make the text of emails you read bigger on a Mac, go to Outlook > Settings > Reading and change Preview font for message. You can also select a message and choose Format > Increase Font Size; that size lasts until you leave the folder. While writing, Format > Zoom enlarges the draft on your screen only.
If you also send mail from Gmail, here’s how to change the default font in Gmail.
Outlook on iPhone and Android
The Outlook phone app has no default compose font size setting. The app follows your phone’s font size. On Android, Microsoft points to Settings > Display and wallpaper > Font; the menu name can differ by phone maker. You can still format the text in a single email with the formatting button above the keyboard while you write.
Change the size in just one email
While writing, select the text and pick a size from the font size box on the Format Text tab or the formatting toolbar. This changes only that message, not your default. You can also add strikethrough to text in Outlook from the same place.
Set a Default Font Color in Classic Outlook
Open File > Options > Mail > Stationery and Fonts. On Personal Stationery, choose Font under New mail messages, pick a Font color, check the preview and close the dialogs with OK. Set Replying or forwarding messages separately if you like. Open a new HTML draft to check the result; changing this default does not recolor an existing draft. To restore the default color, choose Automatic in the same Font dialog. The classic Outlook defaults are on Microsoft’s font and color help page; the new Outlook and web compose controls are covered above. Dark text on a white background is the easiest for recipients to read.
If the Font Buttons Are Greyed Out or the Font Keeps Changing Back
These fixes are for classic Outlook unless noted.
- A theme or stationery is on. On the Personal Stationery tab, select Theme, choose (No Theme), and select OK. The Font buttons become available again. If you want to keep the theme, set its Font box to Always use my fonts.
- The message is plain text. Plain text has no font sizes. In a draft, select Format Text > HTML. If every email opens as plain text, check File > Options > Trust Center > Trust Center Settings > Email Security and clear Read all standard mail in plain text.
- The reply font is different. Set Replying or forwarding messages too. Quoted text from the other person keeps their font.
- An old draft still uses the old font. A new default applies only to emails you start after the change. Start a new email, or select the draft’s text and change it.
- Your signature looks different. Signatures keep their own font. Edit it in the signature settings.
- A work account won’t let you change it. Your organization may control mail format. Ask your IT department.
- New Outlook or the web: make sure you selected Save, then close and reopen the app or reload the page.
If Emails Suddenly Look Tiny
- One sender’s emails are small: senders choose their own fonts, so zoom the reading pane for those messages.
- Replies look small: a Microsoft moderator suggests checking that File > Options > Mail > Compose messages in this format is set to HTML, and that the reply font is set too.
- The inbox layout looks cramped (classic): select View > Reset View to return the current folder to its default layout. For other layout fixes, read about changing Outlook view back to normal.
- Everything on the PC is small: go to Settings > Accessibility > Text size, or change scaling in Settings > System > Display. For more detail on both, read how to increase text size in Windows 11.
Make the Whole Outlook Window Larger
If the whole interface is too small, open Windows Settings > System > Display, select the monitor Outlook is on, and choose a larger value under Scale. Keep the display’s recommended resolution so text stays sharp. Microsoft’s display guide explains the options. This affects every app on that screen, so if you only want bigger email text, use the Outlook zoom steps above.
Outlook Font Size Questions
Why are only some emails small?
Senders choose fonts in their messages. Zooming the reading pane is the fastest fix.
Does zoom change the email for the recipient?
No. Zoom only changes how it looks on your screen. To change what recipients see, change your default compose font.
Will recipients see my font?
Usually. If a recipient doesn’t have your font installed, their email app substitutes one, so common fonts such as Aptos, Calibri, Arial or Verdana are safest. Sizes from 10 to 12 points read well for most people.
Does changing the default font change emails I already sent?
No. It applies only to emails you write after you save the change.
How do I add a signature?
Follow the steps to add a signature in Outlook.
If pasted text leaves your message with mixed fonts and sizes, here’s how to remove formatting from an email in Outlook.

Matthew Burleigh is the founder, head writer, and editor of Solve Your Tech, which he launched in 2012. He has written technology tutorials since 2008 and worked in IT since 2003, including small-business support, IT management, and consulting. He holds Bachelor’s and Master’s degrees in Computer Science from Arizona State University.
Matthew writes practical guides for Windows, iPhone and iPad, Microsoft Office, Outlook, Google apps, and Android. Solve Your Tech’s guides are checked step by step against the device or app maker’s own documentation and tested on his own devices whenever he has the hardware or software, with clear steps, sources, and update dates.
Read more about Matthew and how Solve Your Tech writes and updates its guides, or report a correction.