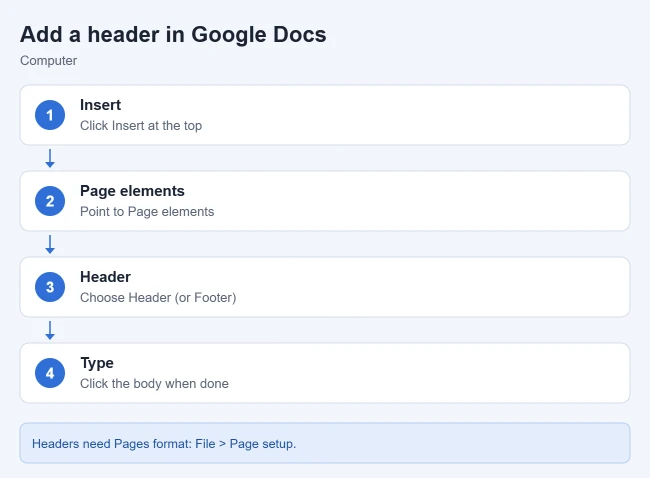
To add a header in Google Docs, click Insert › Page elements › Header, type your text, and click back in the body of the page. The header repeats at the top of every page, and you remove it by double-clicking it, clicking Options, and choosing Remove header.
These steps cover Google Docs in a web browser on Windows, Mac, and Chromebook, plus the Google Docs app for iPhone, iPad, and Android. They follow Google’s Use headers, footers, page numbers & footnotes help page and its iPhone and iPad version. Headers only work when the document uses Pages format, not pageless.
Before You Start
- You need edit access. If you can only view or comment, the Insert menu won’t let you add a header. Ask the owner to share the file with you as an editor.
- The document must be in Pages format. Google says headers, footers, and page numbers aren’t available in pageless documents. To check, click File › Page setup, select Pages at the top, and click OK. You can also click Format › Switch to Pages format.
- A header is not a heading. A header is the strip of text at the top of every page, such as a title or your name. A heading is a styled title inside the body, like Heading 1. Heading steps are at the end of this guide.
How to Add a Header on a Computer
- Open the document in Google Docs on your computer.
- Click Insert › Page elements.
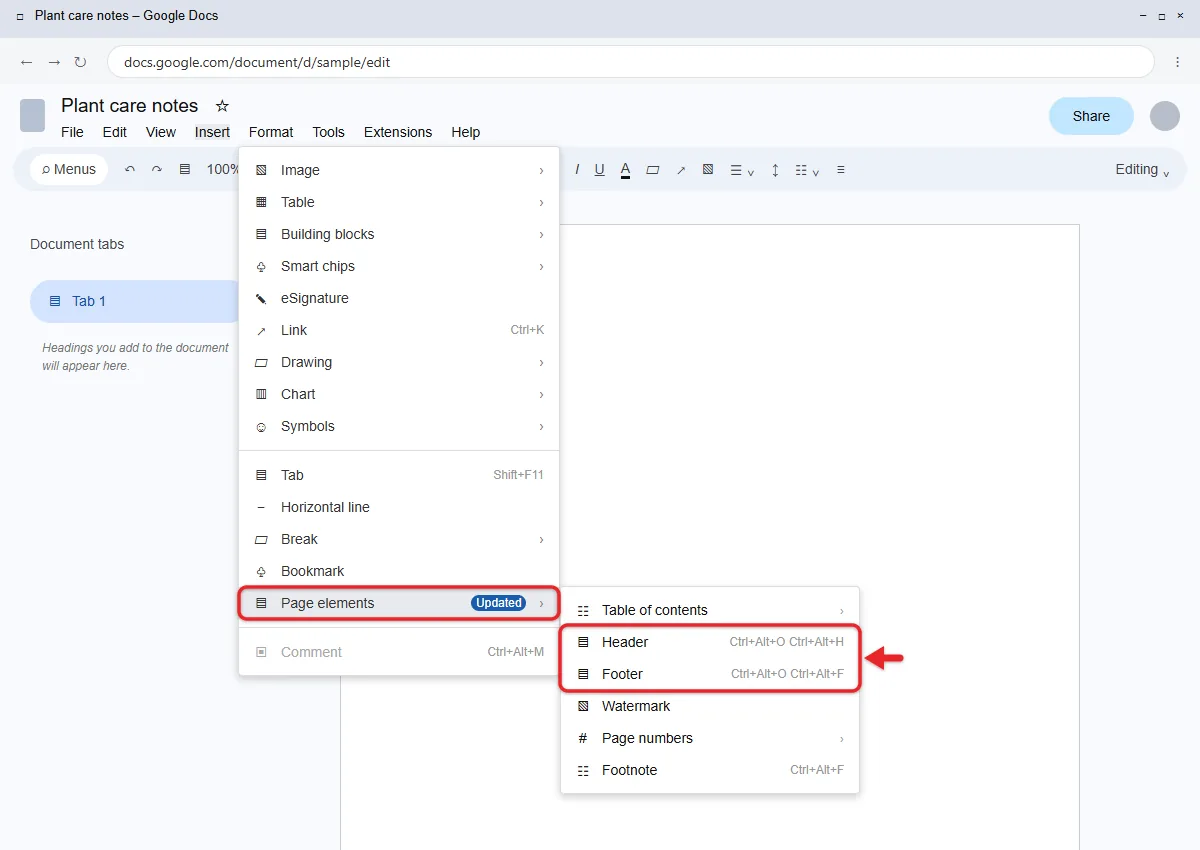
- Choose Header. The cursor jumps into a new area at the top of the page.
- Type your text, such as the document title, your name, or a date.
- Click anywhere in the body of the page to leave the header.
The text now appears at the top of every page. To add a footer instead, choose Footer in step 3; every step in this guide has a footer version.
You can also use Google’s keyboard shortcuts from its Google Docs shortcut list. On Windows or Chromebook, hold Ctrl + Alt and press O, then H for a header or F for a footer. On a Mac, hold Ctrl + ⌘ and press O, then H or F. The same shortcut moves you into an existing header.
Header text has a few quirks worth knowing. It’s left out when you get a word count in Google Docs, unless you select it first. It stays full width even when you make two columns in Google Docs for the body. And if you switch the document to pageless format, existing headers and footers disappear from view until you switch back. Pageless format also moves footnotes to the end of the document, as explained in how to add footnotes in Google Docs.
How to Edit and Format a Header
- Double-click the header area at the top of any page.
- Change the text. Use the toolbar to change the font, size, bold, color, or alignment, the same way you format body text.
- Click in the body to leave the header.
The change applies to every page that shares that header. A few layout ideas:
- Title on the left, name on the right: type the title, press Tab until the cursor reaches the right side, and type your name. For more control, insert a one-row, three-column table in the header and hide its borders.
- Page numbers: click in the header, then click Insert › Page elements › Page number and pick a position. Page count adds the total number of pages, for “Page 2 of 10” style headers. For more numbering options, here’s how to add page numbers in Google Docs.
- Logo: click in the header, then click Insert › Image › Upload from computer. Drag a corner handle to shrink it. For crop and wrap settings, read about inserting and editing pictures in Google Docs.
Keep the header short. One line of text, or a small logo and one line, keeps it from crowding the page.
If you want every new document to start in the same font, you can change the default font in Google Docs once instead of formatting each file.
Use a Different Header on Some Pages
By default every page shows the same header. Google offers three ways to change that:
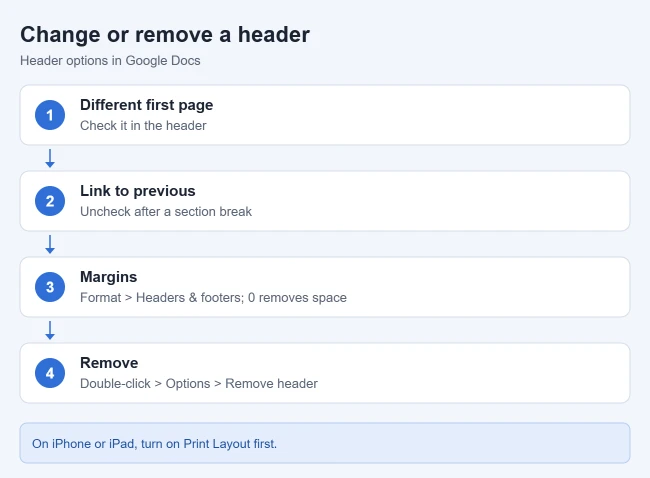
- Different first page: click in the header and check Different first page, which appears just below the header area. The first page of the document or section gets its own header, which you can leave blank for a title page.
- Different odd and even pages: click a header, click Options on the right, set Apply to to Whole document, check Different odd and even, and click Apply. Then type separate text on an odd page and an even page. This suits printed booklets where the header alternates sides.
- Different header for a section: click where the new part should start, click Insert › Break › Section break (next page), then click in the header of the new section and uncheck Link to previous. Type the new header text. If you don’t see Link to previous, you need a section break first.
To learn the difference between break types, read about page breaks and section breaks in Google Docs. If a section break leaves an empty page behind, you can delete a blank page in Google Docs. To set up a full title page, add a cover page in Google Docs.
How to Change the Header Margin
The header margin is the space between the top edge of the page and the header text. Change it when the header sits too low or takes up too much room.
- Click in the header.
- Click Format › Headers & footers. You can also click Options on the right of the header and choose Header format.
- Under Apply to, choose this section or the whole document.
- Enter a new Header margin. A smaller number moves the header closer to the top edge. Setting it to 0 removes the extra header space.
- Click Apply.
If the header text overlaps the body or looks cut off, raise the page’s top margin in File › Page setup instead. The landscape orientation guide shows the other settings in that window.
How to Remove a Header
- Double-click the header.
- Click Options on the right.
- Choose Remove header. The header text and its space disappear.
This removes the header for that section, so repeat it in each section if your document has several. If you only want to clear the text but keep the space, select the text and press Delete instead. Changed your mind right away? Press Ctrl + Z (⌘ + Z on a Mac) to undo.
Headers in the Google Docs App
The steps are the same on iPhone, iPad, and Android, according to Google’s help pages for each.
- Open the document in the Google Docs app and tap Edit (the pencil icon).
- Tap More (three dots) at the top right and turn on Print Layout.
- Tap the top of the page where the header goes.
- Type your text, then tap the body of the page to leave the header.
Headers, footers, and page numbers only show in Print Layout, so turn it on whenever you need to see them. The app doesn’t offer the Options menu, odd and even headers, or header margins; open the document at docs.google.com on a computer for those. To remove header space in the app, change the margin size.
Troubleshooting
- No Header option under Page elements: the document is in pageless format. Click File › Page setup, choose Pages, and click OK.
- The header is missing on the phone: turn on Print Layout in the More menu.
- Insert menu is grayed out or missing: you have view-only or comment-only access. Ask the owner for edit access, or make your own copy with File › Make a copy.
- The first page shows a different header than the rest: Different first page is checked. Click the header and clear it, or type text in the first-page header too.
- Removing one header didn’t remove them all: the document has several sections. Remove the header in each one.
- Link to previous is missing: there’s no section break above that page. Add one with Insert › Break › Section break (next page).
- Header too tall: lower the header margin as shown above.
Create Reusable Letterhead in Google Docs
To make letterhead, add a header with the steps above and type your organization’s name and contact details. Add a logo with Insert › Image › Upload from computer while the cursor is in the header, then resize it so it doesn’t crowd the text. Check Different first page if the letterhead should appear only on page 1.
Name the file something like Letterhead master. For each new letter, open it, choose File › Make a copy, name the copy, and write in the copy so the master stays clean. Google’s file-copy instructions cover the copy options.
Looking for Headings Instead?
To turn a line of body text into a heading, click in the line and choose Heading 1, Heading 2, or another level from the style menu on the toolbar (it usually says Normal text). The keyboard shortcut is Ctrl + Alt + 1 through 6 on Windows or Chromebook, and ⌘ + Option + 1 through 6 on a Mac. Headings build the document outline and table of contents; they don’t repeat on every page the way a header does.
Frequently Asked Questions
Can I put a header on only one page?
Yes, on the first page. Check Different first page, type text in the first-page header, and leave the other pages’ header empty. For a page in the middle, put section breaks before and after it and uncheck Link to previous in each new section.
Can I put an image in a header?
Yes. Click in the header first, then use Insert › Image. Logos work well when they’re resized to about the height of one or two lines of text.
Why can’t I see my header?
The document is probably pageless, or Print Layout is off in the mobile app. Switch to Pages in File › Page setup on a computer, or turn on Print Layout in the app’s More menu.
Are footers handled the same way?
Yes. Use Insert › Page elements › Footer to add one and Remove footer in the Options menu to delete it. Different first page, odd and even, and section options work the same way.
Is there a shortcut to add a header?
Yes. On Windows or Chromebook, hold Ctrl + Alt and press O, then H. On a Mac, hold Ctrl + ⌘ and press O, then H.
If you’re formatting a school paper, you may also need to indent in Google Docs for your reference list.

Matthew Burleigh is the founder, head writer, and editor of Solve Your Tech, which he launched in 2012. He has written technology tutorials since 2008 and worked in IT since 2003, including small-business support, IT management, and consulting. He holds Bachelor’s and Master’s degrees in Computer Science from Arizona State University.
Matthew writes practical guides for Windows, iPhone and iPad, Microsoft Office, Outlook, Google apps, and Android. Solve Your Tech’s guides are checked step by step against the device or app maker’s own documentation and tested on his own devices whenever he has the hardware or software, with clear steps, sources, and update dates.
Read more about Matthew and how Solve Your Tech writes and updates its guides, or report a correction.