There are various elements of the Microsoft Word 2010 program that you might only see intermittently or that you might only know about from working on a version of the program on a different computer.
One such element is the “Navigation” pane that can be shown on the left side of Word 2010’s program window.
This pane offers a convenient place to browse through the pages of your document or to search for text within the document.
The Navigation pane is a feature that can be viewed or hidden by adjusting a setting within the program.
This setting will stay applied as Word 2010 is closed and opened, so if you have previously hidden the Navigation pane, or if it was never visible to begin with, then you can follow our guide below to learn how to show the pane and start using it.
Display the Navigation Panel in Word 2010
The steps in this article will show you how to display the Navigation column at the left side of the window in Microsoft Word 2010.
This column will remain visible for the entire time that Word 2010 is open. Once you no longer need the Navigation pane, you can close it by unchecking the box that you check in Step 3 below.
Step 1: Open Microsoft Word 2010.
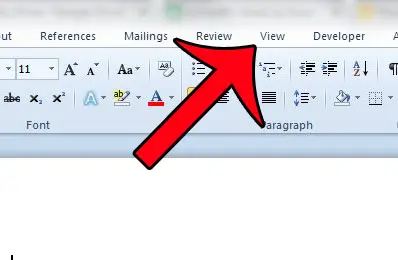
Step 2: Click the View tab at the top of the window.

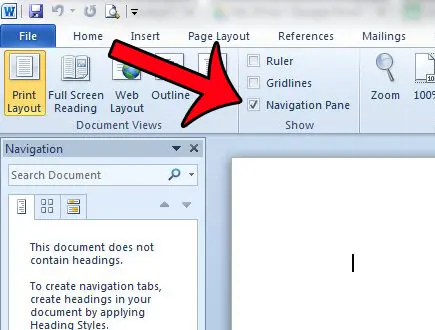
Step 3: Check the box to the left of Navigation Pane. You should now see this pane at the left side of your window.

Now that you know how to show the navigation pane in Word 2010, you can use this feature to toggle that window on or off based on whether you need it for your current document.
Have you ever worked on a document in Microsoft Word 2010 with a group of people? It can be difficult to see when changes have been made in situations like this, so it can be helpful to use the “track changes” feature in the program. Click here and learn how to turn it on for a document that you are editing in Word 2010.

Matthew Burleigh has been writing tech tutorials since 2008. His writing has appeared on dozens of different websites and been read over 50 million times.
After receiving his Bachelor’s and Master’s degrees in Computer Science he spent several years working in IT management for small businesses. However, he now works full time writing content online and creating websites.
His main writing topics include iPhones, Microsoft Office, Google Apps, Android, and Photoshop, but he has also written about many other tech topics as well.