Powerpoint 2010 is a program where you need to create material to grab your audience’s attention.
This is particularly true of audiences that might watch a lot of Powerpoint presentations and have become jaded by them.
One effective way to make your presentation stand out is to add some movement to your slides.
You can accomplish this effect by embedding a Youtube presentation into the slideshow, or you can add some animation to your images.
Powerpoint 2010 has a number of different animations that you can experiment with, but one of my favorites is the bouncing animation.
By learning how to make a picture bounce in Powerpoint 2010 you can draw some attention to an image that you want to highlight, while also providing a break in the monotony that often accompanies a Powerpoint slideshow.
Applying the Bounce Animation in Powerpoint 2010
Powerpoint 2010 has a surprising number of ways that you can change your image.
You can actually perform some edits to your image from directly within Powerpoint by using the Picture Tools – Format menu but, if you do not want to actually change the appearance of the image, then using a bounce animation is a good way to make an image stand out.
Step 1: Open the Powerpoint slideshow that contains the image you want to make bounce.
Step 2: Click the slide at the left side of the window that contains the image that will be bouncing, then click the image in the slide so that it is selected.
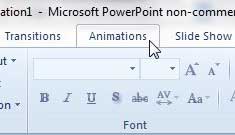
Step 3: Click the Animations tab at the top of the window.
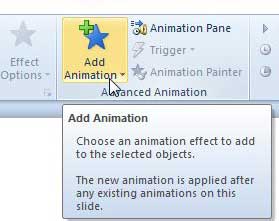
Step 4: Click the Add Animation drop-down menu in the Advanced Animation section of the ribbon at the top of the window.
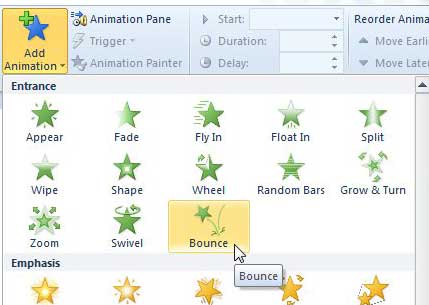
Step 5: Click the Bounce option in the Entrance section of the menu. Powerpoint should then perform the animation once, allowing you to see how the effect will look.
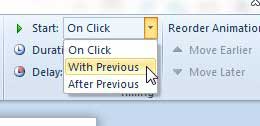
Step 6: Click the drop-down menu to the right of Start in the Timing section of the ribbon, then choose when you want the bounce animation to start.
You can also configure the options in this section to adjust the duration and delay of the animation.
Now that you know how to make a picture bounce in Powerpoint 2010, you can use these steps to apply this animation, or others, to elements inside of your presentation slides.

Matthew Burleigh has been writing tech tutorials since 2008. His writing has appeared on dozens of different websites and been read over 50 million times.
After receiving his Bachelor’s and Master’s degrees in Computer Science he spent several years working in IT management for small businesses. However, he now works full time writing content online and creating websites.
His main writing topics include iPhones, Microsoft Office, Google Apps, Android, and Photoshop, but he has also written about many other tech topics as well.


