Organization is a very important component in Microsoft Excel, but the majority of it is focused upon how your spreadsheets appear on the screen.
If you are worried about keeping a printed spreadsheet organized, then you need to take some additional steps so that it is simpler to read.
One helpful way to do this is by repeating your top, or “header” row at the top of each page. This allows your readers to know what data belongs in which column, and will help to eliminate confusion.
You can perform a similar action in the Windows version of Excel. This Excel repeat rows at top tutorial will show you how.
How to Repeat the Top Row on Every Page in Excel 2011
This tutorial is going to focus on repeating the top row on every page, but you can also use these steps to repeat any row that you want.
Step 1: Open the spreadsheet in Excel 2011 on which you want to have the top row printed on every page.
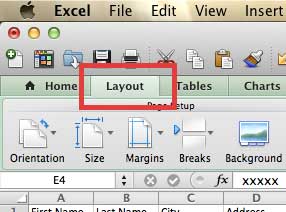
Step 2: Click the Layout tab.

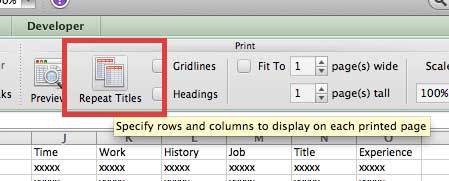
Step 3: Click the Repeat Titles button in the Print section of the ribbon.

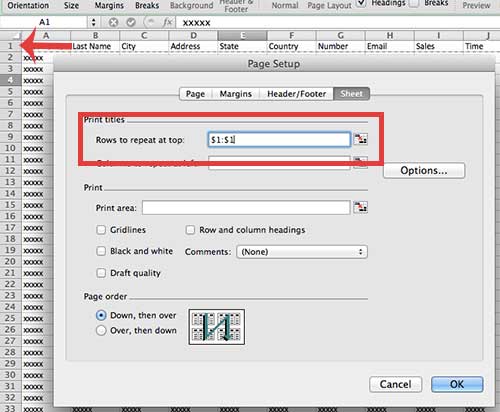
Step 4: Click the row number at the left side of the window that contains the headers that you want to repeat at the top of each page. In the image below, for example, I am going to repeat row 1.

Step 5: Click the OK button at the bottom of the window to save your settings. Now the row that you just selected will print at the top of each page.
You can buy magazine subscriptions from Amazon now, and they are priced very low. View their selection here.
We have previously written about how to print gridlines in Excel 2011. Click here to learn how.

Matthew Burleigh has been writing tech tutorials since 2008. His writing has appeared on dozens of different websites and been read over 50 million times.
After receiving his Bachelor’s and Master’s degrees in Computer Science he spent several years working in IT management for small businesses. However, he now works full time writing content online and creating websites.
His main writing topics include iPhones, Microsoft Office, Google Apps, Android, and Photoshop, but he has also written about many other tech topics as well.