The contacts that you have in Microsoft Outlook 2011 are well designed to work in that program, but you may not always be relying upon the contact information in the Outlook program on your Mac.
You may find yourself with a need to export your contact information to a CSV file so that you can upload it to an email account online, or so that it can be sorted and edited in Microsoft Excel.
Excel is capable of reading a number of different file types, including comma separated value (CSV) files. Fortunately this is one of the export options available to you, so you can use it to export your Outlook 2011 contacts to an Excel compatible file type.
As an Amazon affiliate, I earn from qualifying purchases.
Are you trying to export your Mac Outlook contacts so that you can view them on a Windows PC? The Office 2013 suite is a available as a subscription, and includes Outlook by default. This gives you another option if you do not want to spend the up-front cost of purchasing one of the Business versions of Office.
Save Outlook 2011 Contacts to a CSV File for Excel
Saving your Outlook 2011 contacts in an Excel-compatible format is not only a good way to put them in a more accessible form, it also provides you with a relatively small file size that can easily be backed up to a cloud storage option like DropBox or SkyDrive. With that in mind, follow the steps below to export your Outlook 2011 Mac contacts to a CSV file.
Step 1: Launch Outlook 2011.
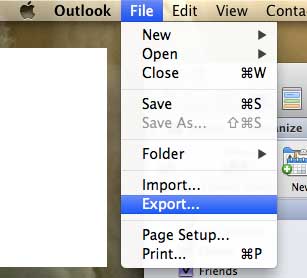
Step 2: Click File at the top of the screen, then click Export.
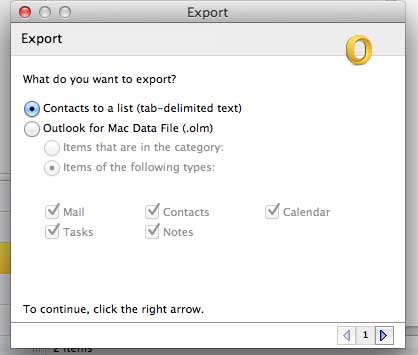
Step 3: Check the option to the left of Contacts as a List, then click the right arrow at the bottom-right corner of the window.
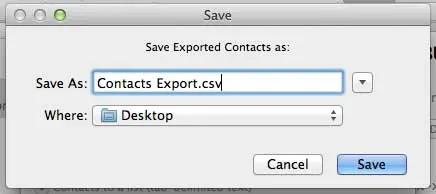
Step 4: Replace the “.txt” part of the file name with “.csv“. For example, the default file name in the image below was Contacts Export.txt, but I changed it to Contacts Export.csv.
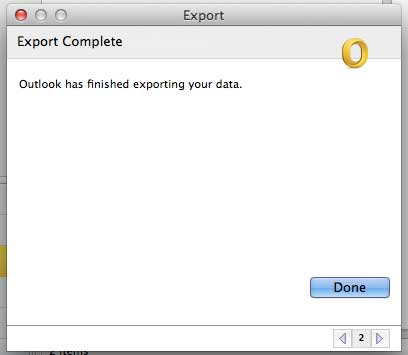
Step 5: Click the Done button.
You can then launch Excel on a Windows or Mac computer and open the file directly from there (this can result in some undesired formatting) or you can use the Import option in Excel to properly align the file into columns. Note that you can also import from the default .txt file option that Outlook will create, if you choose to go that route. However, to open the file directly in Excel without using the import function, you will need to change the file type to .csv during the Outlook Export process.
Have you ever tried to follow directions in Excel 2011 that required the Developer tab, but you couldn’t find it? Learn how to add the Developer tab in Excel 2011 to gain access to some more advanced features of the program.
Would you like to have access to and be able to change calendar details in Microsoft Excel? The method for exporting your Google Calendar into an Excel-compatible file format is covered in the next section.
Excel Export from Google Calendar
There are frequent interactions between the programs and files you use on a daily basis, which might not be apparent or something you had thought about until a circumstance demands it.
For more information, check out this guide about how to export Google Calendar to Excel.
I had never considered utilizing or viewing calendar data in Excel, but it turns out that Google Calendar data can be exported in a way that makes working with it in a spreadsheet program like Excel quite simple.
- Open your web browser and navigate to Google Calendar.
- Select Settings and sharing by selecting the three dots button.
- Select the option for Export Calendar.
- Select Extract All by performing a right-click on the calendar export file.
- Get Microsoft Excel going.
- After selecting File, choose Open.
- Go to the folder that contains the calendar file.
- Choose All Files after selecting All Excel Files.
- Open by clicking the calendar file.
- Select Delimited, then click the Next button.
- Click Finish after selecting the Tab checkbox.
You can utilize this method whenever you encounter a situation where you believe it would be useful now that you are aware of how to export from Google Calendar.

Matthew Burleigh has been writing tech tutorials since 2008. His writing has appeared on dozens of different websites and been read over 50 million times.
After receiving his Bachelor’s and Master’s degrees in Computer Science he spent several years working in IT management for small businesses. However, he now works full time writing content online and creating websites.
His main writing topics include iPhones, Microsoft Office, Google Apps, Android, and Photoshop, but he has also written about many other tech topics as well.


