To edit a contact on iPhone, open the Contacts app, tap the person, tap Edit, make your changes, and tap Done (the checkmark) to save. You can change a name, phone number, email address, photo, birthday, notes, pronouns, or labels, and add fields such as a nickname.
These steps are for iOS 27 and also match iOS 26 and iOS 18 on every iPhone model, including iPhone 13. They follow Apple’s Edit contacts on iPhone, Add or edit your contact info and photo, and Use contacts from the Phone app guides.
How to edit a contact
- Open the Contacts app, or open the Phone app and tap Contacts.
- Tap the contact. The contact card opens.
- Tap Edit. Red minus buttons appear next to existing entries.
- Enter or update the information, such as a phone number, email address, street address (tap add address), birthday, or notes. Tap the label next to a number to change it to mobile, home, work, or another type. If international calls to a saved number fail, add the country code or turn off Dial Assist on iPhone.
- Tap Done (the checkmark).
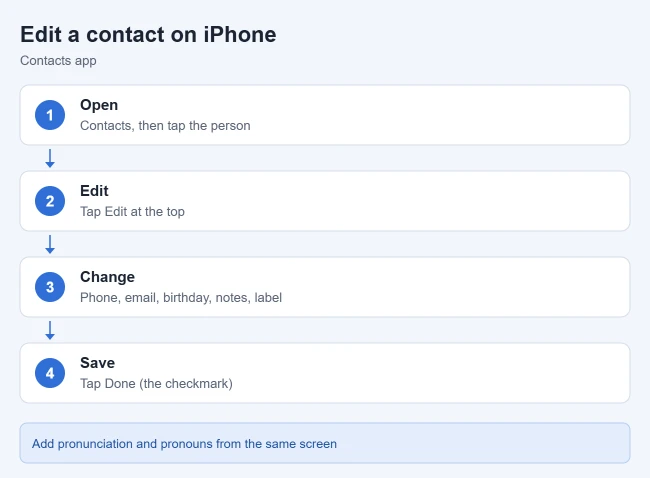
The changes save right away and sync to your other devices if you use iCloud Contacts. To leave without saving, tap Cancel instead of Done.
You can also confirm the edit when you view your iCloud contacts on a computer.
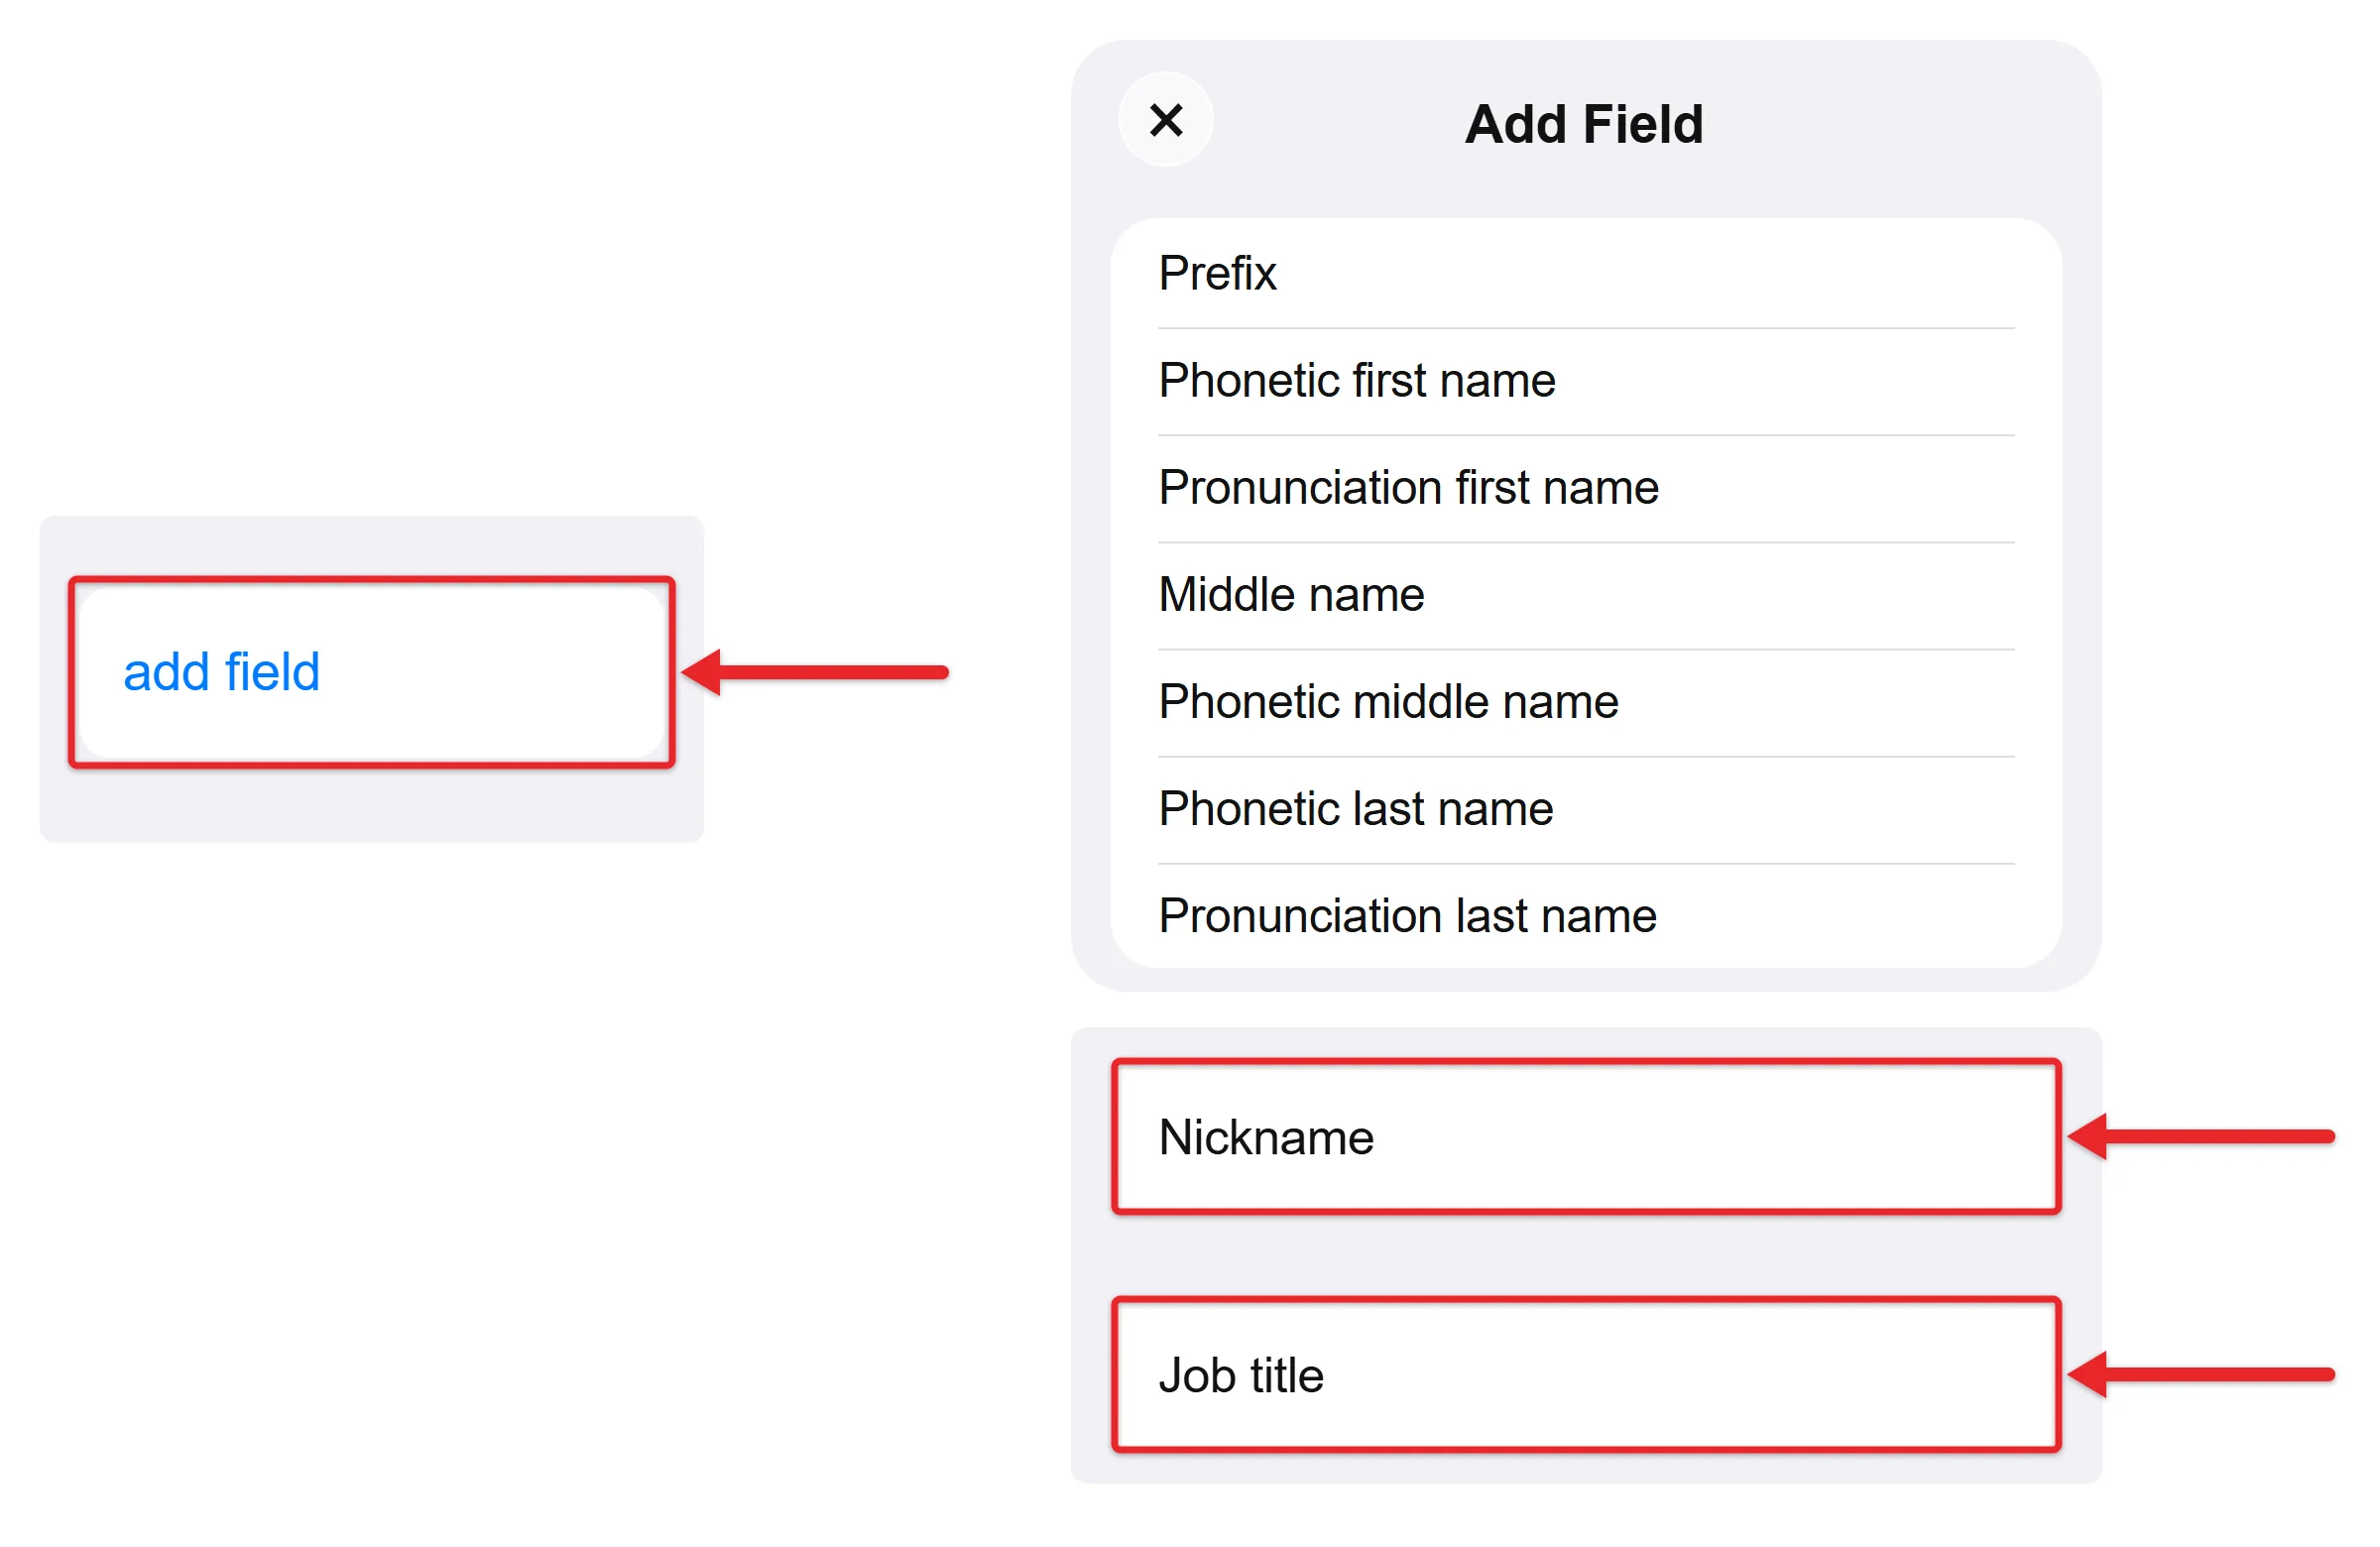
To add a field that isn’t shown, such as Nickname, Job Title, or a phonetic name for a hard-to-pronounce name, scroll to the bottom of the edit screen and tap add field. To remove an entry, such as an old number, tap the red minus button next to it, tap Delete, and tap Done.
How to add a photo to a contact
- Open the contact and tap Edit.
- Tap Add Photo (or the current photo) at the top.
- Pick a photo from your library or take one, or choose a Memoji, emoji, or monogram.
- Move and scale the photo, then tap Choose and Done.
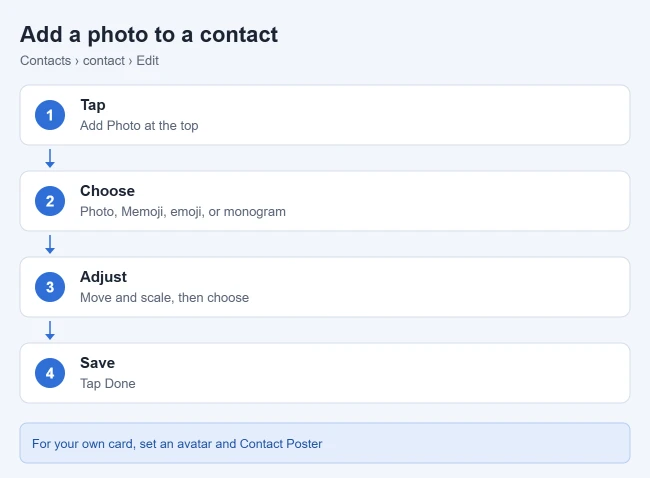
The photo shows on calls, messages, and in your contacts list. The incoming call picture can also fill the whole screen when that person calls. If you would rather not see photos in your text list, you can hide the contact pictures next to text messages.
How to add pronouns to a contact
- Open the contact and tap Edit.
- Tap add pronouns, choose a language, select the pronouns, and tap Add.
Pronouns appear on the card. When you share another person’s contact, their pronouns are never shared.
How to edit your own contact card
- Open Contacts and tap My Card at the top.
- Tap Edit and update your name, address, phone number, or birthday.
- Tap your photo to choose an avatar and Contact Poster, and turn on Name & Photo Sharing if you want others to see them.
Editing My Card also updates the information Safari uses for AutoFill. If My Card is missing, create a contact with your details, touch and hold it in the list, and tap Make this My Card. To control who receives your name and picture, turn name and photo sharing on or off.
Mac users can change their contact card on a MacBook Air as well.
How to save a recent caller as a contact
- Open the Phone app and tap Calls (or Recents if you use the Classic layout).
- Tap the Info button (the “i”) next to the number. Tapping the number itself may call it back.
- Tap Create New Contact, or tap Add to Existing Contact and choose a contact.
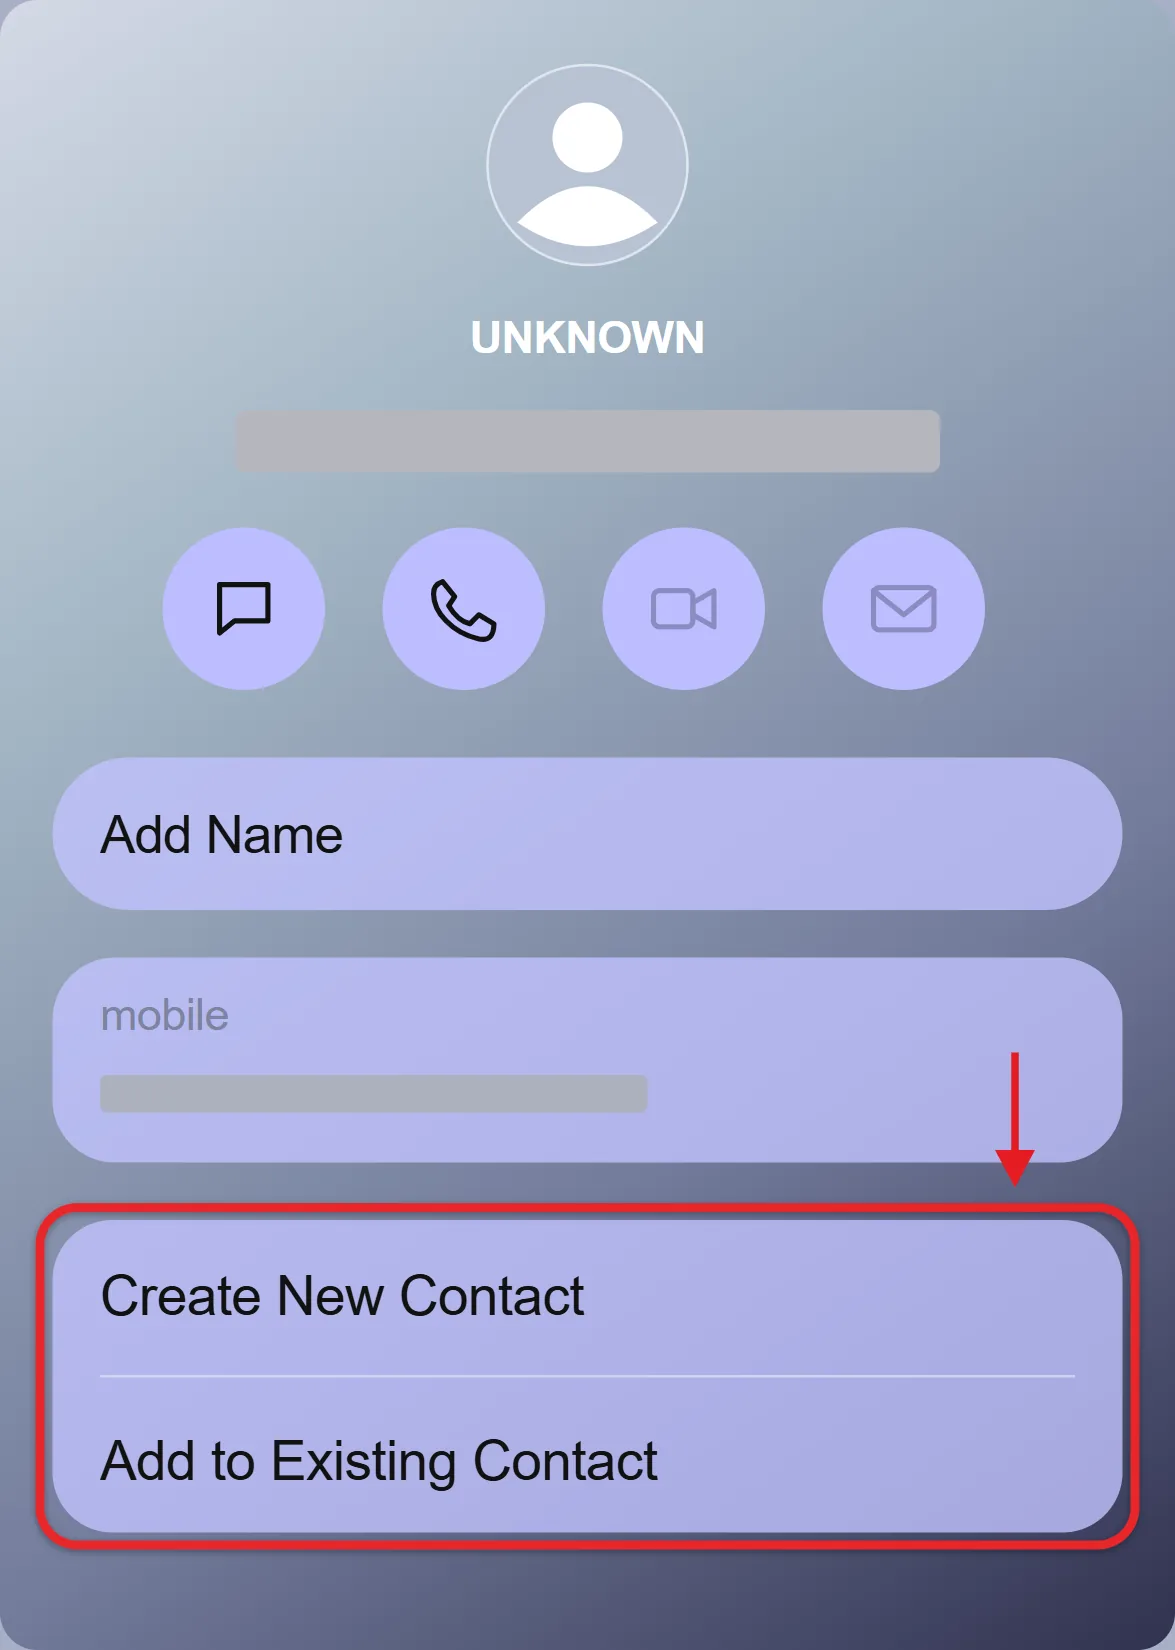
The number is saved, and future calls show the name.
Saving a number also lets it ring through after you silence unknown callers on iPhone.
Choose a line for a contact (Dual SIM)
iPhones with Dual SIM use the same line you used last time with that contact. To pick a preferred line, open the contact, tap default below the name, and choose a line for calls and messages.
If you only want someone off the quick-access list in the Phone app, remove them from Favorites on iPhone. That leaves their contact card available. Deleting the contact removes the card completely.
How to sort contacts by first name
To sort your iPhone contacts by first name, go to Settings > Apps > Contacts > Sort Order and choose First, Last. The list in the Contacts app then runs alphabetically by first name.
- Open the Settings app.
- Scroll down and tap Apps, then tap Contacts.
- Tap Sort Order and choose First, Last.
- Go back, tap Display Order, and choose First, Last if you also want each name shown with the first name in front.
If you don’t see Apps, your iPhone has an older version of iOS, and Contacts is listed directly in Settings.
Sort Order and Display Order are separate settings. Sort Order decides where a contact falls in the alphabetical list, and Display Order only changes how the name reads. To go back to sorting by last name, choose Last, First under Sort Order.
If a contact still lands in the wrong spot, the full name may be typed into one field. Open the contact, tap Edit, and put the first and last names in their own fields, then tap Done. These options are covered in the Manage and delete contacts on your iPhone or iPad article.
If an edit won’t save or sync
- Fields don’t respond: the contact may come from a read-only account, such as a work directory. Change it in that account instead.
- Changes don’t reach your iPad or Mac: go to Settings, tap your name, tap iCloud, and make sure Contacts is on (tap See All if you don’t see it).
- A Gmail or Outlook contact doesn’t update: go to Settings > Apps > Contacts > Contacts Accounts, tap the account, and make sure Contacts is on.
There is no undo after you tap Done. To reverse a change, edit the card again. If a contact disappeared, you may be able to recover deleted contacts on iPhone.
Frequently asked questions
Can a contact have more than one phone number or email?
Yes. While editing, tap add phone or add email again for each extra entry, then tap the label to mark it as mobile, home, work, or another type.
Does the other person see my changes?
No. Edits only change the card on your devices. To send someone the updated details, share the contact from your iPhone.
Related: How to merge duplicate contacts on iPhone, How to set a ringtone for a contact, and How to duplicate a photo on iPhone (handy if you want to keep an uncropped copy of a contact photo).

Matthew Burleigh is the founder, head writer, and editor of Solve Your Tech, which he launched in 2012. He has written technology tutorials since 2008 and worked in IT since 2003, including small-business support, IT management, and consulting. He holds Bachelor’s and Master’s degrees in Computer Science from Arizona State University.
Matthew writes practical guides for Windows, iPhone and iPad, Microsoft Office, Outlook, Google apps, and Android. Solve Your Tech’s guides are checked step by step against the device or app maker’s own documentation and tested on his own devices whenever he has the hardware or software, with clear steps, sources, and update dates.
Read more about Matthew and how Solve Your Tech writes and updates its guides, or report a correction.