One of the most convenient things about iTunes and your Apple ID is how well everything integrates. If you have an iPhone or iPad and you sign into iTunes on your computer with the same Apple ID you can access your purchases.
But you may be wondering how to set up iTunes automatic file downloads if you don’t want to manually find and download the movies, music, or TV shows that you purchased on your other devices.
How to Change Automatic Download Settings in iTunes Windows 10
- Open iTunes.
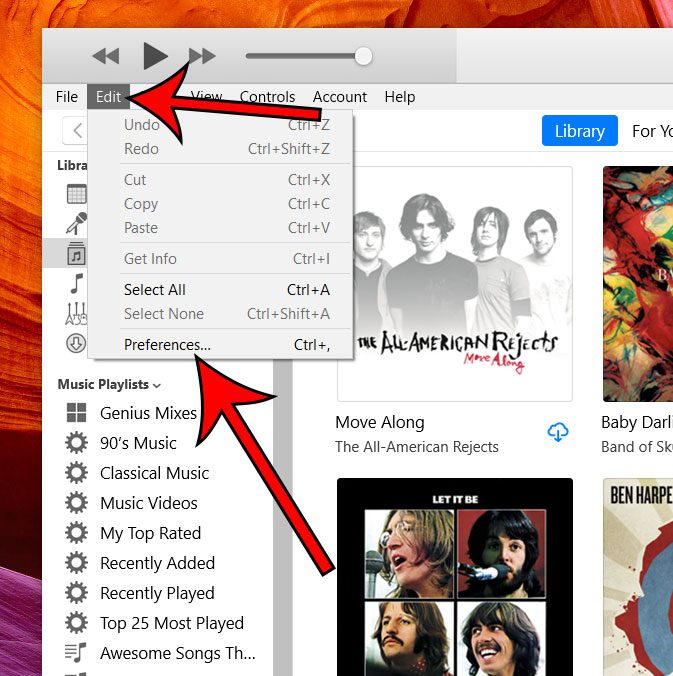
- Click Edit.
- Choose Preferences.
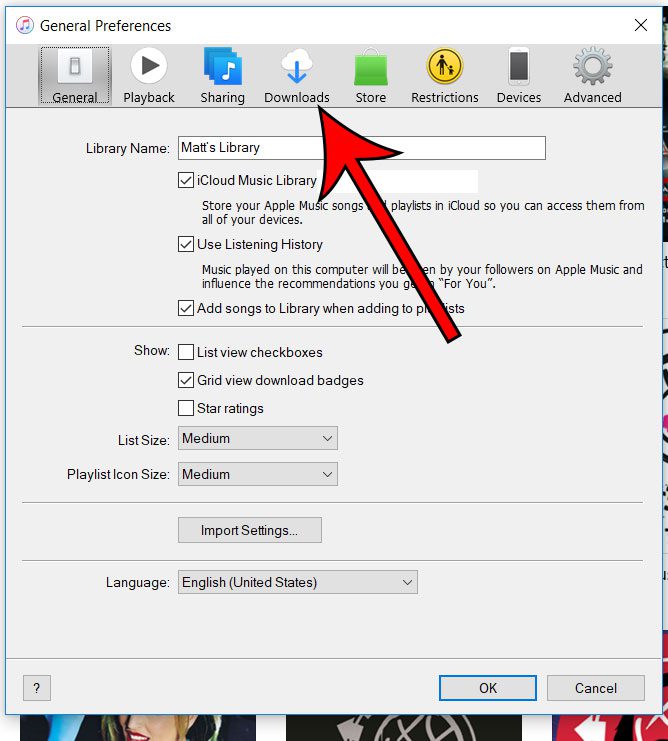
- Select the Downloads button.
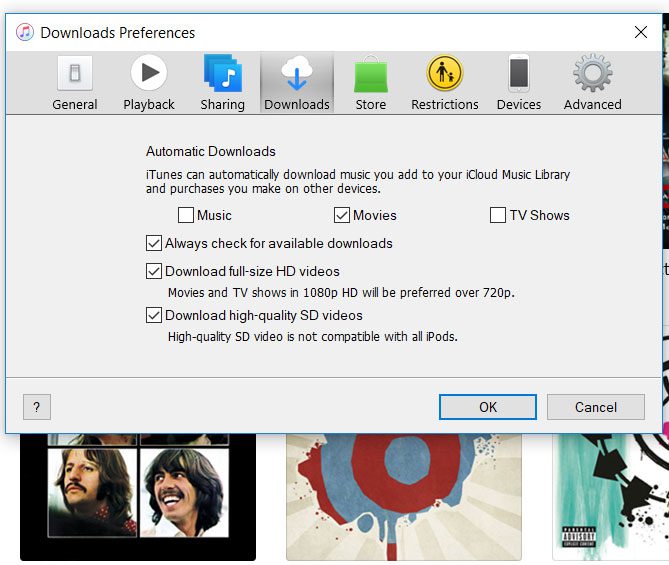
- Configure the file download settings and click OK.
Our guide continues below with additional information on how to change the iTunes automatic file downloads setting, including pictures of these steps.
When you purchase music, movies, or TV shows using your iTunes account, that content becomes available on other devices where you are signed into that account. Many of those devices can also be configured to download this purchased content automatically so that you don’t need to worry about doing it manually.
One of the places where you can control this setting is the iTunes app on your Windows 10 computer. Our guide below will show you where to adjust this setting if you would like to be able to automatically download iTunes content that you own.
If you are an iPhone owner too then you may be wondering how to change the ringtone on your iPhone 13 if you want to use a tone you purchased, or just want to switch to something different.
How to Enable or Disable iTunes Automatic Downloads in Windows 10 (Guide with Pictures)
The steps in this article were performed on a Windows 10 computer, using the most current version of the iTunes software that was available when this article was written.
Note that you will need to have the available hard drive space on your computer to download your purchased files.
Step 1: Launch the iTunes app.
Step 2: Select the Edit tab at the top of the window, then choose the Preferences option.

Step 3: Click the Downloads tab at the top of the window.

Step 4: Adjust the settings on this menu as needed, then click the OK button at the bottom of the window when you’re done.

Now that you know how to enable iTunes automatic file downloads on your Windows 10 laptop or desktop you can better control the types of files that you save from iTunes and the amount of space that the application and its files take up.
Our tutorial on My Downloads History in Google Chrome will show you an easy way to locate files that you have downloaded in the browser.
Did you know that your iPhone has automatic download settings, too? Find out how to adjust these settings, including an option for your app updates, so that you can choose whether or not to download your purchases automatically on your phone.

Matthew Burleigh has been writing tech tutorials since 2008. His writing has appeared on dozens of different websites and been read over 50 million times.
After receiving his Bachelor’s and Master’s degrees in Computer Science he spent several years working in IT management for small businesses. However, he now works full time writing content online and creating websites.
His main writing topics include iPhones, Microsoft Office, Google Apps, Android, and Photoshop, but he has also written about many other tech topics as well.