Almost every program that you use on your computer that includes text input allows for some level of customization in the way that text appears. Whether it’s a document in Word or a spreadsheet in Excel, there are options that let you choose how text appears in those applications.
Do you have contacts from another account? Find out how to import them to Gmail with a CSV file so that you can access them there, too.
So if you are unhappy with the way your text looks in Gmail, you may be looking for a way to change that, too. Our tutorial will show you where to find the default font setting in Gmail so that you can choose a new font, adjust the text size, or even adjust the text color.
Change Gmail Default Font – Quick Summary
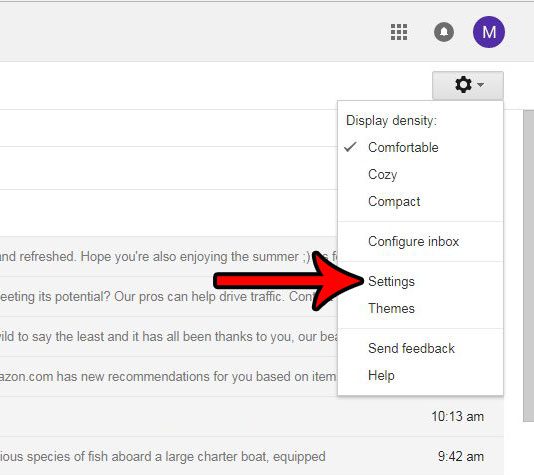
- Click the gear icon at the top-right of Gmail.
- Choose the Settings option.
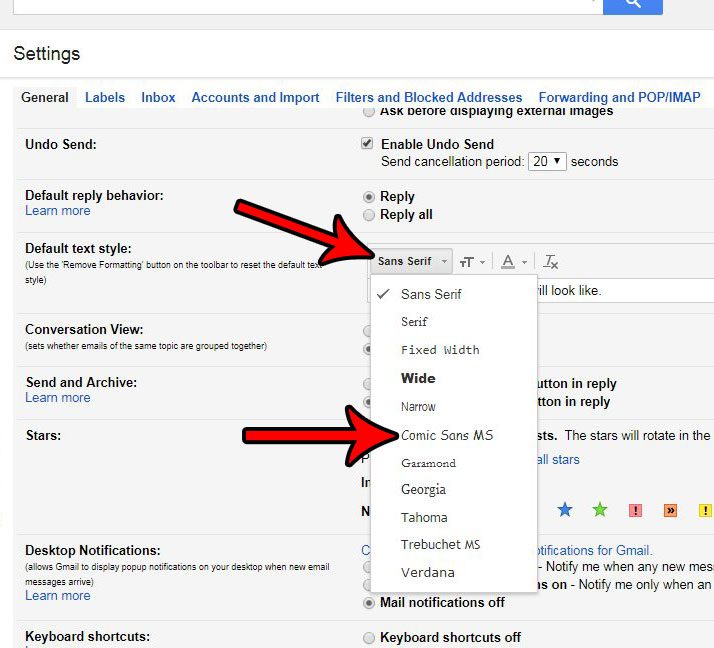
- Select the current font to the right of Default font style, then choose a new one.
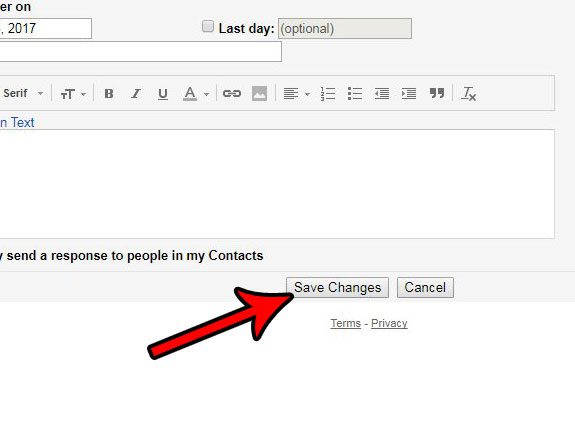
- Scroll down and click the Save Changes button.
For additional information, including pictures for each step, continue to the next section.
A lot of the information in an email can be edited, including the subject. You can check out our tutorial on changing Gmail subjects to learn how.
How to Switch to a Different Default Font for Gmail Emails
The steps in this guide are performed in your Web browser. The font setting changes that you make by following this guide will affect the font that is used by default when you type new emails in Gmail in your browser.
This will not affect the default font used in third-party mail apps like Outlook. If you are trying to change the default font for your Gmail account in Outlook, then read this article.
Step 1: Open your Web browser and go to your Gmail inbox at https://mail.google.com/mail. If you aren’t already signed in, then enter your Gmail address and password to do so.
Step 2: Click the gear icon at the top-right of the window, then select the Settings option from the dropdown menu.

Step 3: Scroll down to the Default text style part of the menu, then click the Sans Serif dropdown menu and choose the new font that you would like to use as your default. Note that there are also options to change the size of the text, or the color of the text.

Step 4: Scroll to the bottom of the menu and click the Save changes button.

Now that you know how to change the default font in Gmail, you can adjust this setting whenever you get tired of the current default font, or if you find that it is problematic or difficult to read.
As mentioned above, this change will only affect emails that you write when you are using Gmail in a Web browser. If you are writing emails on your smartphone or in a third-party email application like Outlook, then the font used will be the one selected in that app.
Google Docs lets you update your default fonts as well, though it may not be obvious how. You can read our how to set default font in Google Docs article for more information.
You may also notice that there are only a handful of font options that you can select from. Since the emails will need to be opened in other mail applications and on other mail hosts, there is some standardization for the fonts that can be used so that they can be read in these other locations.
Have you ever sent an email, only to realize a few seconds later that you made an error in that email? Learn how to recall an email in Gmail and see a cool option in Gmail that will give you a small window where you can get an email back before it reaches its recipient.
Continue Reading

Matthew Burleigh has been writing tech tutorials since 2008. His writing has appeared on dozens of different websites and been read over 50 million times.
After receiving his Bachelor’s and Master’s degrees in Computer Science he spent several years working in IT management for small businesses. However, he now works full time writing content online and creating websites.
His main writing topics include iPhones, Microsoft Office, Google Apps, Android, and Photoshop, but he has also written about many other tech topics as well.