Google’s Gmail service is something that I use constantly and with which I am exceedingly happy.
I have used and tested many different email providers, but this is the one I prefer.
Your choice of email provider is certainly up to you, and no one can fault you for using the email provider that you do.
If you had previously been using Gmail and found something about it unsatisfactory, then you probably looked for another email provider with features that you preferred over Gmail.
Once finding this provider, you were left with the unenviable task of informing your new contacts that you had switched email addresses.
This task is tedious and, depending upon the number of people with your email address, likely impossible.
Fortunately, you can configure Gmail to automatically forward emails to your new account, ensuring that any messages sent to your old address will also be sent to the new address and you won’t experience any downtime or missed messages with your new address.
How to Set Up Email Forwarding in Gmail
One of the best features of Gmail is the ease with which you can access advanced features of the service, without needing to pay for an upgrade to the service.
Mail forwarding is a feature that is offered by nearly every major email provider, but not all of them will allow you to set up your forwarding for free.
In Gmail the process of setting up forwarding is very straightforward, and you can add or remove your forwarding settings at any time.
Begin by logging into your Gmail account.
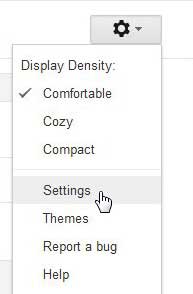
Click the Gear icon at the top-right corner of the window, then click the Settings option.
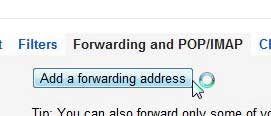
Click the Forwarding and POP/IMAP tab at the top of the window, then click the Add a forwarding address button just below it.
Type your new email address into the field in the pop-up window, then click the Next button.
Click the Proceed button, then click the OK button on the screen where Gmail tells you that a confirmation code was sent to the new email address.
Leave your Gmail window or tab open, then open a new window or tab and sign into the email account for your new email address.
Open the email from Google, highlight the verification code, then press Ctrl + C to copy it.
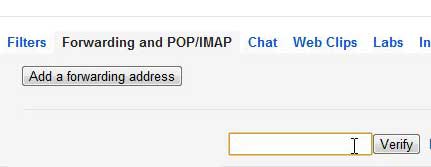
Return to the Gmail window or tab, click inside the verification field, press Ctrl + V to paste the copied code, then click the Verify button.
Check the option to the left of Forward a copy of incoming mail to, then click the Save Changes button at the bottom of the window.
Gmail will now forward all of your mail to the new email address that you have provided.
Now that you know how to automatically forward emails in Gmail, you can use this feature of the email service to send your messages to a different account as well.

Matthew Burleigh has been writing tech tutorials since 2008. His writing has appeared on dozens of different websites and been read over 50 million times.
After receiving his Bachelor’s and Master’s degrees in Computer Science he spent several years working in IT management for small businesses. However, he now works full time writing content online and creating websites.
His main writing topics include iPhones, Microsoft Office, Google Apps, Android, and Photoshop, but he has also written about many other tech topics as well.


