Do you have an old email address that is forwarding messages to your Gmail account?
Or do you manage a separate account and forward messages from that account to Gmail because the interface is better and it’s simpler to manage everything in one place?
If you can answer “yes” to either of these questions, then you may want to separate the emails being forwarded to Gmail from those other accounts, instead of accumulating them in your general Inbox.
By using a combination of filters and labels, it is possible to automatically move forwarded messages in Gmail to their own separate folder, or “label.”
This will prevent you from confusing those forwarded messages with messages that were sent directly to your Gmail account, and help to avoid any potentially confusing communication that might occur as a result of it.
If you’ve ever wished that you could undo an email that you sent, then our accidentally sent email to wrong person Gmail guide can show you how.
Organizing Forwarded Emails with Gmail Filters and Labels
I have a lot of different email accounts that I manage in Gmail and other email services, and checking them individually can be annoying.
I really like the default Gmail Web interface, and would prefer to manage everything there.
So I have set up all of those accounts to forward messages to one Gmail account, where they are efficiently filtered into separate folders, or labels.
As I check each of those labels, I know which email account was the target of those messages, and I can respond appropriately to the message, if necessary. It also clears unnecessary clutter from the main Inbox, where I prefer to have as few messages as possible.
The process described below is going to assume that you have already set up forwarding to your Gmail account, and that you have completed the verification process that action requires.
Step 1: Sign into the Gmail account where your messages are being forwarded.
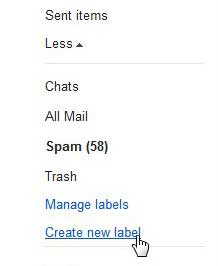
Step 2: Expand the labels (folders) at the left side of the window, then click the Create New Label link.
You will probably need to click the More link at the bottom of your current labels to display this link.
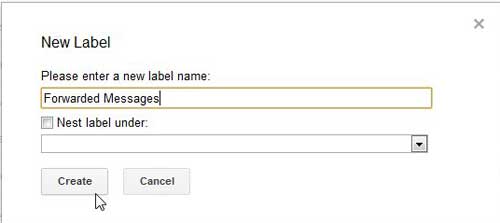
Step 3: Type a name for the new label into the field at the top of the window (I am using “Forwarded Messages” for the sake of simplicity, but I would recommend using something that easily identifies the source of the forwarded messages), then click the Create button.
You can use the nesting option if you want to include the new label underneath an already existing label but, for the sake of this tutorial, we are just going to create another top-level label.
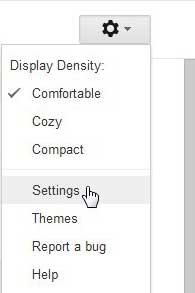
Step 4: Click the gear icon at the top-right corner of the window, then click Settings.
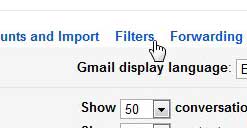
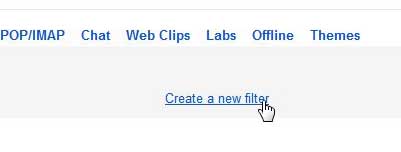
Step 5: Click the blue Filters link at the center of the window.
Step 6: Click the Create a New Filter link.
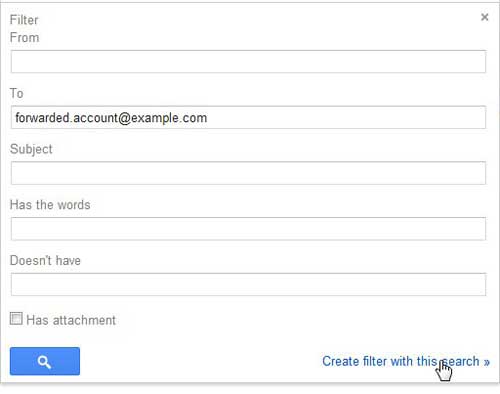
Step 7: Type the email address from which the messages are being filtered into the To field, then click the Create filter with this search link.
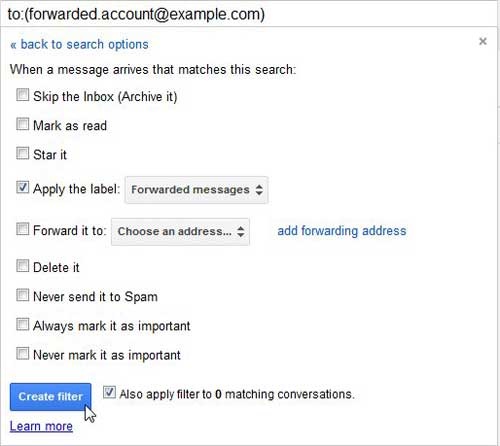
Step 8: Check the box to the left of Apply the label, choose the label you created earlier, check the box to the left of Also apply filter to x matching conversations box (the x value will be equal to the number of messages currently in Gmail that have already been forwarded from that account), then click the Create filter button.
Gmail will then run the filter on your existing conversations and move all of the messages that fit this criteria to the label that you created earlier.
Additionally, all future messages forwarded from that account will automatically be moved to this label.
Now that you know how to move forwarded messages automatically in Gmail, you can use this option to start organizing them in your inbox.
You probably noticed that there many other options that you could have applied to the filter that you just created.
If you only wanted to move some of your forwarded messages into this label, then you can use those items to further filter your messages.
There is a lot that you can do with the filters in Gmail, and you can take your Inbox to a whole other level of organization by customizing your Gmail filters.
Google Drive has some options that let you sort files as well. View our tutorial on how to add a folder in Google Drive so that you can organize your documents, spreadsheets, pictures, and more.

Matthew Burleigh has been writing tech tutorials since 2008. His writing has appeared on dozens of different websites and been read over 50 million times.
After receiving his Bachelor’s and Master’s degrees in Computer Science he spent several years working in IT management for small businesses. However, he now works full time writing content online and creating websites.
His main writing topics include iPhones, Microsoft Office, Google Apps, Android, and Photoshop, but he has also written about many other tech topics as well.
