To make two columns in Google Docs, select the text, click Format > Columns, and choose the two-column option. Use More options in the same menu to change the spacing or add a line between the columns, and Insert > Break > Column break to start the right column where you want.
These steps are for Google Docs in a web browser on a computer, checked against Google’s Add or delete columns in a document help page in October 2026. Google says columns can’t be created in the Google Docs app for Android, iPhone or iPad, so a table workaround for phones and tablets is covered near the end.
Before You Start
- The document must use Pages format. Columns aren’t available in pageless documents. If Format > Columns is missing or grayed out, see the troubleshooting section below.
- You need edit access. With view or comment access, the Format menu won’t change the layout.
- Know the difference between columns and a table. Columns make text flow from the bottom of one column to the top of the next, like a newspaper or newsletter. A table gives you separate boxes that don’t flow into each other. Pick columns for long text and a table for side-by-side sections such as a comparison or a résumé.
How to Make Two Columns in Google Docs
- Open the document in Google Docs on a computer.
- Select the text you want in columns. To do the whole document, press Ctrl + A (Command + A on a Mac).
- Click Format in the menu bar, then point to Columns.
- Click the middle icon, the two-column preset.
The selected text flows into two columns. It fills the left column first, then continues at the top of the right column.
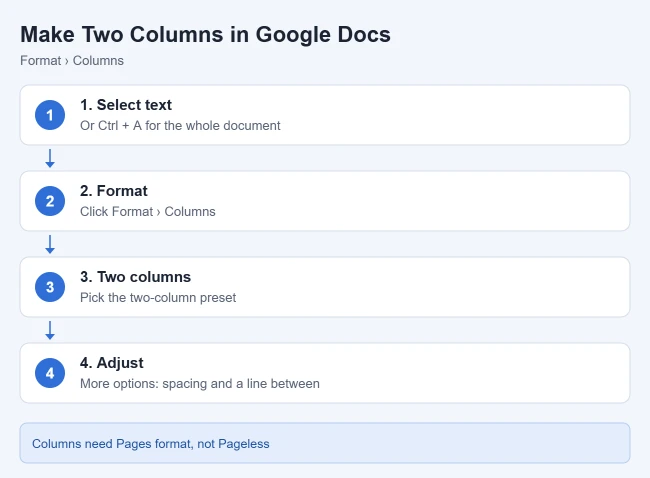
To start a new document in columns, apply the two-column preset on the empty page, then type. The text follows the column layout as you write.
Put only part of a document in columns
Columns apply to whatever you select. To keep a title or intro across the full page, select only the paragraphs below it before you choose Format > Columns. The rest of the document stays in one column. Docs keeps the two layouts apart with section breaks, which you can see by turning on View > Show section breaks.
How to Change Column Spacing or Add a Line
- Click inside the text that’s in columns, or select it.
- Click Format > Columns > More options.
- In the Column options box, set the Number of columns, type a new Spacing in inches, and check Line between columns if you want a divider.
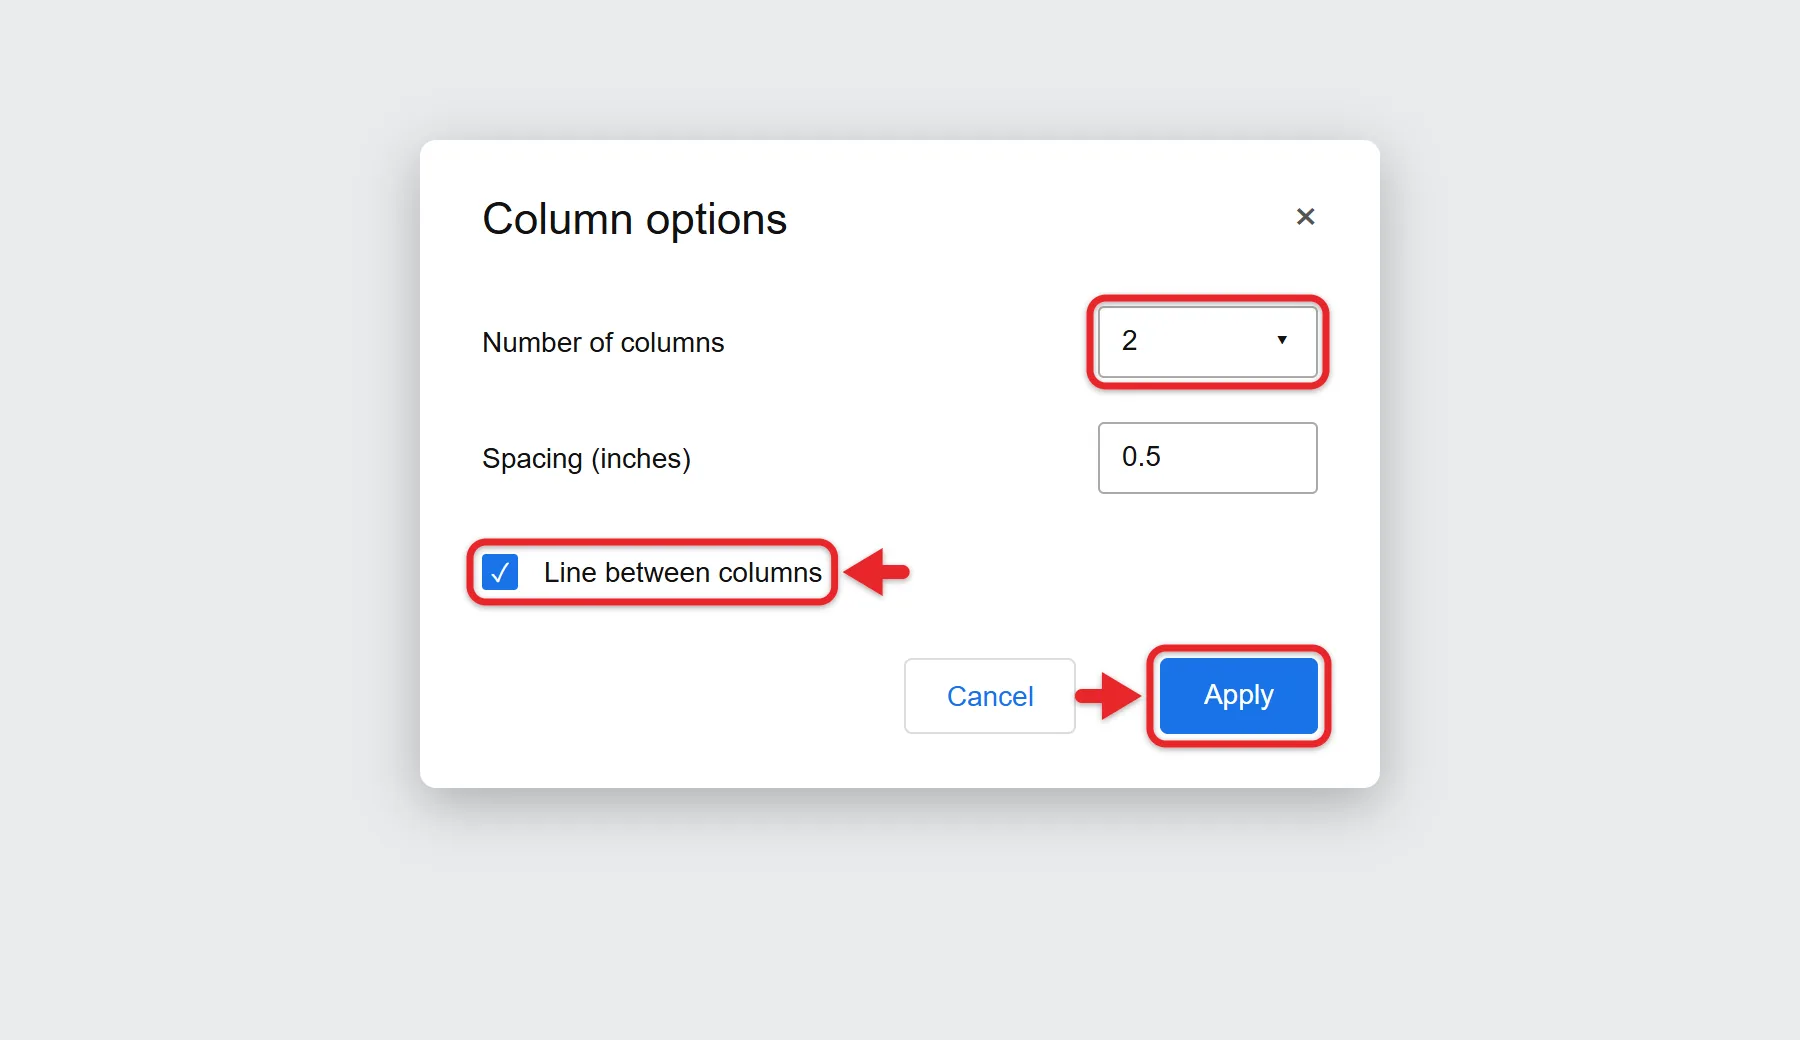
- Click Apply.
The columns update with your new spacing, and a thin vertical line appears between them if you turned it on. Wider spacing makes each column narrower, so try small changes, such as 0.3 to 0.5 inches, before you go further.
A divider that runs across the page is a different tool: insert a horizontal line in Google Docs.
How many columns can you have?
The presets and the Column options box go up to three columns. Google Docs gives every column the same width, so you can’t make one column wider than the other. If you need uneven sides, use the table method below.
How to Move Text to the Next Column
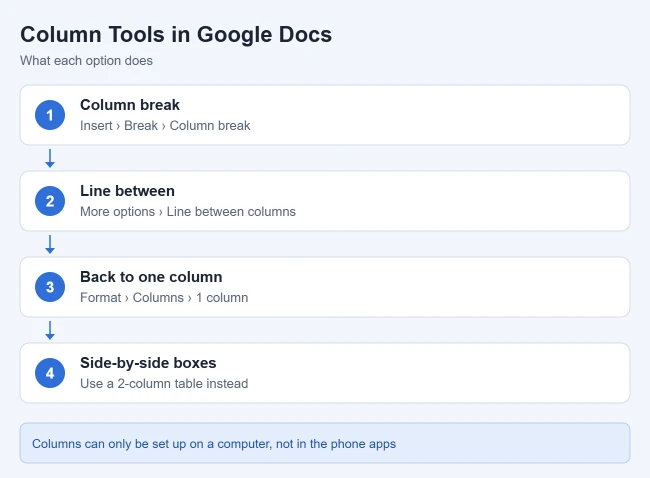
A column break makes the next text start at the top of the next column, similar to a page break. It is the easiest way to balance two columns or start a new topic at the top of the right column.
- Click where you want the next column to start.
- Click Insert > Break > Column break.
Everything after the cursor moves to the top of the next column. The option is only available once text is in two or more columns, so apply the columns first.
To remove a column break, click at the start of the text that moved and press Backspace. Turn on View > Show non-printing characters if you can’t tell where the break is. A break in the wrong spot can leave an empty page, which you can fix by deleting a blank page in Google Docs. A page break does the same job for a whole page: insert a page break in Google Docs.
How to Go Back to One Column
- Select the text that’s in columns.
- Click Format > Columns.
- Click the left icon, 1 column.
The text returns to a single column across the page. If you only want to remove the divider or change the spacing, use More options instead.
Tips for a Clean Two-Column Layout
- Fit images to the column. Click an image and drag a corner handle until it fits inside the column. A wide image can push text around or onto the next page.
- Keep headers and footers in mind. Headers, footers and page numbers stay full width across the page even when the body is in columns. A title on every page goes in the header, so add a header in Google Docs if you want one.
- Use landscape for wider columns. Choose File > Page setup, select Landscape, and click OK. Each column gets more room.
- Start from a template for newsletters. Some Google Docs templates already use columns. To start from one, create a newsletter using a Google Docs template.
Why Is the Columns Option Grayed Out?
- The document is pageless. Pageless documents don’t support columns. Click File > Page setup, choose Pages at the top, and click OK. You can also use Format > Switch to Pages format.
- You’re on a phone or tablet. Columns aren’t available in the Android, iPhone and iPad apps, so open the document in a browser on a computer.
- You only have view or comment access. Ask the owner for edit access, or make your own copy with File > Make a copy.
- Column break is grayed out. The text where your cursor sits isn’t in columns yet. Apply two columns first.
Use a Table for Side-by-Side Boxes
If you want two separate boxes that don’t flow into each other, use a table instead of columns:
- Click where the boxes should go and click Insert > Table.
- Choose a 2 x 1 table (two columns, one row).
- Type in each cell.
- To hide the grid, select the whole table, click the Border width button on the toolbar, and choose 0 pt.
You get two side-by-side areas that you can fill independently. To make one side wider, hover over the line between the cells until you see a two-sided arrow, then drag it. For exact widths, right-click the table and choose Table options. Google’s table help page covers these controls.
For a single boxed note that body text wraps around, you can insert a text box in Google Docs with the Drawing tool instead.
Two Columns in Google Docs on iPhone, iPad or Android
The Google Docs apps can’t make flowing text columns. Google’s iPhone and iPad columns help says to use a computer, so open the document there and follow the steps above.
If you only need two side-by-side boxes on your phone or tablet, use a table in the app:
- Open the document and tap Edit (the pencil).
- Tap where the table should go, then tap Add (+) > Table.
- Set 2 columns and 1 row, and tap Insert table.
To change a column’s width, tap a cell, tap Format > Table, and use the arrows next to Column width. Google’s iPad table instructions cover borders too. Text in a table doesn’t flow from one cell to the next.
Frequently Asked Questions
Can I make three columns?
Yes. Choose the three-column preset in Format > Columns, or set the number to 3 in More options. Three is the most Google Docs allows.
Can columns have different widths?
No. Google Docs gives all columns the same width. If you need one side wider, a borderless table gives you more control. Drag the border between the cells to resize each side.
How do I type in the second column?
Text moves to the second column once the first one fills up. To start typing in the second column sooner, click where the left column should end and insert a column break.
Why did my text jump to a new page after I added columns?
A column break near the bottom of a page, or an image wider than the column, can push text onto the next page. Turn on View > Show non-printing characters to find the break, and resize any wide images.
Related Guides

Matthew Burleigh is the founder, head writer, and editor of Solve Your Tech, which he launched in 2012. He has written technology tutorials since 2008 and worked in IT since 2003, including small-business support, IT management, and consulting. He holds Bachelor’s and Master’s degrees in Computer Science from Arizona State University.
Matthew writes practical guides for Windows, iPhone and iPad, Microsoft Office, Outlook, Google apps, and Android. Solve Your Tech’s guides are checked step by step against the device or app maker’s own documentation and tested on his own devices whenever he has the hardware or software, with clear steps, sources, and update dates.
Read more about Matthew and how Solve Your Tech writes and updates its guides, or report a correction.