If you aren’t in school or a corporate environment that has strict rules about the way that your documents are formatted, then you have probably found that you often change the page settings when you create a new document.
You might even change them in the same way for every new document that you create. Word 2013 is a very versatile program, and certain settings will lend themselves more favorably to certain situations.
One setting that I personally adjust on a regular basis is the margins for my documents.
I prefer to use the narrow margins, so it seems unnecessary for me to change the margins to the narrow option whenever I create a new document.
It would be far more convenient if the margins were set to the narrow option by default. Our guide below will show you how to change the default margins for new documents that you create in Word 2013.
Related: How to Set 1 Inch Margins in Word 2011
Using Narrow Margins By Default in Word 2013
The steps in this article are going to change the default margins for new documents that you create in Word 2013, which use the Normal template.
Any other templates that you use will not be affected by the change that you will be applying below.
If you wish to change the default margins for a different template, then you will need to open that template and repeat these steps there as well.
Here is how to use narrow margins by default in Word 2013 –
- Open Word 2013.
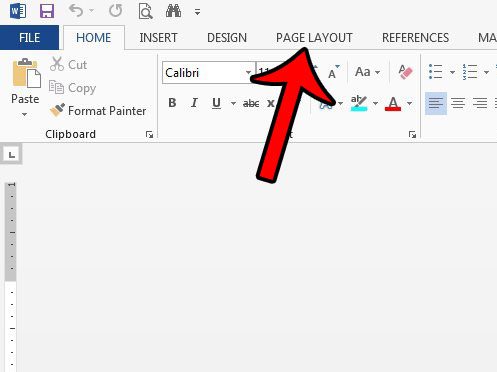
- Click the Page Layout tab at the top of the window.
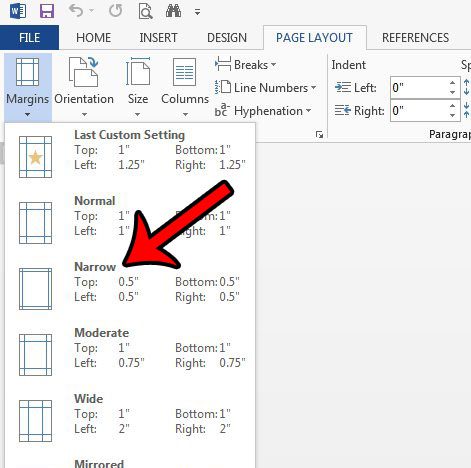
- Click the Margins button, then click the Narrow option.
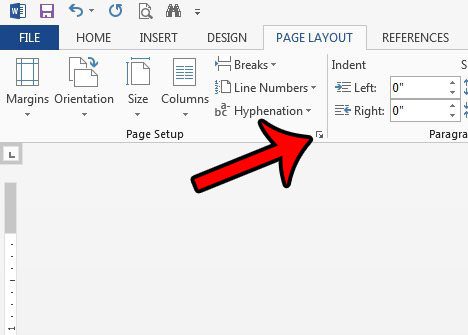
- Click the small Page Setup button at the bottom-right corner of the Page Setup section in the ribbon.
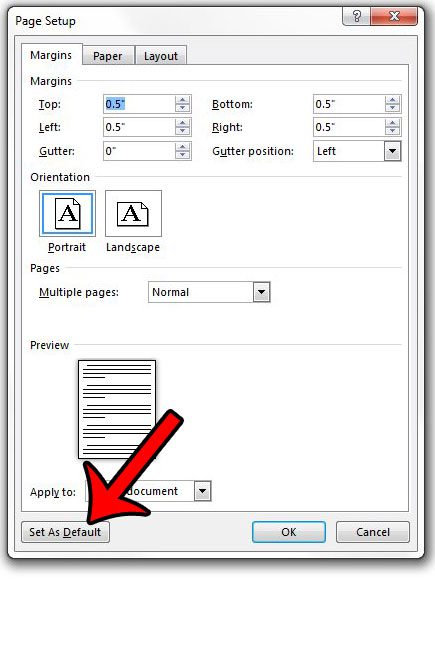
- Click the Set as Default button at the bottom of the window.
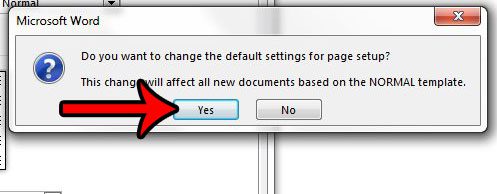
- Click the Yes button to confirm that you wish to use these settings as the new default for your documents.
These steps are also shown below with pictures –
Step 1: Open Word 2013.
Step 2: Click the Page Layout tab at the top of the window.
Step 3: Click the Margins button in the Page Setup section of the ribbon, then click the Narrow option.
Step 4: Click the Page Setup button at the bottom-right corner of the Page Setup section of the ribbon.
Step 5: Click the Set as Default button at the bottom of the Page Setup window.
Step 6: Click the Yes button to confirm that you want to apply this change to the Normal template.
Now that you know how to use narrow margins by default in Word 2013, you will be able to apply this setting automatically to new documents that you create in the application.
Many of the other default elements in your document can be adjusted, too. Learn how to change the default font color in Word 2013 to a different color of your choosing.

Matthew Burleigh has been writing tech tutorials since 2008. His writing has appeared on dozens of different websites and been read over 50 million times.
After receiving his Bachelor’s and Master’s degrees in Computer Science he spent several years working in IT management for small businesses. However, he now works full time writing content online and creating websites.
His main writing topics include iPhones, Microsoft Office, Google Apps, Android, and Photoshop, but he has also written about many other tech topics as well.