Windows 7 brought about a lot of changes to the way that you were probably used to navigating and making changes in earlier versions of Windows.
One way that this occurs, in nearly every facet of Windows 7, is through the removal of the menu bar that many people had come to rely upon in Windows XP.
The menu bar was the row of navigational links, such as File, Edit, Tools and View, that you were accustomed to seeing and using to perform tasks and make changes.
Fortunately, these menus are not gone, they are merely hidden by default. Therefore you can take a few simple actions to show the menu bar in Windows 7 explorer.
Display the Menu Bar in Windows Explorer for Windows 7
If you have been wondering how to make changes in Windows 7, you are not alone. Many new users are confused by the inclusion of new menus and the new organizational system used in Windows 7. Additionally, many of the changes that you relied upon menus to make before can now be more quickly accessed through the right-click shortcut menu. Technically these options are faster and easier in Windows 7, but they are difficult to locate when you are used to something different.
One new item in Windows 7 that I personally find useful is the inclusion of the Windows Explorer icon in the taskbar at the bottom of your screen. This icon is the manila folder. If you click that icon, it will automatically open your default Windows Explorer folder. Conveniently, the method for showing the menu bar in Windows 7 explorer begins by launching a menu found in this window.
If you have not already, click the Windows Explorer icon in the taskbar at the bottom of the window.
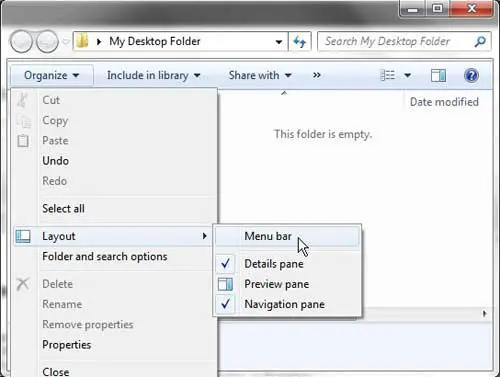
Click the Organize button in the horizontal bar at the top of the window, click Layout, then click Menu bar.
Now that you know how to show the menu bar in the Windows 7 File Explorer, it can be much easier to perform some of the tasks available in that window.
That’s it! You should now see the menu bar that has been missing at the top of the window.
While you have this window open, note that you can also make other changes to the appearance of your Windows Explorer folders on this menu.
For example, the Details pane option displays an informational panel at the bottom of the window that will tell you information about the folder, such as how many files the folder contains, and how much space they take on your hard drive.
The Preview pane option will create another section in your window that will show a preview of the selected file.
Finally, the Navigation pane shows a list of folders and locations that are frequently used, which can expedite your navigation through the files and folders on your computer.

Matthew Burleigh has been writing tech tutorials since 2008. His writing has appeared on dozens of different websites and been read over 50 million times.
After receiving his Bachelor’s and Master’s degrees in Computer Science he spent several years working in IT management for small businesses. However, he now works full time writing content online and creating websites.
His main writing topics include iPhones, Microsoft Office, Google Apps, Android, and Photoshop, but he has also written about many other tech topics as well.
