You have a lobby display, a trade show booth or a church foyer screen, and you want a PowerPoint deck to play on its own all day without anyone touching it. In PowerPoint for Windows, go to Slide Show > Set Up Slide Show, choose Browsed at a kiosk (full screen) and select OK. Then give every slide a timing, because in kiosk mode clicks don’t advance slides. The show loops until someone presses Esc.
What Kiosk Mode Does and Doesn’t Do
Kiosk mode is one of three show types in PowerPoint’s Set Up Show dialog. Microsoft’s page on creating a self-running presentation describes all three:
| Show type | What it does | Best for |
|---|---|---|
| Presented by a speaker (full screen) | The normal slide show. You advance with clicks, keys or a remote | Talks and meetings |
| Browsed by an individual (window) | Plays the show in a window instead of full screen | Sending a deck someone will read at a desk |
| Browsed at a kiosk (full screen) | Full screen, loops until Esc, and ignores mouse clicks for advancing | Lobbies, booths, waiting rooms |
Two things surprise most people. First, a click anywhere on the slide does nothing in kiosk mode, so a show with no timings sits on slide one forever. Second, kiosk mode doesn’t lock the file. Anyone at the keyboard can press Esc and be back in PowerPoint, so physical setup still matters (more on that below).
Viewers can still interact in one way: hyperlinks and action buttons on the slides keep working. That is how you build a touch-screen kiosk where visitors pick a topic.
Turn On Kiosk Mode in PowerPoint for Windows
These steps apply to PowerPoint for Microsoft 365 and recent desktop versions on Windows.
- Open the presentation.
- Select the Slide Show tab.
- Select Set Up Slide Show.
- Under Show type, select Browsed at a kiosk (full screen). The loop option should show as turned on, because kiosk shows always loop.
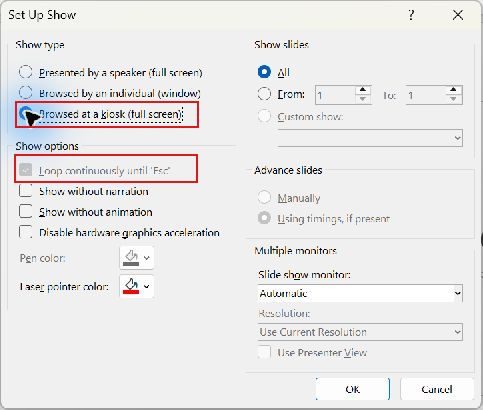
- Check the other options in the dialog while it is open: which slides to show (All, or a From/To range), whether to play narrations and animations, and which monitor to use if the PC has more than one.
- Select OK.
The setting is saved with the file, so it stays on the next time you open it. To switch back to a normal presentation, return to the same dialog and pick Presented by a speaker (full screen).
Set Slide Timings So the Show Advances
This is the step that makes or breaks a kiosk show. You have two ways to add timings.
Option 1: Set the Same Time for Every Slide
- Select the Transitions tab.
- In the Timing group, under Advance Slide, check After and enter a time, such as 00:08.00 for eight seconds.
- Select Apply To All to copy that timing to every slide.

- Change individual slides afterward if one needs longer, such as a slide with a lot of text.
A slide with After set to zero, or with After unchecked, won’t move on in kiosk mode. If you check On Mouse Click as well, that box has no effect in a kiosk show, so the After time is what counts. The older walkthrough on setting the time between slides shows the same Timing group in more detail.
Option 2: Rehearse the Timings
- On the Slide Show tab, select Rehearse Timings. The show starts with the Rehearsal toolbar and a timer that begins right away.
- Read each slide at the pace a visitor would, then advance to the next one. You can pause or repeat a slide from the toolbar.
- At the end, choose to keep the new timings.
Rehearsing works well when slides have very different amounts of content. Microsoft notes you can see the saved timings under each slide in Slide Sorter view. Make sure Use Timings on the Slide Show tab stays checked, or PowerPoint ignores the timings you just saved.
Here is a worked example. Fenwick runs a garden center and has a 12-slide “Spring Planting” deck for the checkout screen. He gives every slide 10 seconds with Apply To All, then bumps the two price-list slides to 20 seconds. The loop runs about two minutes and 20 seconds, short enough that a customer in line sees most of it.
Add Narration if You Want Sound
If you want a recorded voice over the loop, use Record on the Slide Show tab and choose to start from the beginning or the current slide. The recording saves the narration and the timings together. You will need a microphone; doing a voiceover in PowerPoint covers the recording controls. If the screen is in a quiet waiting room, you can leave narration off in the Set Up Show dialog without deleting it.
For an interactive kiosk on a touch screen, give visitors their own way to move.
- Go to Insert > Shapes and pick an action button from the bottom of the list (Back, Next, Home and others), or draw any shape.
- Draw it on the slide. For an action button, the Action Settings box opens; choose what it does, such as hyperlink to the next slide or a specific slide.
- For any shape, text or picture, you can instead select it and use Insert > Link (or Action) to point it at another slide in the deck.
- To show the same buttons on every slide, add them on the slide master (View > Slide Master).
Keep the timings in place even on an interactive deck, so the show keeps cycling when nobody is using it. For more ideas on clickable elements, see making things appear with clickable buttons in PowerPoint.
Start, Stop and Launch the Show Automatically
- Start: press F5, or select From Beginning on the Slide Show tab.
- Stop: press Esc. The Set Up Show dialog has no option to turn Esc off, so put the keyboard away or out of reach on a public display.
- Launch straight into the show: save the file as a PowerPoint Show. Select File > Save As (or Save a Copy), set the file type to PowerPoint Show (*.ppsx) and save. Double-clicking that file opens the slide show directly, without the editing window. Microsoft explains this on its page about starting a presentation automatically with a PowerPoint Show.

To edit a .ppsx later, open PowerPoint first and then use File > Open to pick the file. Keep the original .pptx as your working copy anyway.
If the toolbar or controls in the lower corner of the slide show bother you on a public screen, hiding the toolbar in a full-screen slide show walks through those options.
Kiosk Mode in PowerPoint for Mac
PowerPoint for Mac has the same show type. Open the Slide Show tab and look for Set Up Slide Show (it may be labeled Set Up Show), then choose Browsed at a kiosk (full screen). Timings work the same way through the Transitions tab and Rehearse on the Slide Show tab. Labels can differ slightly by version, so look for those names if your ribbon looks different.
What About PowerPoint for the Web?
PowerPoint for the web doesn’t appear to offer the Set Up Show dialog or a kiosk show type. If your deck lives online, open it in the desktop app (the Open in Desktop App option, if your account has it) and set up kiosk mode there. Another route for screens that only play video is to export the deck as an MP4; turning a PowerPoint into a video covers that.
Fix a Kiosk Show That Stalls, Won’t Loop or Stops
- Stuck on one slide: that slide has no After time, or After is zero. Check it on the Transitions tab.
- Timings ignored everywhere: Use Timings is unchecked on the Slide Show tab. Turn it back on.
- Only part of the deck plays: the Set Up Show dialog has a From/To range, or some slides are hidden. Set Show slides to All, and unhide slides you want in the loop.
- The screen goes black or the PC sleeps: Windows power settings can still turn off the display. Set the screen and sleep timers to Never in Windows Settings for a dedicated display PC.
- A video won’t replay: test the full loop at least twice before the event. Video playback depends on the video’s own playback options.
- Animations look choppy: try turning off hardware graphics acceleration in the Set Up Show dialog, if your version shows that option.
Kiosk Show Questions
Can visitors click to skip ahead?
Not by clicking the slide. They can only use hyperlinks and action buttons you’ve added.
Will the show restart from the first slide on its own?
Yes. Kiosk mode loops continuously until someone presses Esc.
Can I keep the presenter’s laptop screen free while the show runs on a TV?
Yes. Pick the TV in the slide show monitor setting in Set Up Show. The show plays on the TV, and the laptop screen can show PowerPoint or another window.
Can I update the slides without stopping the display for long?
Press Esc, make your edits, save, and start the show again. The kiosk setting is stored in the file, so you don’t need to turn it on again.
A good next step is a full test run: set your timings, save a .ppsx copy, open it on the actual display PC and let it loop twice while you watch.

Matthew Burleigh is the founder, head writer, and editor of Solve Your Tech, which he launched in 2012. He has written technology tutorials since 2008 and worked in IT since 2003, including small-business support, IT management, and consulting. He holds Bachelor’s and Master’s degrees in Computer Science from Arizona State University.
Matthew writes practical guides for Windows, iPhone and iPad, Microsoft Office, Outlook, Google apps, and Android. Solve Your Tech’s guides are checked step by step against the device or app maker’s own documentation and tested on his own devices whenever he has the hardware or software, with clear steps, sources, and update dates.
Read more about Matthew and how Solve Your Tech writes and updates its guides, or report a correction.