Apple’s Safari browser is used on all of its Internet-capable products, including the iPad.
It is a powerful, full-featured browser that offers most of the settings and customization options that you would find in other Web browsers on your computer.
One important element of the Web browsing experience is the ability to protect your privacy, which can be accomplished through the use of a private browsing session.
We have previously covered how to do this in the Firefox and Chrome browsers, but it is also possible to do private browsing on your iPad 2.
This allows you to continue using the default, non-private browsing setting for your regular browsing but also specify certain browsing sessions where Safari does not remember any historical or form data.
This is helpful if you are shopping for a gift for a family member while using the iPad and you do not want them to be able to see the sites that you have been visiting.
iPad 2 Private Browsing Session
The difference between a regular browsing session and a private browsing session on your iPad 2 is the data that the Safari browser will store.
In a regular browsing session, you are accumulating a history of the pages that you visit, form data that you fill in, as well as any cookie or password data that you encounter or enter along the way.
However, private browsing sessions begin and end without storing any of this data on your device. To learn how to start a private browsing session on your iPad 2, follow the steps below.
Step 1: Navigate to the iPad screen containing your Settings icon.
Step 2: Tap the Settings icon to open the menu.
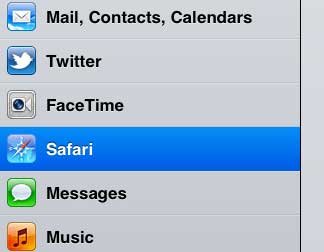
Step 3: Touch the Safari option at the left side of the screen.
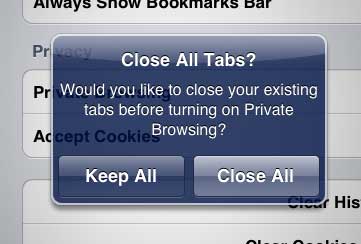
Step 4: Tap the button to the right of Private Browsing. If you have currently open tabs in a Safari browsing session, you will be prompted to either Keep All or Close All.
Step 5: After you have chosen how you want Safari to handle your current browsing session, the button to the right of Private Browsing will now say On.
Now that you know how to do private browsing on an iPad, you will be able to use this feature in the future any time that you want to visit Web pages without saving that activity to your history.
Your iPad’s Safari browser will remain in private browsing until you return to this screen and disable the setting. When you come back to disable private browsing, you will once again be asked how you want Safari to handle your currently open browser tabs.

Matthew Burleigh has been writing tech tutorials since 2008. His writing has appeared on dozens of different websites and been read over 50 million times.
After receiving his Bachelor’s and Master’s degrees in Computer Science he spent several years working in IT management for small businesses. However, he now works full time writing content online and creating websites.
His main writing topics include iPhones, Microsoft Office, Google Apps, Android, and Photoshop, but he has also written about many other tech topics as well.


