There are many different ways that Windows 7 can display the files that are stored inside of the folders on your computer.
Whether you want to see as many files in a folder at once or if you want to see a large thumbnail image for each file that is there, it is possible to learn how to change the folder view in Windows 7.
This option can be extremely useful if you have a lot of files in a single folder and need to quickly check file names for a specific one, or if you cannot remember the name of a file and need to see a large preview of that file to jog your memory.
No matter what you need, you can change the view of the folder whenever you need to.
Change a Folder’s View Setting in Windows 7
Sometimes the organizational and view settings in Windows 7 can be frustrating.
Unfortunately, this is difficult to contend with, because there is not one universal view setting that is ideal for all scenarios.
You may find that you prefer the List view, for example because it allows you to see many files at once.
But if you need to search for a file by date or file size, then the Details option would probably be a more suitable choice.
You will need to become familiar with all of the different folder view options so that you can best choose how to view your files in certain situations.
If, after adjusting the view settings for one of your folders, you discover that you prefer that option instead of the current default, you can use the tutorial on this page to apply that setting to all of your folders.
Step 1: Begin by opening the folder for which you want to change the view.
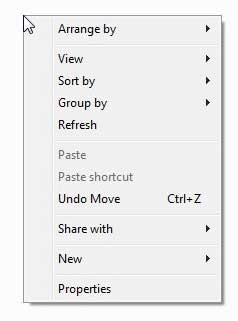
Step 2: Right-click in an empty area of the folder. This will display the shortcut menu. Note that you have to click in an empty space, otherwise you will probably be selecting a file and you will get a completely different set of shortcut options.
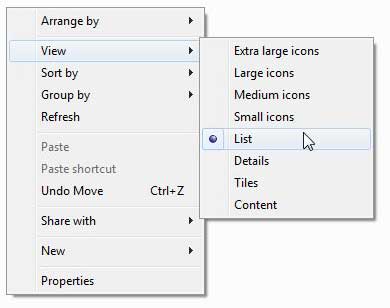
Step 3: Click the View option, then choose the view setting that you prefer.
Now that you know how to change the folder view in Windows 7, you can make it easier to find the files you need if the current setting isn’t helping oyu out.
You will need to experiment with these to learn what each option will give you. Some options, like Extra large icons, will show a bigger thumbnail icon.
This is great for images, but unnecessary for Office documents. On the other hand, the Details option will show you file size and date information, which is helpful for Office documents, but not when you are looking for an image and cannot remember anything but what the image looks like.

Matthew Burleigh has been writing tech tutorials since 2008. His writing has appeared on dozens of different websites and been read over 50 million times.
After receiving his Bachelor’s and Master’s degrees in Computer Science he spent several years working in IT management for small businesses. However, he now works full time writing content online and creating websites.
His main writing topics include iPhones, Microsoft Office, Google Apps, Android, and Photoshop, but he has also written about many other tech topics as well.

