Editing pictures can be difficult and time-consuming, especially if it’s not something that you do a lot.
Fortunately, many of the popular Microsoft Office applications that you use every day have some ways to make image adjustments directly in your content.
Our tutorial below will show you how to flip a Microsoft Word 2013 picture that you have added to your document.
How to Flip a Microsoft Word Image
- Click the picture that you want to flip.
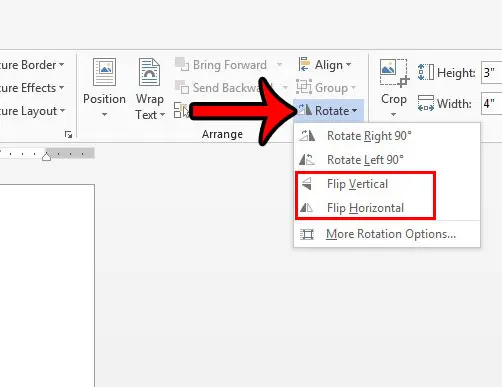
- Select the Rotate button in the Arrange section of the ribbon.
- Click the Flip Vertical or Flip Horizontal button.
This guide continues below with additional information on flipping a picture in Word 2013, including pictures of these steps.
Do you have a picture on your phone that you can’t identify? Learn how to compare it with others online with the steps in our Google reverse image search guide.
Often when you add a picture to a document, such as Microsoft Word, then the document might not look right. This can leave you wondering how to flip a picture in Word 2013.
You might need to learn how to flip an image in Word if you have a picture, but it is a mirror image of what you need it to be. Fortunately, Microsoft Word has some image editing abilities, as not every image that you have or need for your document will be in exactly the form that you require.
Whether you need to crop a picture, add a link to a picture, change its size, or flip the picture along a vertical or horizontal axis, Word has something that can help you.
One option available to you for picture editing in Word is a rotation tool that can be used to flip a picture vertically or horizontally. This will modify the picture so that it becomes a mirror version of itself.
Document editors like Microsoft Word and Google Docs have some options that make it easier to add weird symbols. Our tutorial on how to insert a degree symbol in Google Docs will show you how to do it in the Google word processor.
How to Rotate a Picture in Word 2013 (Guide with Pictures)
The steps in the article below will assume that you already have a picture in your document, but you want to flip that picture so that the left side of the image appears on the right side of the image, or the top of the picture appears at the bottom.
This feature is commonly used for printing t-shirt transfers, but can also be helpful if the picture that you have would simply look better if it were flipped. These steps were performed in Microsoft Word 2013, but will also work in other versions of Microsoft Word as well.
Step 1: Open your Word document that contains the image you want to flip.
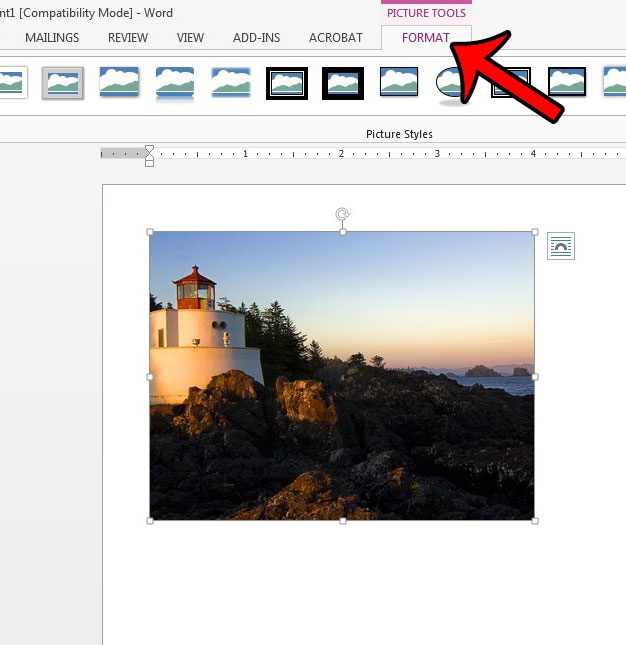
Step 2: Click the picture to select it. This will add a Picture Tools: Format tab to the top of the window, which becomes the active tab.

Step 3: Click the Rotate button in the Arrange section of the ribbon, then click the Flip Vertical or Flip Horizontal button.

Now that you know how to flip a picture in Word 2013 you will be able to make a number of different adjustments to the pictures that you include in the documents you edit.
If you will notice on that Rotate menu, there are a few more rotation options as well, including:
- Rotate Right 90 degrees
- Rotate Left 90 degrees
- More Rotation Options
If you open that More Rotation Options menu, you will see a menu that lets you adjust other settings for your picture, as well as a way to rotate the picture in single degree increments. For example, you could use this to rotate the picture 45 degrees, if you were so inclined.
There are a number of other helpful options on the Picture Tools: Format tab in Word 2013, including a tool that allows you to crop out the unwanted parts of your picture. Learn how to crop a picture in Word 2013 so that you don’t have to do it in a separate image-editing application.

Matthew Burleigh has been writing tech tutorials since 2008. His writing has appeared on dozens of different websites and been read over 50 million times.
After receiving his Bachelor’s and Master’s degrees in Computer Science he spent several years working in IT management for small businesses. However, he now works full time writing content online and creating websites.
His main writing topics include iPhones, Microsoft Office, Google Apps, Android, and Photoshop, but he has also written about many other tech topics as well.