Some of the changes that you will want to make to a Microsoft Word document can seem pretty easy to accomplish.
You’ve probably already changed the font or text color of some text in your document, and you may have changed the margins or background.
But if you have ever needed to use a different case for existing text, such as one called “toggle case” then you might be curious how to use that feature.
Do you have a document that is entirely in the wrong case? Or did you accidentally hit Caps Lock while you were typing, and go through an entire paragraph or two before you realized it?
Retyping the same text in a document can be annoying and frustrating, so you may be looking for a quick way to switch the case of a selection of letters in Word 2013.
Fortunately, this is possible with the help of a font setting that lets you toggle the case.
Our guide below will show you where to find this setting and how you can use it to switch the case of your upper and lowercase letters with ease.
How to Apply Toggle Case in Microsoft Word
- Open your document.
- Select the text to change.
- Choose the Home tab.
- Click the Change Case button, then choose the Toggle Case option.
Our article continues below with additional information on changing to toggle case in Word, including pictures of these steps.
Want to make a change to everything in your document? Our select all Microsoft Word tutorial can show you how to do that.
How to Switch the Case of Each Letter in Word 2013 (Guide with Pictures)
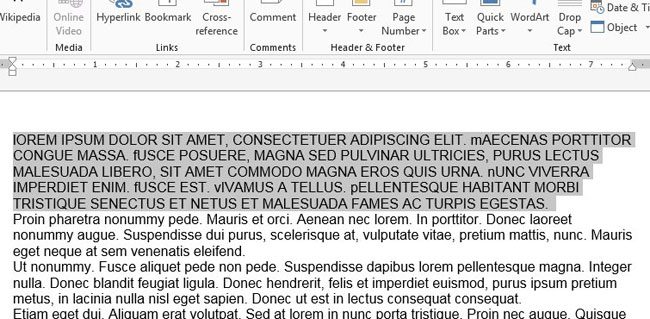
The steps in this article are going to show you how to use the “Toggle Case” font setting in Word 2013. This is going to switch the case of every selected letter. That means capital letters become lowercase letters and vice versa.
Step 1: Open your document in Word 2013.
Step 2: Select the text for which you would like to toggle the case.
If you wish to select the entire document, then click anywhere inside the document and press Ctrl + A on your keyboard to select everything.

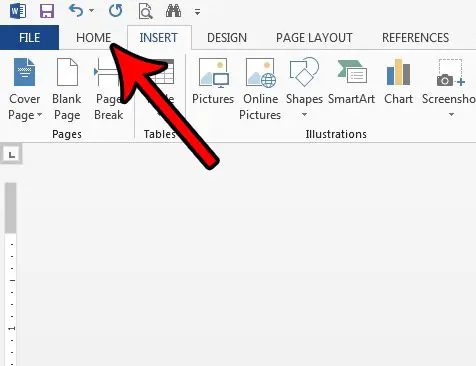
Step 3: Click the Home tab at the top of the window.

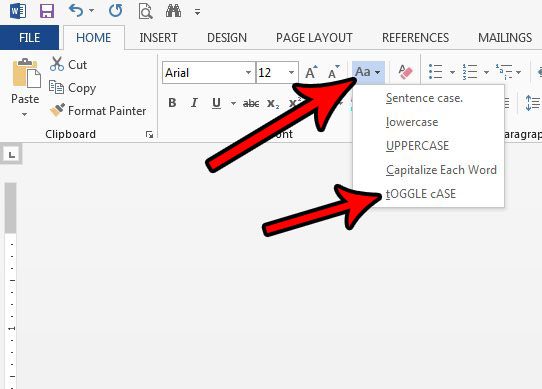
Step 4: Click the Change Case button in the Font section of the ribbon, then choose the tOGGLE cASE option.

Our guide continues below with additional discussion on cases in Microsoft Word 2013.
How Do I Switch to Sentence Case in Microsoft Word?
If you want to change the case style for some text so that the first letter of each sentence is uppercase, then you want to use the Sentence case option.
You can switch to this by making your text selection, then click the Change Case button and choosing the Sentence case option.
Note that making the first letter uppercase and the rest lowercase is the default setting in Microsoft Office Word applications, so you will likely only need to make this change if another option has been applied to the selected text, such as the lowercase text or upper case option.
More Information on How to Toggle Case in Word 2013
When you click the case button in the Font group on the ribbon you will notice that you have the following options on the drop down menu:
- Sentence case
- lowercase
- UPPERCASE
- Capitalize Each Word
- tOGGLE cASE
The combination of lowercase and uppercase letters that is shown in each option is the type of case that will be used when you apply that chosen case to your selection.
As we mentioned previously you can use the keyboard shortcut of Ctrl + A to select the entire document. If you don’t want to select the whole document then you can use your mouse to select the text you wish to modify.
If you have enabled Caps Lock on your keyboard and you hold down the Shift key while typing then you will actually type a lowercase letter. This is another way to use sentence case if you don’t want to use the option in the Change Case dropdown.
If you want to open the Font dialog box so that you can use some of the options there then you will need to click the small Font button at the bottom-right of the Font group. Once that window opens you will be able to apply some other options, such as small caps.
Is there a lot of formatting in your document that you want to remove, but going through and changing each individual option is either slow, impractical, or frustrating? Learn about the way to clear formatting in Word 2013 and quickly get rid of most formatting at once with the click of a button.

Matthew Burleigh has been writing tech tutorials since 2008. His writing has appeared on dozens of different websites and been read over 50 million times.
After receiving his Bachelor’s and Master’s degrees in Computer Science he spent several years working in IT management for small businesses. However, he now works full time writing content online and creating websites.
His main writing topics include iPhones, Microsoft Office, Google Apps, Android, and Photoshop, but he has also written about many other tech topics as well.