One useful thing that you can do when working with Excel worksheets that are going to print on multiple sheets of paper is to ensure that those pages are numbered. This will make it easy to re-establish the page order in case the pages ever wind up in the wrong order. It can also help to make referencing something on a particular Excel sheet a little simpler.
Page numbers are a helpful way to keep printed documents organized, especially if the document is something like a spreadsheet. Excel spreadsheets, especially multi-page ones, can all look very similar, and an out of order spreadsheet can be difficult to re-organize without page numbers.
But there are times where page numbers can be distracting or disruptive, so you may choose to remove them from your file. But if you did not add the page numbers to the spreadsheet yourself, you may be having difficulty determining how you can remove them. So continue reading our guide below to learn how you can remove page numbers from your Excel 2010 spreadsheet.
How to Delete Excel Page Numbers
- Open your spreadsheet.
- Select the Page Layout tab.
- Click the Page Setup button.
- Choose the Header/Footer tab.
- Click the Header drop down and choose the None option, then repeat with the Footer drop down.
- Click OK to apply your changes.
Our article continues below with additional information on removing page numbers in Excel, including pictures of these steps.
If you need to delete all of the data in a sheet instead of just the page numbers, then our tutorial on how to delete a sheet in Excel can show you the steps.
Getting Rid of Excel 2010 Page Numbers (Guide with Pictures)
This tutorial is going to completely remove all of the page numbers from your Excel 2010 spreadsheet. If you decide later that you want to have page numbers, you can read this article to learn how to add them.
Step 1: Open the spreadsheet in Excel 2010.
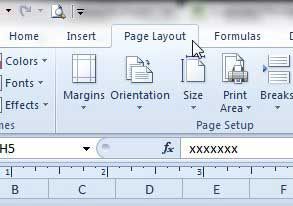
Step 2: Select the Page Layout tab at the top of the window.

Step 3: Click the small Page Setup button at the bottom-right corner of the Page Setup section of the ribbon at the top of the window.
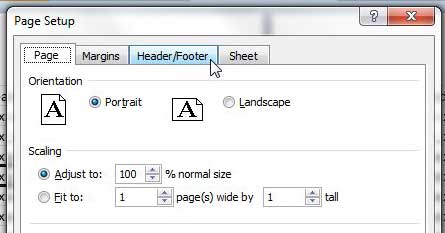
This is going to open the Page Setup Dialog box, which has a variety of different options to format the way your spreadsheet looks and prints.

Step 4: Click the Header/Footer tab at the top of the window.

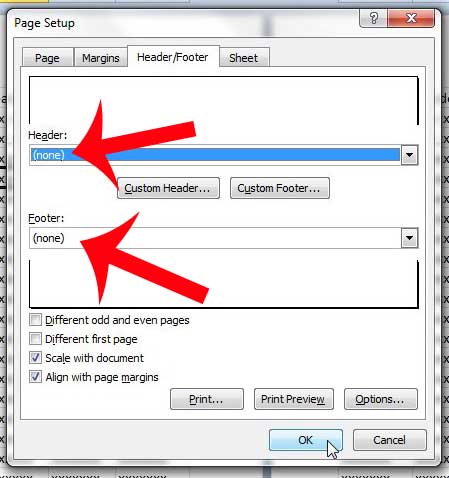
Step 5: Click the drop-down menu under Header, then select the None option at the top of the list.
Repeat this for the drop-down menu under Footer as well. Your window should then look like the image below.

Step 6: Click the OK button when you are done.
If you open the Print menu in Excel, your page numbers should no longer be visible.
Do you struggle to try to adjust your Excel spreadsheets so that they print better? Learn how to fit all of your columns on one page to save time manually adjusting column widths.
More Information on How to Remove Page Numbers in Excel
This guide assumes that you have inserted page number objects into your document so that Excel will handle them automatically. If you have added page numbers using something other than the Page Number function in the header or footer then you may need to manually find and delete the page numbers from your cells instead.
One reason that you might want to remove the page numbers from your spreadsheet is when you find that Excel is printing page numbers on the physical copy of your spreadsheets. This is often a surprise, as header and footer information like page numbers isn’t visible in the Normal view of the Excel spreadsheet. However, you can see it in the Print Preview window. That’s why it is always a good idea to look through the preview before printing your spreadsheet, particularly if it is going to print on a lot of pages.
If you are looking to insert page numbers rather than remove them, then you can do so by selecting the Insert tab, then clicking the Header & Footer button. You can then select the desired location for the page numbers, click the Design tab under Header & Footer Tools, then click the Page Number button.
There are some additional options for page numbering your Excel worksheet besides simply adding them You can also elect to display the number of pages next to the page number, or you can include other helpful information like the time or filename. If you want to make some additional customizations, like not displaying the first page number, or using different options for odd and even pages then those options can be adjusted in the Page Setup dialog box that we opened by clicking the tiny Page Setup button in the Page Setup group on the Page Layout tab.
The Page Setup group on the Page Layout tab has a lot of other customization options for your printed pages as well. For example, to switch to landscape orientation, in the Page Setup group click the Orientation button and choose the Landscape option.
If you want to see how your spreadsheet pages look without relying on the Print Preview then you can select the View tab at the top of the window, then choose the Page Layout view option.

Matthew Burleigh has been writing tech tutorials since 2008. His writing has appeared on dozens of different websites and been read over 50 million times.
After receiving his Bachelor’s and Master’s degrees in Computer Science he spent several years working in IT management for small businesses. However, he now works full time writing content online and creating websites.
His main writing topics include iPhones, Microsoft Office, Google Apps, Android, and Photoshop, but he has also written about many other tech topics as well.