If you’ve ever re-typed a lot of data in an Excel spreadsheet, then it’s probably something that you don’t want to do again.
So if you run into a situation where you have data in the wrong place, you might be looking for an Excel move column guide that offers a way for you to accomplish this without redoing a lot of work.
Fortunately, there are ways that you can move data to a different location in an Exccel worksheet.
Microsoft Excel Move Column Guide
- Click the column letter of the column you want to move.
- Right-click the column, then choose Cut.
- Select the column to the right of where you want the cut column.
- Right-click the selected column, then choose Insert Cut Cells.
We continue below with additional information on these Excel move column steps, including pictures for each of the steps.
Our guide on how to add numbers in Excel columns can show you simple ways to get totals for your cell values.
The cells in your Microsoft Excel spreadsheet are split up into rows or columns that run horizontally or vertically across the screen or the page. You can type data, or copy and paste data into your cells, then you can format it or perform mathematical operations upon it. But you might discover that you need to move columns in Excel if you have data that is in the wrong location.
When you want to learn how to move columns in Excel 2013, it can be for a number of reasons. Maybe you are trying to make it easier to print your spreadsheet by placing important columns of data near each other, or maybe the organization of your spreadsheet is a little confusing.
But it is a rather simple process to put a column in a different location in your spreadsheet, and Excel will even take care of any cell reference updates caused by the move of your data. So if you have a spreadsheet containing a column that you want to move, then simply follow the steps outlined below.
Do you need to put Microsoft Office on another computer? Consider an Office 365 subscription that lets you install the entire Office suite on up to five computers.
Moving Columns in an Excel 2013 Spreadsheet (Guide with Pictures)
The steps outlined below were performed in Microsoft Excel 2013 but will work in previous versions of Microsoft Excel as well.
If you are moving columns that contain a formula or which are referenced in formulas, then Excel will automatically update the formulas in the column based on its new location.
Step 1: Open the spreadsheet containing the columns that you want to move.
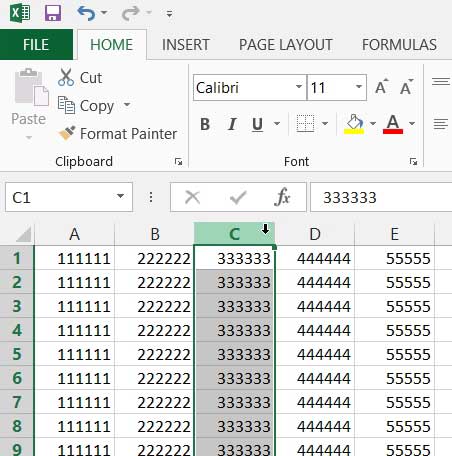
Step 2: Click the column letter of the column that you want to move.
This will select the entire column, like in the image below.
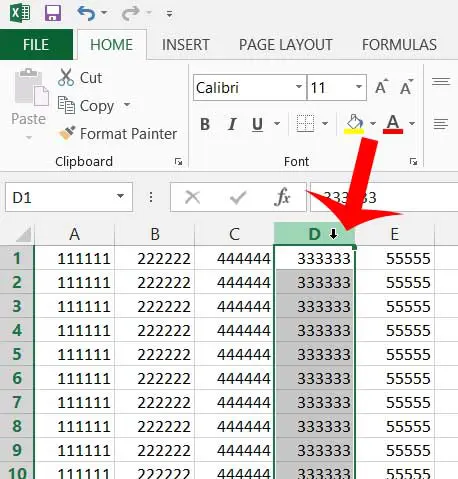
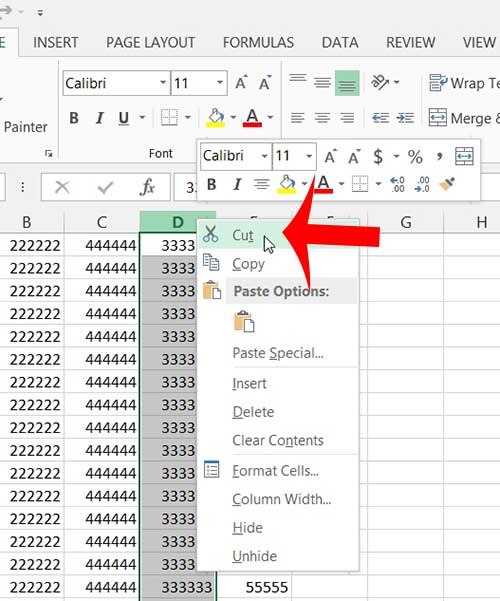
Step 3: Right-click the column letter, then click Cut.
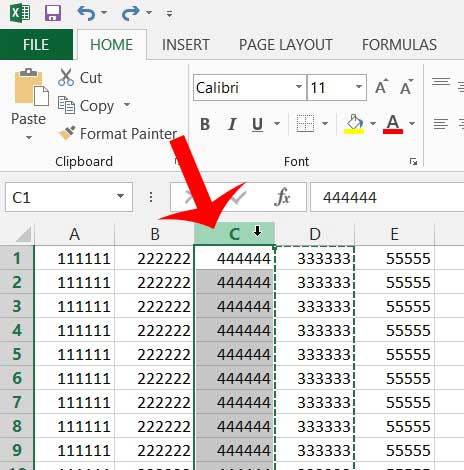
Step 4: Select the column before which you want to insert the column that you just cut.
For example, I want to place my cut column between the current columns B and C, so I have selected column C.
Step 5: Right-click the selected column, then click Insert Cut Cells.
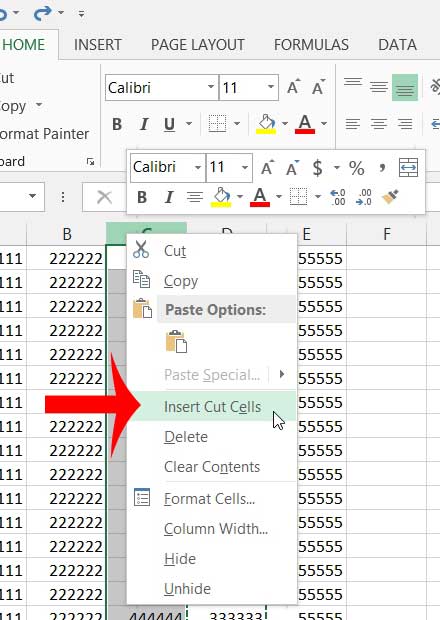
Your column should now be moved to its correct location, as in the image below.
Now that you know the Excel move column process, you might be looking for other ways to do this, such as keyboard shortcuts. We discuss those items below.
More Information on How to Move a Column in Excel 2013
If you don’t like to right-click to perform actions in Excel, then you can use some keyboard shortcuts instead.
To cut a selected column, simply press Ctrl + X on your keyboard.
To paste the cut column to the left of a selected column, press Ctrl + Shift + =.
You can use a similar method if you want to move multiple columns in Excel. Click and hold on the first column letter that you wish to move, then drag your mouse left or right to select additional columns. You can then use the same method above to insert the cut cells into the desired location.
Alternatively, you can click on the first column you wish to move, then hold down the Shift key and click on the last column you wish to move. This will select all of the columns contained within that range.
These same methods can be used to move rows in Excel as well by selecting row numbers instead of column letters in each applicable situation. As columns and rows behave in very similar manners, when you select the row number on the left side of the spreadsheet, it is going to select all of the cells in that row.
You can insert a new column or row in your spreadsheet by choosing the row below where you want your new row or the column to the right of where you want your new column, then right-clicking on one of the selected cells and choosing the Insert option.
Any column heading or row heading is going to update accordingly when you move the column or row to a new location. While formulas will update when you drag the column to the new location, any external references that use these headings might need to be updated. Specifically, this means any tutorials or documentation that your organization uses which might use column or row headings to identify cell locations.
Do you dislike the physical appearance of your spreadsheet? Learn how to change the font of the entire worksheet in just a few short steps.

Matthew Burleigh has been writing tech tutorials since 2008. His writing has appeared on dozens of different websites and been read over 50 million times.
After receiving his Bachelor’s and Master’s degrees in Computer Science he spent several years working in IT management for small businesses. However, he now works full time writing content online and creating websites.
His main writing topics include iPhones, Microsoft Office, Google Apps, Android, and Photoshop, but he has also written about many other tech topics as well.