It’s pretty rare to create a spreadsheet from scratch that doesn’t need even a small amount of editing.
Whether it’s a formatting change, or the addition of some more data, knowing how to update an existing spreadsheet is a valuable skill to have.
One thing that you might need to know is how to insert a row in Excel 2016 if you have missed a set of data that needs to go in between two of your existing worksheet rows.
We will address both of the possible ways that you can add rows in Excel in the various sections of our article below. You can either click on one of the shortcut links below to jump to the appropriate section, or you can continue reading.
How to Insert a Row in Excel 2016
- Open your spreadsheet.
- Select the row number below where you want the new one.
- Right-click the selected row.
- Choose the Insert option.
Our guide continues below with additional information on how to insert a row in Excel 2016, including pictures of these steps.
When you are trying to figure out how to add rows in Excel, you may be looking for two different things. In the first scenario you are trying to insert additional rows into an existing set of data in a spreadsheet.
In the second scenario you are likely trying to figure out how to add all of the values that exist within the cells in a row.
Our guide on how to add columns in Excel can show you a way to add all of the values in a column with just a single, simple formula.
How to Insert Single Rows in Microsoft Excel
When you need to add a new row to a spreadsheet, the easiest way is to simply start typing in the first empty cell after your existing data. However, situations may arise where you have already entered a lot of data, only to find that you need to place a new row in between two of the rows that you have already created. This will shift cells down in your Excel spreadsheet, allowing you to add new data into the blank cells that should have appeared.
Step 1: Open the spreadsheet containing the existing data.
Step 2: Click on the row number at the left side of the window that’s below where you wish to add this new row.
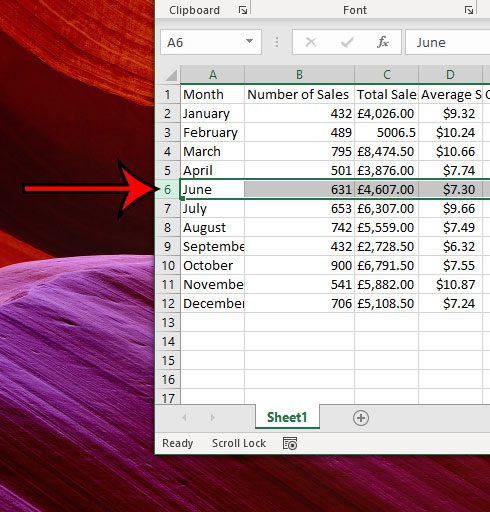
Step 3: Right-click on the selected row number, then choose the Insert option.
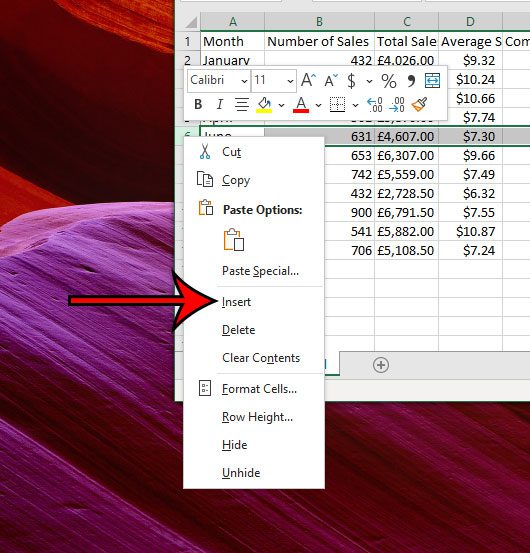
If you would prefer to use a keyboard shortcut to add a new row, then simply press Ctrl + Shift + + on your keyboard after selecting the appropriate row number. Note that the third button to press for this keyboard shortcut is the plus symbol next to your Backspace key.
Alternatively you can add a new row after selecting the insertion point by clicking the Home tab at the top of the window, then clicking the Insert button in the Cells section of the ribbon and choosing the Insert Sheet Rows option.
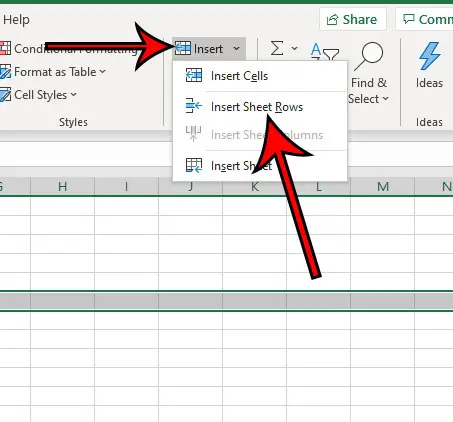
This method is beneficial when you need to insert rows at various points throughout your spreadsheet, but it’s a little slow if you need to add a lot of new rows at once.
How to Insert Multiple Rows in Excel
The method in this section is a little easier when you need to add multiple new rows to a single location in your spreadsheet.
Step 1: Open your Excel worksheet.
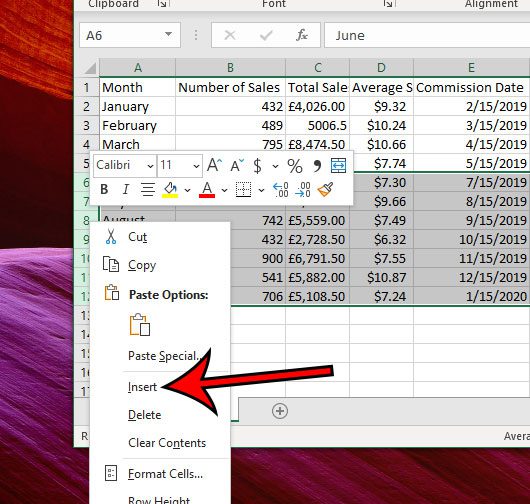
Step 2: Click and hold on the row number below the desired location for the new rows, then drag your mouse down to to select the number of rows equal to how many rows you want to insert.
I have selected seven rows in the picture below, which is going to insert seven new rows. Note that you could also select the first row number, then press Shift on your keyboard and select the last row number instead. If you are trying to select rows with your mouse but encountering problems (which can happen when dealing with a lot of rows) then the method with the Shift key may be easier.
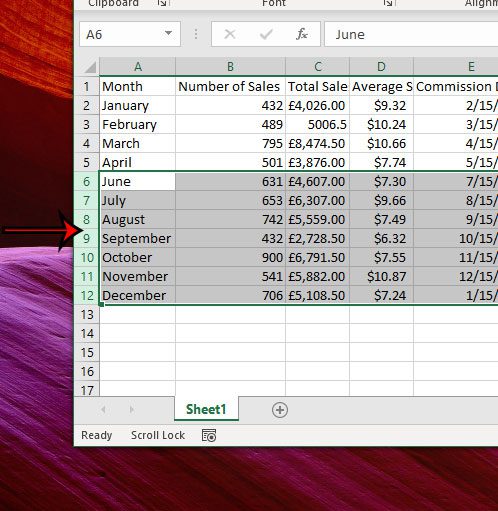
Step 3: Right-click on one of the selected row numbers, then choose the Insert option. You could also use the Insert Sheet Rows option on the Home > Insert drop-down menu, or you could use the Ctrl + Shift + + keyboard shortcut option.
Related: Microsoft Excel Create Table Guide
How to Add All of the Values in a Row in Excel
The last part of this article will discuss adding the values found within the cells of a row. We accomplish this with the help of Excel’s SUM function, which I will be placing in the first empty cell to the right of my existing values in the row. In many cases this is going to be a Total column, or something similar.
Step 1: Open your Excel spreadsheet.
Step 2: Click in the cell where you wish to display the total for the values in your entire row.
Step 3: Type =SUM(XX:YY) into this cell, but replace the XX with the first cell in the row, and replace YY with the last cell in the row. In my example image below I am adding all of the values in the second row, so my formula is =SUM(B2:M2). Note that the selected cells that you see after entering your formula are the ones that are included in the total. After you have finished entering the formula, press the Enter key on your keyboard.
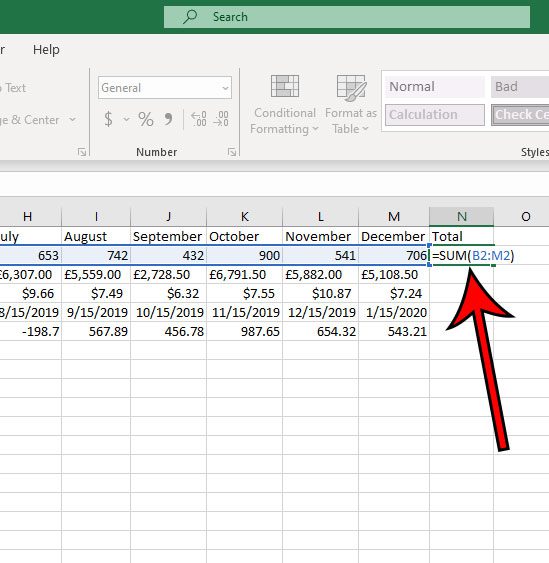
Instead of manually entering the cell locations, you could also click on the first cell after entering the =SUM( part of the formula, then drag to select the rest of the cell values that you wish to add.
More Information on How to Add Rows in Excel
- All of the procedures outlined in the article above can be used to add new columns, or add the values found within columns of your spreadsheet. You will simply be dealing with the column letters at the top of the window instead of the row numbers at the left side of the window. You would also need to select the Insert Sheet Columns option from the Home > Insert menu instead o the Insert Sheet Rows option.
- Inserting rows with the methods above will add blank rows full of blank cells. If there is an existing row of data in your spreadsheet that you want to move to a different location you can click its row number to select the entire row, press Ctrl + X on your keyboard to cut it, then right-click on the row number below where you want to insert that row and choose the Insert Cut Cells option. You should then see your cut row above the row that you selected. As with the other methods in this guide, this is a good way to move an entire column, too.
Find out how to view and/or print gridlines in Excel if you are having trouble visually separating the cells in your spreadsheet.
Additional Sources

Matthew Burleigh has been writing tech tutorials since 2008. His writing has appeared on dozens of different websites and been read over 50 million times.
After receiving his Bachelor’s and Master’s degrees in Computer Science he spent several years working in IT management for small businesses. However, he now works full time writing content online and creating websites.
His main writing topics include iPhones, Microsoft Office, Google Apps, Android, and Photoshop, but he has also written about many other tech topics as well.