Open the photo in Photos, tap Edit, tap Portrait at the top of the screen so it turns off, then tap Done. The background blur disappears, the photo stays in your library, and you can turn the effect back on later.
These steps are for the Photos app on iPhone with iOS 26 and recent earlier versions such as iOS 18. They follow Apple’s Use Portrait mode on your iPhone article.
What the Portrait Effect Is
- What the Portrait effect is. When you take a picture in Camera’s Portrait mode, the iPhone saves depth information along with the image. Photos uses that depth data to blur the background (often called bokeh). Because the blur is an edit layered on the original, you can switch it off.
- Which photos have it. Portrait mode works on iPhone 7 Plus, iPhone 8 Plus, iPhone X and later, and iPhone SE (2nd generation) and later. On iPhone 15 and later, Camera can also save depth information for some pictures taken in regular Photo mode, so those can show the same controls.
- Nothing gets deleted. Turning off Portrait changes how the photo looks. It does not remove the picture or its depth data.
- iCloud Photos syncs the change. If you use iCloud Photos, the photo looks the same on your iPad and Mac after you edit it on your iPhone.
Turn the Portrait Effect Off
- Open the Photos app and tap the photo. Portrait photos show a Portrait label in the upper-left corner of the viewer.
- Tap Edit. The editing screen opens with the photo in the middle. If you see editing tabs at the bottom, such as Adjust, Filters, and Crop, and one of them is Portrait, tap it.
- Tap Portrait at the top of the screen. It changes from yellow to gray, and the background in the preview turns sharp.
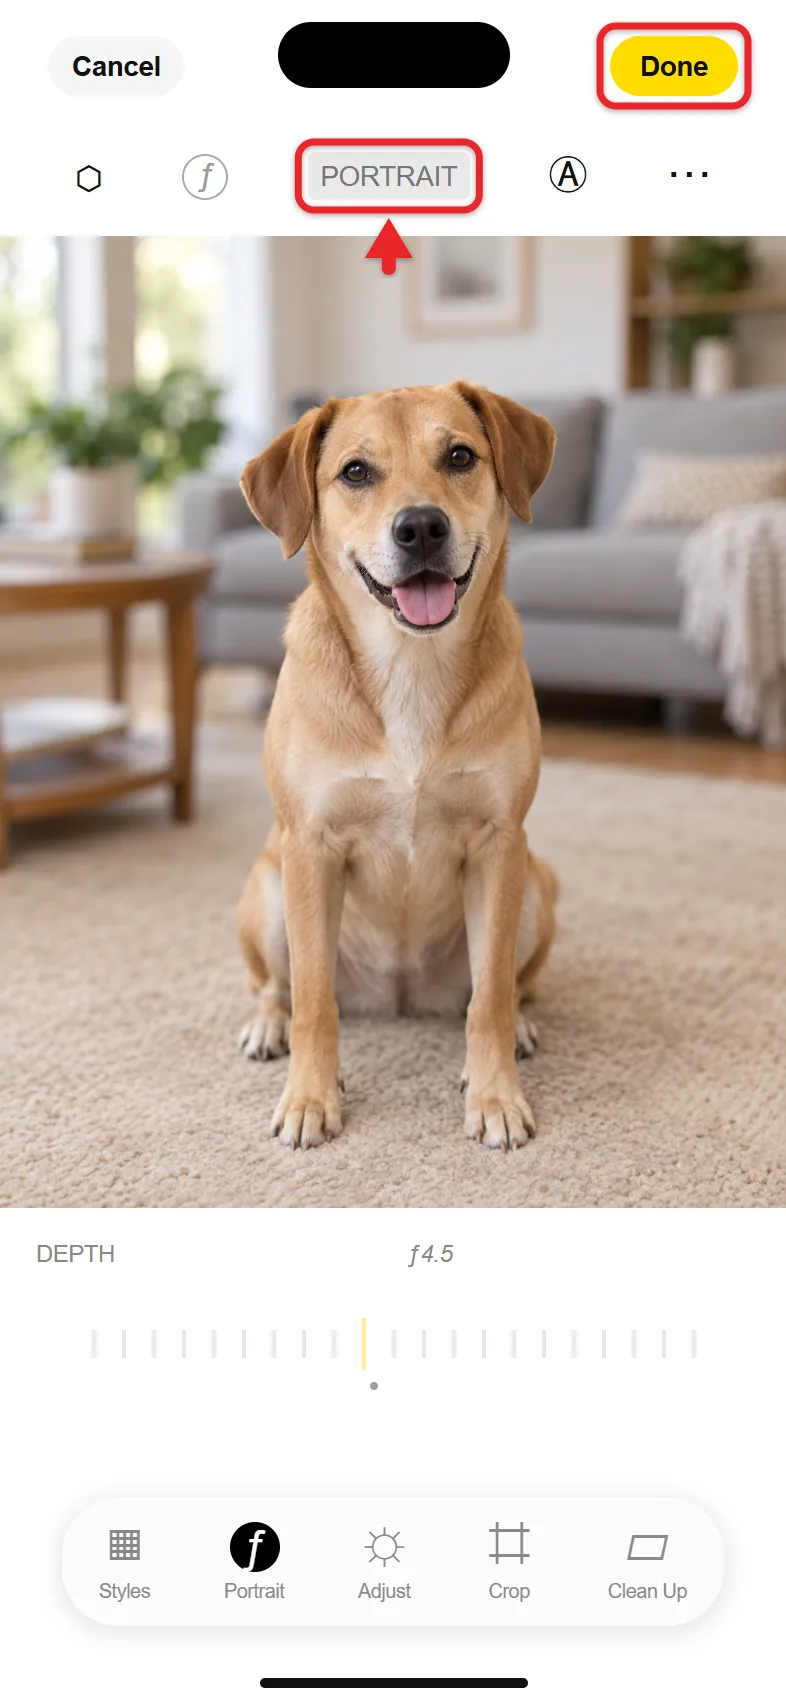
- Tap Done to save the change.
The photo now looks like a regular picture with no background blur. To confirm, close the editor and compare the background with the subject. Both should be in focus.
Turn the Portrait Effect Back On
Open the same photo, tap Edit, tap Portrait again so it turns yellow, then tap Done. Apple documents this as the way to add the effect back. It works as long as you are editing the original photo in your library, not a copy saved from another app.
Keep Both Versions
If you want a blurred copy and a sharp copy, duplicate the photo first. In Photos, open the picture, tap the More button (three dots), and tap Duplicate. Then turn off Portrait on one of the two copies. To see where the copy appears, read about duplicating a photo on iPhone.
Reduce the Blur Instead of Removing It
If the background is too blurry but you still want some separation, change the strength with Depth Control.
- Open the photo in Photos and tap Edit.
- Tap the ƒ number button (for example, ƒ4.5) at the top of the screen. A slider appears under the photo.
- Drag the slider. Lower ƒ numbers add more blur, and higher numbers make the background sharper. A gray dot above the slider marks the original setting.
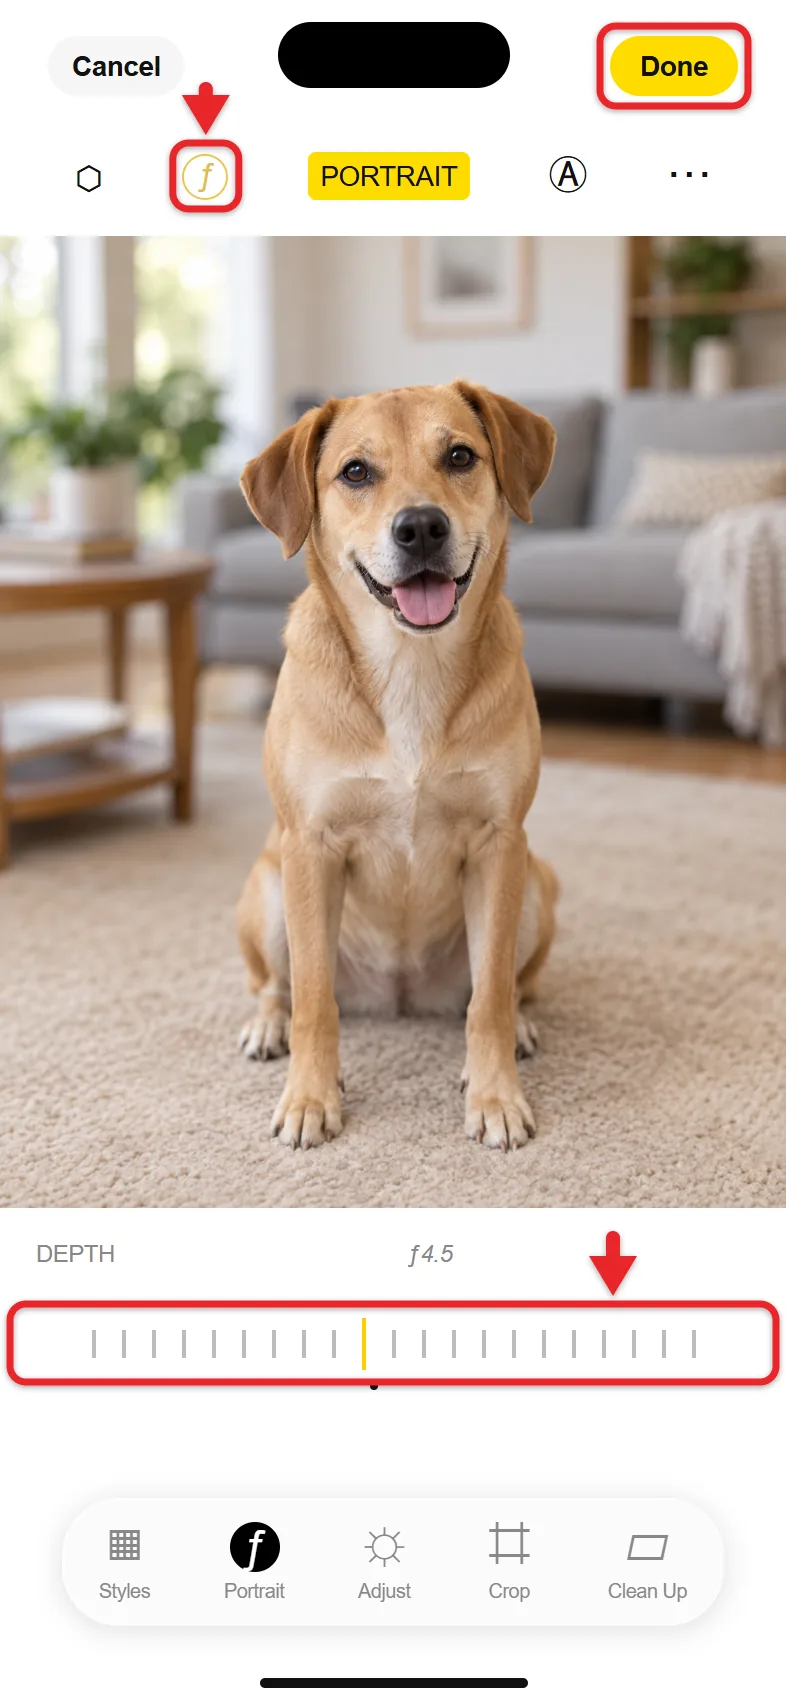
- Tap Done.
For more ways to control background blur, including adding it to new photos, follow the steps for blurring an iPhone photo’s background.
Change Which Part Stays Sharp
Sometimes the problem isn’t the blur but the focus point, such as a sharp background and a blurry face. On Portrait photos taken with iPhone 13 or later, open the photo, tap Edit, then tap the person or object you want in focus. Photos refocuses on that spot and blurs the rest. Tap Done to save. On iPhone 15 and later, this also works on regular photos that captured depth information.
Remove Portrait Lighting Only
Portrait Lighting is a separate effect that changes how light falls on the face, with options such as Studio Light, Contour Light, Stage Light, Stage Light Mono, and High-Key Light Mono. If the face looks too dark or the background turned black, the lighting is the issue, not the blur.
- Open the photo and tap Edit.
- Swipe through the lighting effects and choose Natural Light, which shows the portrait as it was taken.
- Tap Done.
This keeps the background blur. To remove both, turn off Portrait as shown above.
Remove the Portrait Effect on a Mac
If your photos sync to a Mac through iCloud Photos, you can make the same change there. Open Photos, double-click the picture, and click Edit in the toolbar. Click Portrait under the photo to switch the effect off, then click Done. Apple’s Mac Photos Portrait guide covers the lighting and focus controls.
For an overall color or black-and-white look instead, you can add a filter to the picture in the same Photos editor.
Stop New Photos From Getting the Blur
Turning off the effect only changes photos you already took. To avoid it on new pictures, open Camera and swipe the mode names above the shutter button to Photo before you shoot. If Camera keeps opening in Portrait, check Settings > Camera > Preserve Settings. With Camera Mode on, Camera reopens in whatever mode you used last. The steps for saving the camera mode on iPhone explain that setting.
If the Portrait Button Is Missing
- The photo was not taken with depth information. A picture with a naturally soft background, taken in regular Photo mode on an older iPhone, has no Portrait control. Photos can’t make that background sharper.
- It’s a screenshot or a saved copy. Screenshots, images saved from social media, and copies exported from other editing apps usually lose the depth data. Find the original in your library instead.
- It came from another phone or camera. Pictures from Android phones and standalone cameras don’t carry Apple’s Portrait data, so the toggle doesn’t appear.
- You already reverted or flattened it elsewhere. If an app saved its own version over the picture, the original depth information may be gone.
Use Revert to Original With Care
Photos also offers Revert to Original (in the More menu of an edited photo). That undoes every saved edit on the picture, including crops, filters, and light adjustments, not only the Portrait change. Apple’s Portrait editing guide covers the Portrait controls. Use the Portrait button when you only want to change the blur.
Portrait Mode Questions
Will removing the Portrait effect lower the photo’s quality?
No. The photo returns to the image the camera captured before the blur was applied, at the same resolution.
Does this delete the photo or its depth data?
No. The picture stays in your library, and the depth data stays with the original, which is why you can turn the effect back on.
Can I remove the blur from a photo someone sent me?
Only if the received file still includes Portrait data. If you don’t see the Portrait button after tapping Edit, the blur is part of the image and can’t be removed in Photos.
How do I find all my Portrait photos?
In Photos, scroll down to the collections below your library and look under Media Types for Portrait. That album lists every picture with Portrait data, so you can open each one and turn the effect off.
Will the people I share it with see the sharp version?
Yes. When you share a photo after turning off Portrait, the copy you send matches what you see on your screen.

Matthew Burleigh is the founder, head writer, and editor of Solve Your Tech, which he launched in 2012. He has written technology tutorials since 2008 and worked in IT since 2003, including small-business support, IT management, and consulting. He holds Bachelor’s and Master’s degrees in Computer Science from Arizona State University.
Matthew writes practical guides for Windows, iPhone and iPad, Microsoft Office, Outlook, Google apps, and Android. Solve Your Tech’s guides are checked step by step against the device or app maker’s own documentation and tested on his own devices whenever he has the hardware or software, with clear steps, sources, and update dates.
Read more about Matthew and how Solve Your Tech writes and updates its guides, or report a correction.