To join a Wi-Fi network on iPad, open Settings, tap Wi-Fi, make sure Wi-Fi is on, and tap the network name. Enter the password if asked and tap Join. A blue checkmark next to the network name means you’re connected, and your iPad joins that network automatically the next time it’s in range.
These steps are for iPadOS 27 and iPadOS 26 and follow Apple’s Connect to Wi-Fi on your iPhone or iPad and Manage Wi-Fi settings on iPad guides. Older iPadOS versions use the same basic path, though a few options listed below are newer.
Before You Start
You need the network name and, for most home and office networks, its password. The password is often printed on a sticker on the router. If someone else runs the network, ask them for it. Public networks in hotels, cafes and airports may have no password but ask you to accept terms first.
How to Join a Wi-Fi Network on iPad
- Open the Settings app.
- Tap Wi-Fi, then turn on Wi-Fi. Your iPad searches for available networks and joins any known network automatically.
- Tap the name of the network you want to join. A lock icon next to a name means it needs a password.
- If asked, type the password and tap Join. Some public networks show a page asking you to agree to terms and conditions instead.
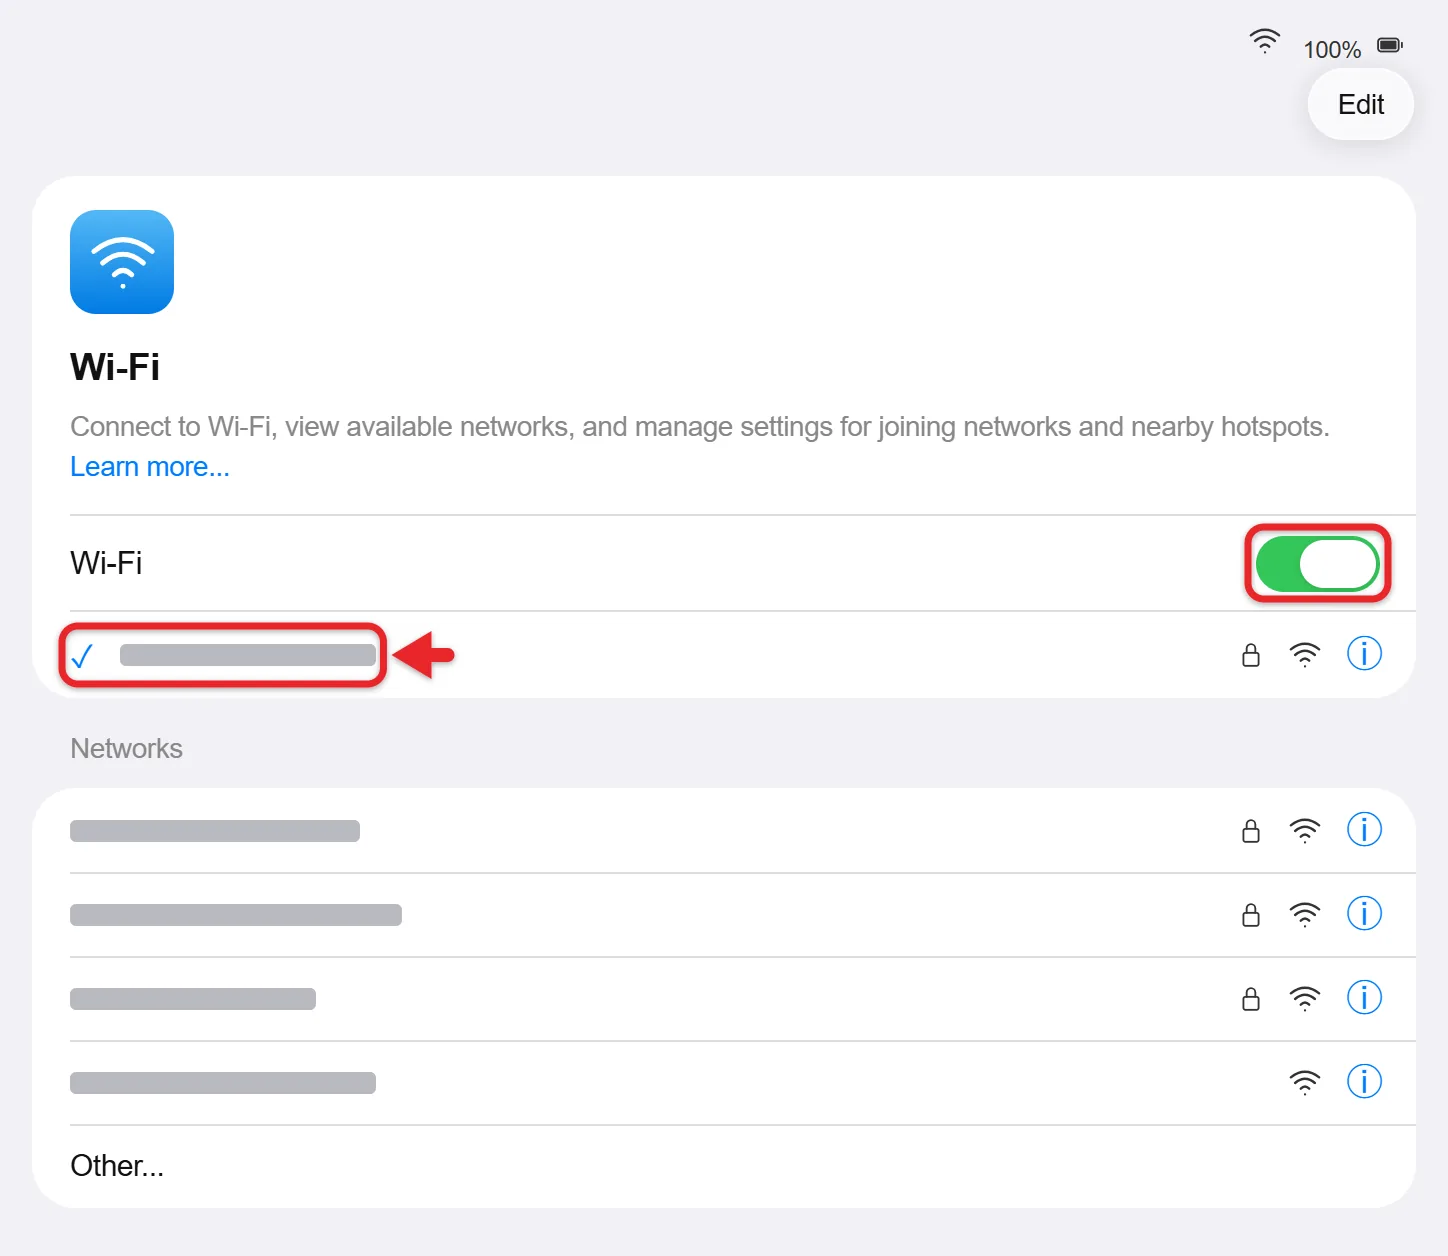
A blue checkmark appears next to the network name, and the Wi-Fi icon appears at the top of the screen.
If a network has no password, the iPad connects as soon as you tap it. Open a website in Safari to confirm you’re online. If the iPad says the password is wrong, check uppercase and lowercase letters and try again. If the router password was recently changed, the fix for an incorrect Wi-Fi password works the same way on iPad.
How to Join a Hidden Wi-Fi Network
A hidden network doesn’t broadcast its name (its SSID), so it won’t appear in the list. You need the exact network name, its security type (such as WPA2 or WPA3) and the password, so get them from whoever set up the router. Join one this way:
- Go to Settings > Wi-Fi.
- Tap Other.
- Enter the network name, choose the security type, and enter the password.
- Tap Join.
The iPad joins the hidden network and remembers it for next time. If it fails, recheck the name, since it must match exactly, including capital letters and spaces.
How to Get the Wi-Fi Password From a Friend’s iPhone
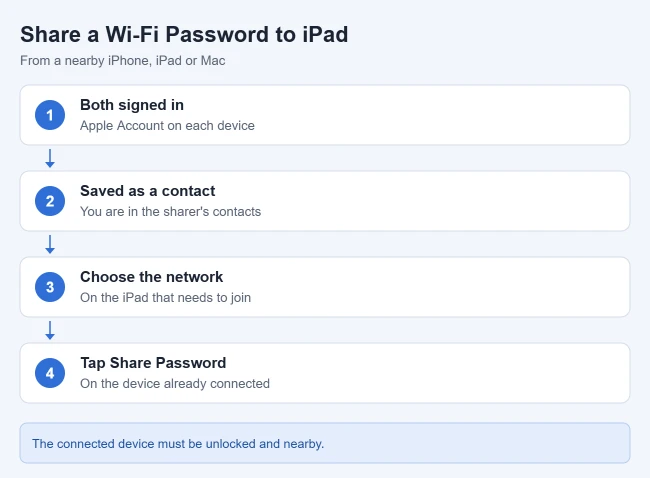
If someone nearby is already on the network, they can share the password with your iPad instead of reading it out. Both devices need to meet the requirements on Apple’s Manage Wi-Fi settings on iPad page:
- The device that’s already connected is unlocked, on the Wi-Fi network, and signed in to an Apple Account.
- You’re signed in to your Apple Account on your iPad.
- You’re in their contacts list, and your iPad is nearby.
Then choose the network on your iPad. On their device, a Wi-Fi Password notification appears, and they tap Share Password.
Your iPad fills in the password and joins the network.
How to See a Saved Wi-Fi Password on Your iPad
Once your iPad has joined a network, you can look up its password to give to another device. Apple’s Find your saved Wi-Fi passwords article describes it:
- Go to Settings > Wi-Fi.
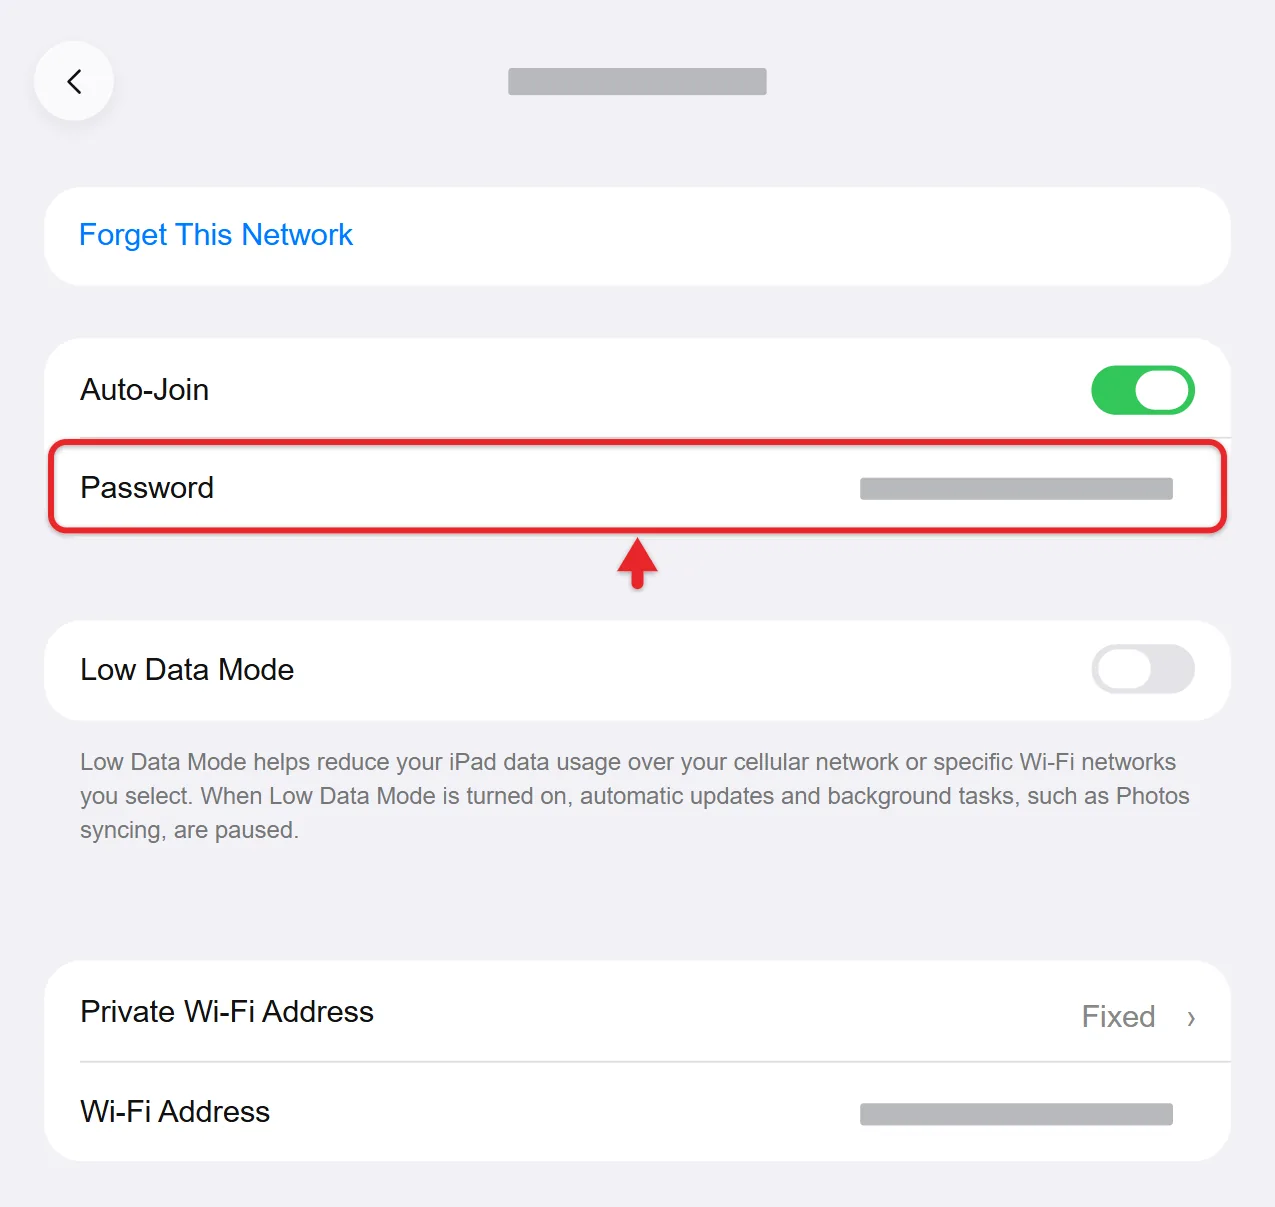
- Tap the info button next to the network you’re on. For a network you joined before, tap Edit first.
- Tap Password and confirm with Face ID, Touch ID or your passcode.
On recent versions, the Passwords app also lists saved networks under Wi-Fi.
How to Join a Personal Hotspot
If an iPhone or iPad with cellular service is sharing a Personal Hotspot, you can join it from the same Wi-Fi screen. Go to Settings > Wi-Fi and tap the name of the device sharing the hotspot. If asked, enter the password. On an iPhone, it’s shown under Settings > Personal Hotspot. On an iPad, look under Settings > Cellular Data > Personal Hotspot. For more detail, read about using your iPhone’s hotspot on iPad.
The iPhone’s owner can change the Personal Hotspot password if it needs a fresh one.
Useful Wi-Fi Settings on iPad
Each of these is explained on Apple’s Manage Wi-Fi settings on iPad page. To find most of them, go to Settings > Wi-Fi and tap the info button next to a network.
- Forget This Network: removes the network and its password so your iPad stops joining it.
- Auto-Join: turn it off to keep the network saved but join it only when you tap it.
- Low Data Mode: helps reduce your iPad’s data use on that network.
- Private Wi-Fi Address: helps reduce tracking of your iPad across networks. In iPadOS 18 and later, choose Off, Fixed or Rotating. Turn it off only if a network won’t let you join or get online with it on.
- Limit IP Address Tracking: hides your IP address from known trackers.
- Ask to Join Networks: on the main Wi-Fi screen, choose Off, Notify or Ask for when no known network is in range.
- Auto-Join Hotspot: choose Never, Ask to Join or Automatic for joining a Personal Hotspot from a device signed in to your Apple Account.
- Connectivity Assist: on Wi-Fi + Cellular models, uses cellular data when Wi-Fi is weak or busy. It replaces the older Wi-Fi Assist setting and might use more cellular data.
Wi-Fi in Control Center Is Not a Full Off Switch
Tapping the Wi-Fi button in Control Center disconnects your iPad from the current network, but Apple’s Use Bluetooth and Wi-Fi in Control Center article says Wi-Fi stays available for AirDrop, AirPlay and Apple Pencil. Your iPad rejoins known networks when you tap the button again, join a network in Settings, move to a new location, restart, or reach 5 a.m. local time. To turn Wi-Fi off completely, use Settings > Wi-Fi.
What to Do if Your iPad Won’t Connect to Wi-Fi
Apple’s If you can’t connect to Wi-Fi article suggests working through these checks in order:
- Check Airplane Mode: make sure it’s off, then go back to Settings > Wi-Fi.
- Check Connectivity Assist: turn it off while you troubleshoot.
- Wi-Fi is grayed out: restart your iPad.
- VPN or security software: uninstall it, restart, and test the connection again. If you need that software, contact its provider.
- Network doesn’t appear: it may be hidden, or the network may block unknown devices. Try Other, or ask whoever manages the network.
- Check the router: see if other devices can connect, move closer, or restart the router and modem. If your router has separate 2.4 GHz and 5 GHz networks, try the other one. The steps for switching your router to 2.4 GHz explain the bands.
- “No Internet Connection” under the network name: your iPad joined, but the router or internet service has the problem. Test another device, then contact your internet provider.
- Reset network settings: as a last resort, go to Settings > General > Transfer or Reset iPad > Reset > Reset Network Settings. This removes all saved Wi-Fi networks and passwords, plus cellular and VPN settings. On a school or work iPad, ask IT first.
If your iPad can’t connect to any Wi-Fi network, even in a different location, contact Apple Support.
Some school and office networks only let in devices they have registered. The steps for finding the MAC address on your iPhone work the same way on iPad, so give the network admin the Wi-Fi Address shown for that network.
Frequently Asked Questions
Why does my iPad join a different network than the one I want?
iPad connects to the most recently used Wi-Fi network first. To stop it from joining a network you don’t want, tap the info button next to that network and turn off Auto-Join, or tap Forget This Network.
Does my iPad need Wi-Fi to get online?
Wi-Fi-only iPads do. Wi-Fi + Cellular models can use a carrier’s cellular data network when no Wi-Fi network is available, as long as the SIM is active and Cellular Data is turned on.
How do I rejoin a network after I forget it?
Tap its name in Settings > Wi-Fi and enter the password again, just like the first time.
Related Guides
- How to use your iPhone’s hotspot on iPad
- How to turn off Bluetooth on iPad
- How to reset network settings on iPad
- How to fix Wi-Fi when other devices work

Matthew Burleigh is the founder, head writer, and editor of Solve Your Tech, which he launched in 2012. He has written technology tutorials since 2008 and worked in IT since 2003, including small-business support, IT management, and consulting. He holds Bachelor’s and Master’s degrees in Computer Science from Arizona State University.
Matthew writes practical guides for Windows, iPhone and iPad, Microsoft Office, Outlook, Google apps, and Android. Solve Your Tech’s guides are checked step by step against the device or app maker’s own documentation and tested on his own devices whenever he has the hardware or software, with clear steps, sources, and update dates.
Read more about Matthew and how Solve Your Tech writes and updates its guides, or report a correction.